# Installation

> Historical documentation restored from the Pigsty v1.5.1 tag.
---

> It takes 3 steps to install Pigsty: [Prepare](/docs/d-prepare/), [Configure](/docs/v-config/#configure), [Execute Playbook](/docs/p-playbook/)


----------------
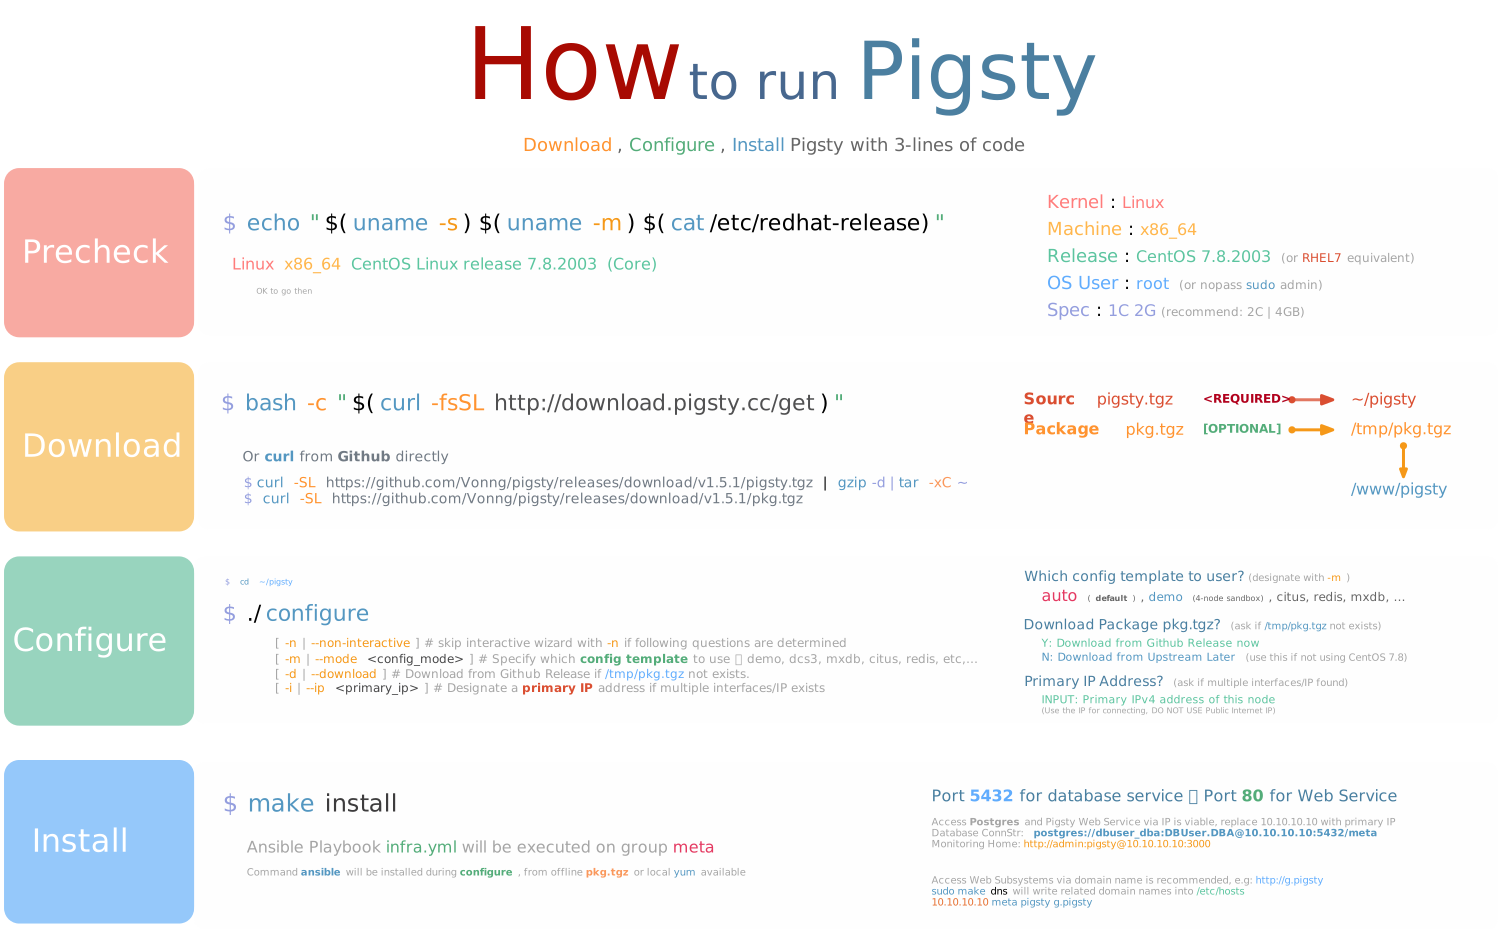
![](/img/history/v1.5/HOW_EN.svg)

There are two typical modes: Singleton & Cluster Management

* [Singleton Meta](#singleton-meta): Install pigsty on one single meta node. (for PostgreSQL dev/test, RDS monitoring, etc...)
* [Cluster Manage](#cluster-manage):  Initiate control from meta node, and manage & monitoring more nodes & databases.


---------------------


## Singleton Meta

When Pigsty is installed on one single node. It will init pigsty infra with a battery including Postgres as CMDB. You may use that database directly.

#### TL; DR

[Prepare](/docs/d-prepare/) a **new** node : Linux x86_64 CentOS 7.8.2003, with **root** or **sudo** access, then [download](/docs/d-prepare/#software-provisioning) pigsty

```bash
curl -SL https://github.com/Vonng/pigsty/releases/download/v1.5.1/pigsty.tgz | gzip -d | tar -xC ~  # Download Latest Pigsty Source
cd ~/pigsty; ./configure                               # Configure pigsty with ip & template
./infra.yml                                            # Install pigsty on current meta node
```

> If you have available Mac/PC/Laptop/Cloud Account, [Sandbox](/docs/d-sandbox/) could be handy to create vm for you.

After installation. port `5432` is ready for postgres database connection @ `postgres://dbuser_dba:DBUser.DBA@10.10.10.10:5432/meta`.

And a Nginx is serving & proxy all WebUI services @ port `80`.

<details><summary>Download Directly via Curl</summary>

```bash
curl https://github.com/Vonng/pigsty/releases/download/v1.5.1/pigsty.tgz -o /tmp/pigsty.tgz
curl https://github.com/Vonng/pigsty/releases/download/v1.5.1/pkg.tgz    -o /tmp/pkg.tgz
```

</details>

#### Access Web Services

Nginx port 80 is the default access endpoint for all Web GUI services. Although it is possible to bypass Nginx add access services directly by port, such as Grafana on 3000, it is highly recommended to use domain names. If you don't have public domain names, considering use [Static DNS](/docs/d-sandbox/#dns-config) on your localhost with `make dns`.

> http://g.pigsty or `http://<primary_ip>:3000` is the portal of the monitoring system (username: admin, password: pigsty)

> Visit `http://<primary_ip>:3000` / http://g.pigsty to visit Pigsty [Grafana](http://demo.pigsty.cc/d/home) (username: `admin`, password: `pigsty`)


----------------

## Cluster Manage

Pigsty can also be used as a controller & monitoring infrastructure for production-grade large-scale nodes & databases.

You can initiate control from [meta](/docs/c-nodes/#meta-node) node, and add more [nodes](/docs/c-nodes/#node) into Pigsty.

You can deploy different types of High available [PostgreSQL](/docs/d-pgsql/) Clusters, [Redis](/docs/d-redis/) clusters, or [Greenplum/MatrixDB](/docs/d-matrixdb/) data warehouse.

```bash
./nodes.yml  -l pg-test      # init 3 nodes of cluster pg-test
./pgsql.yml  -l pg-test      # init HA PGSQL Cluster pg-test
./redis.yml  -l redis-test   # init redis cluster redis-test
./pgsql-matrixdb.yml -l mx-*  # init MatrixDB: mx-mdw,mx-sdw
```


----------------

## Sandbox

There's a standard 4-node demo env for pigsty, named '[Sandbox](/docs/d-sandbox/)'. You can create a sandbox on your laptop with [Vagrant](/docs/d-prepare/#vagrant), or create them on public cloud with [Terraform](/docs/d-sandbox/#terraform). The same deployment procedure could apply to production [deployment](/docs/d-deploy/).

[![](/img/history/v1.5/SANDBOX.gif)](/docs/d-sandbox/)

Take [sandbox](/docs/d-sandbox/) as an example, install pigsty on meta node `10.10.10.10` with:

```bash
./infra.yml     # install pigsty on meta node 10.10.10.10
```

#### Nodes Init

Now add 3 more nodes `10.10.10.11`, `10.10.10.12`, `10.10.10.13` into pigsty [`nodes.yml`](/docs/p-nodes/#nodes)

```bash
./nodes.yml -l pg-test        # init 3 nodes of cluster pg-test
```

After that, these 3 nodes are set with DCS service, node exporter & promtail logger. And can be used for subsequent database deployment. check [Config: Nodes](/docs/v-nodes/) & [Playbook: Nodes](/docs/p-nodes/) for details.


#### PostgreSQL Deploy

Create a classic 1 primary & 2 replicas HA PostgreSQL cluster with [`pgsql.yml`](/docs/p-pgsql/#pgsql) playbook.

```bash
./pgsql.yml -l pg-test  # init pgsql cluster pg-test
```

Once complete, you can check the newly created PostgreSQL cluster from [Monitoring Dashboards](http://demo.pigsty.cc/d/pgsql-cluster/pgsql-cluster?var-cls=pg-test).

Check [Config: PGSQL](/docs/v-pgsql/), [Customize: PGSQL,](/docs/v-pgsql-customize/) and [Playbook: PGSQL](/docs/p-pgsql/) for more details.


### Redis Deployment

In addition to the PostgreSQL cluster, you can deploy various other types of clusters and even other types of databases.

For example, to deploy [Redis](/docs/d-redis/):

```bash
./configure -m redis    # use redis config template
./nodes.yml             # init nodes for redis cluster
./redis.yml             # create redis on those nodes
```

Check [Config: REDIS](/docs/v-redis/) and [Playbook: REDIS](/docs/p-redis/) for more details.


#### MatrixDB Deployment

To deploy the open-source time-series data warehouse [MatrixDB](/docs/d-matrixdb/) (Greenplum7):

```bash
./configure -m mxdb   # Use the sandbox environment MatrixDB configuration file template
./download matrix     # Download the MatrixDB package and build the local source
./infra.yml -e no_cmdb=true # If meta node is part of it, add no_cmdb var to skip CMDB creation
./nodes.yml           # configure all nodes for MatrixDB installation
./pgsql-matrixdb.yml   # Install MatrixDB on those nodes
```
