This is the multi-page printable view of this section. .
Pigsty v1.5.1 Documentation
- 1: Introduction
- 2: Installation
- 3: Features
- 4: FAQ: Frequently Asked Questions
- 5: Concepts
- 6: Architecture
- 7: Infrastructure
- 8: Concept: Nodes
- 9: Concept: PGSQL
- 10: Concept: Redis
- 11: PGSQL Service & Access
- 12: PGSQL Authentication and Privilege
- 13: PGSQL Authentication and Privilege
- 14: Pigsty Deployment
- 15: Preparation
- 16: Sandbox
- 17: Monitoring System
- 18: PostgreSQL Deployment
- 19: Redis Deployment
- 20: MatrixDB Deployment
- 21: Playbooks
- 22: Playbook: INFRA
- 23: Playbook: NODES
- 24: Playbook: PGSQL
- 25: Playbook: REDIS
- 26: Configuration
- 27: Config: Infra
- 28: Config: Nodes
- 29: Config: PGSQL
- 30: Config: REDIS
- 31: Customize: PGSQL
- 32: Pigsty Dashboards
- 33: Service Discovery
- 34: Metrics
- 35: Alerting
- 36: Install Applications
- 37: Docker Applications
- 38: Upgrade Grafana Backend Database
- 39: Jupyter Lab
- 40: Backup and Recovery
- 41: Offline Installation
- 42: CMDB Usage
- 43: Migration Tutorial
- 44: PGSQL SOP: Standard Operating Procedure
- 45: FHS: File Hierarchy Structure
- 46: HA Scenarios
- 47: Common Failures
- 48: Community
- 49: Roadmap
- 50: Development Log
- 51: Why Pigsty
- 52: User Interface
- 53: Deploy
- 54: Customization of Postgres Template
- 55: Redis Deploy & Monitor
- 56: PGWeb
- 57: Using TimescaleDB to store Prometheus data
Pigsty v1.5.1 Documentation
Battery-Included Open-Source PostgreSQL Distribution
Latest Version: v1.5.1 | Github Repo | Demo
Documentation: EN Docs | 中文文档 | Github Pages
What is Pigsty?
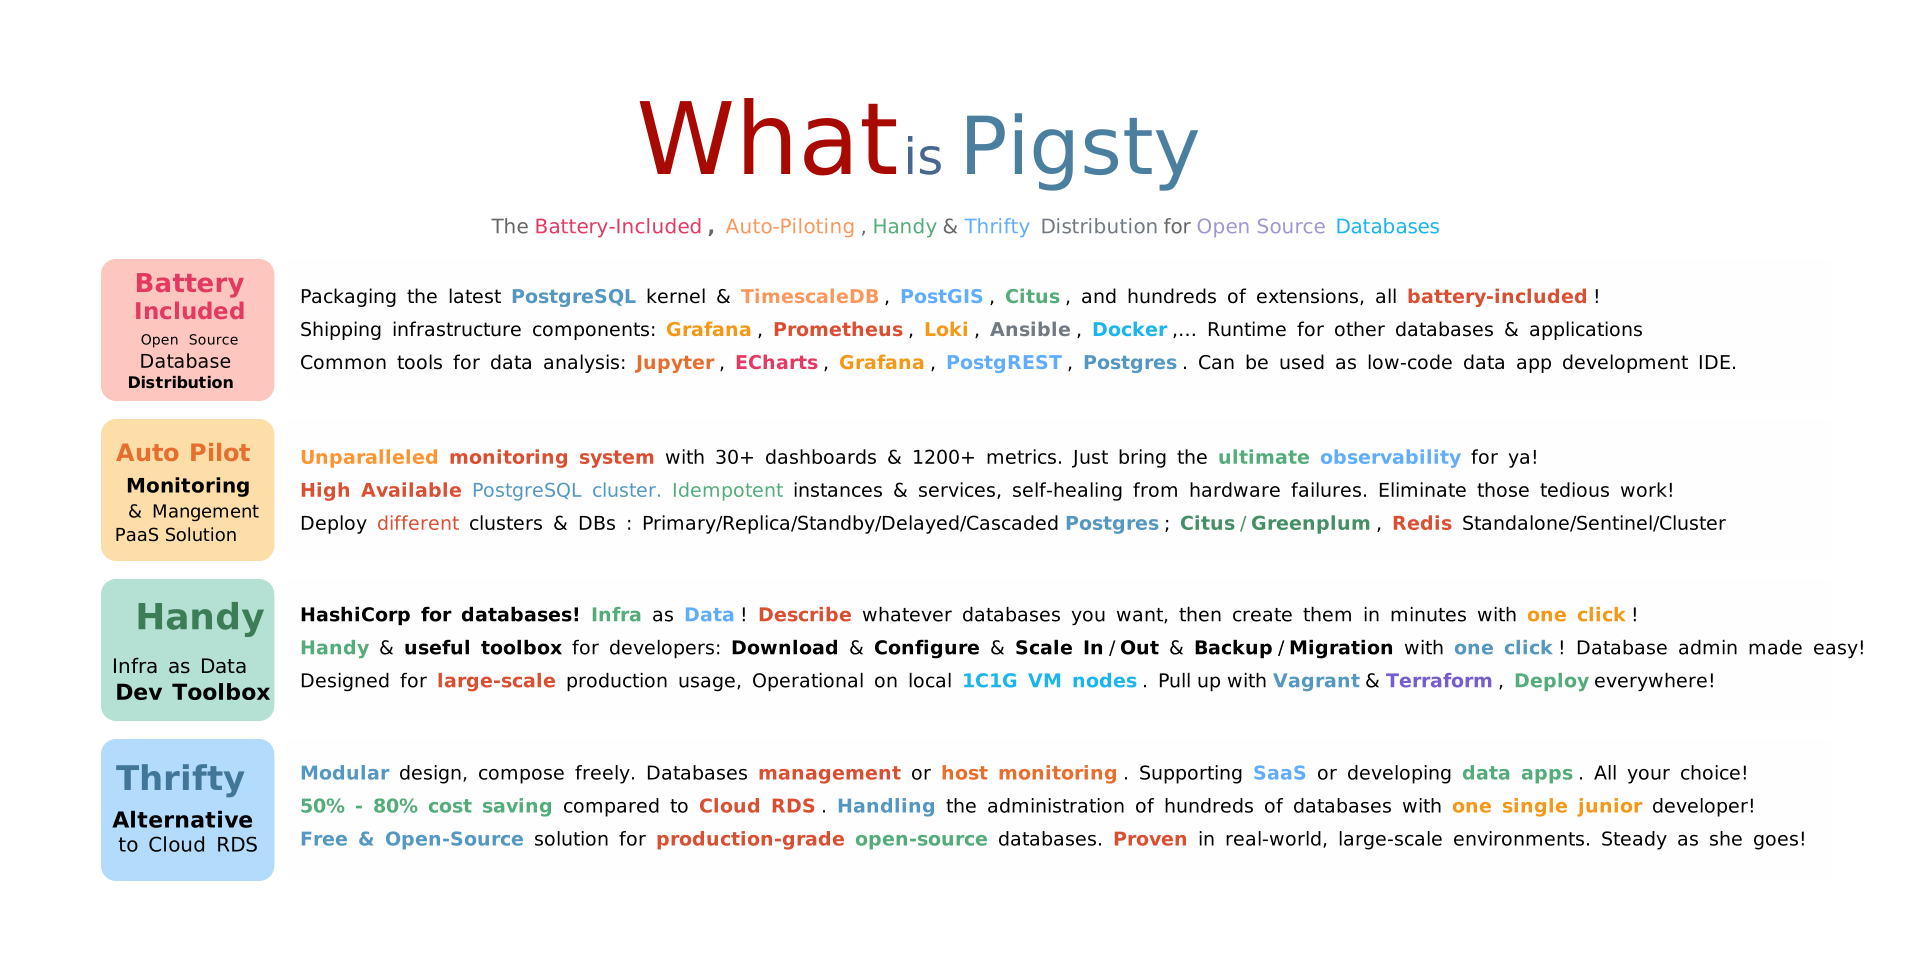
Pigsty is battery-included open-source database distribution, with the latest PostgreSQL kernel, TimescaleDB, PostGIS, Citus & 100+ extensions, along with an entire Infra: Grafana, Prometheus, Loki, Ansible, Docker to support your databases & applications. It also includes common tools for data analysis.
Pigsty is a monitoring & management SRE Solution. Which includes an unparalleled monitoring system with ultimate observability, and high-available PostgreSQL with self-healing architecture. You can deploy various clusters & instances: primary, replica, standby, offline, delayed, cascade, and even Citus, Redis, and Greenplum clusters.
Pigsty is a handy toolbox for developers. It treats Database as Code, Infra as Data. You just describe what database you want, and pigsty will create it for you. You can download, install, deploy, scale, backup, migration with one command. It can be deployed everywhere: a 10k+ core prod env or local 1C/2G VM, cloud, or on-premises.
Pigsty is a secure & thrifty alternative to Cloud RDS/PaaS. It can empower a single DEV/DBA to manage hundreds of databases clusters, with all data under your own control. It can save 50% - 80% cost compared to cloud RDS using ECS or on-premise deployment. And the software itself is completely open-source & free!
Check FEATURES for more detail.
Distribution
Observability
High Availability
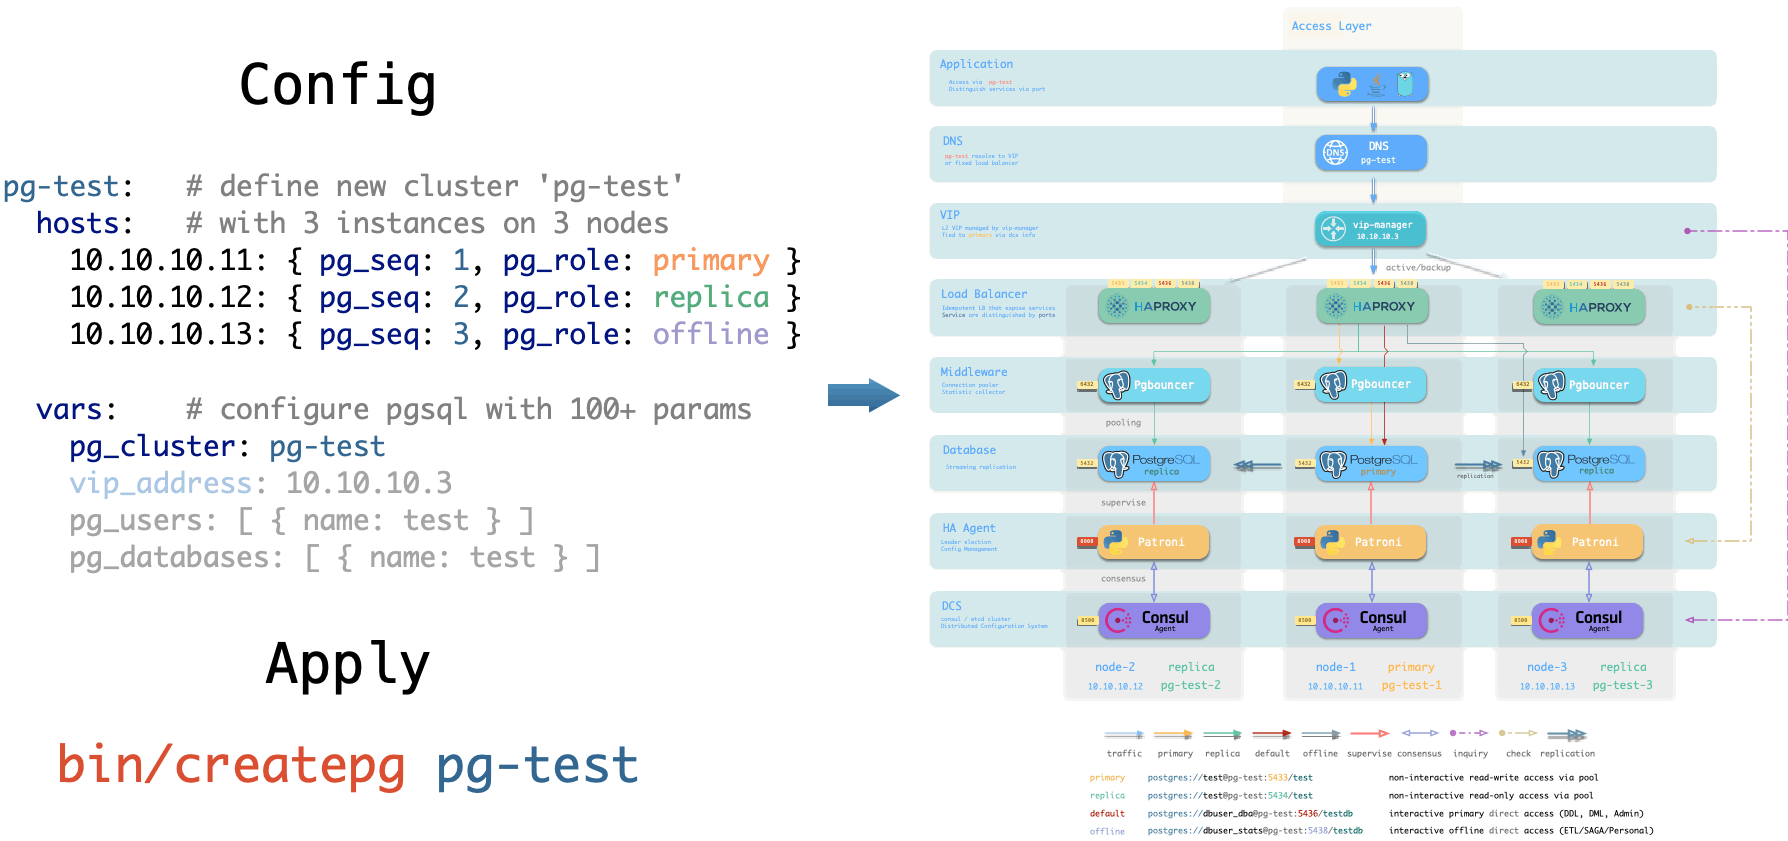
Architecture
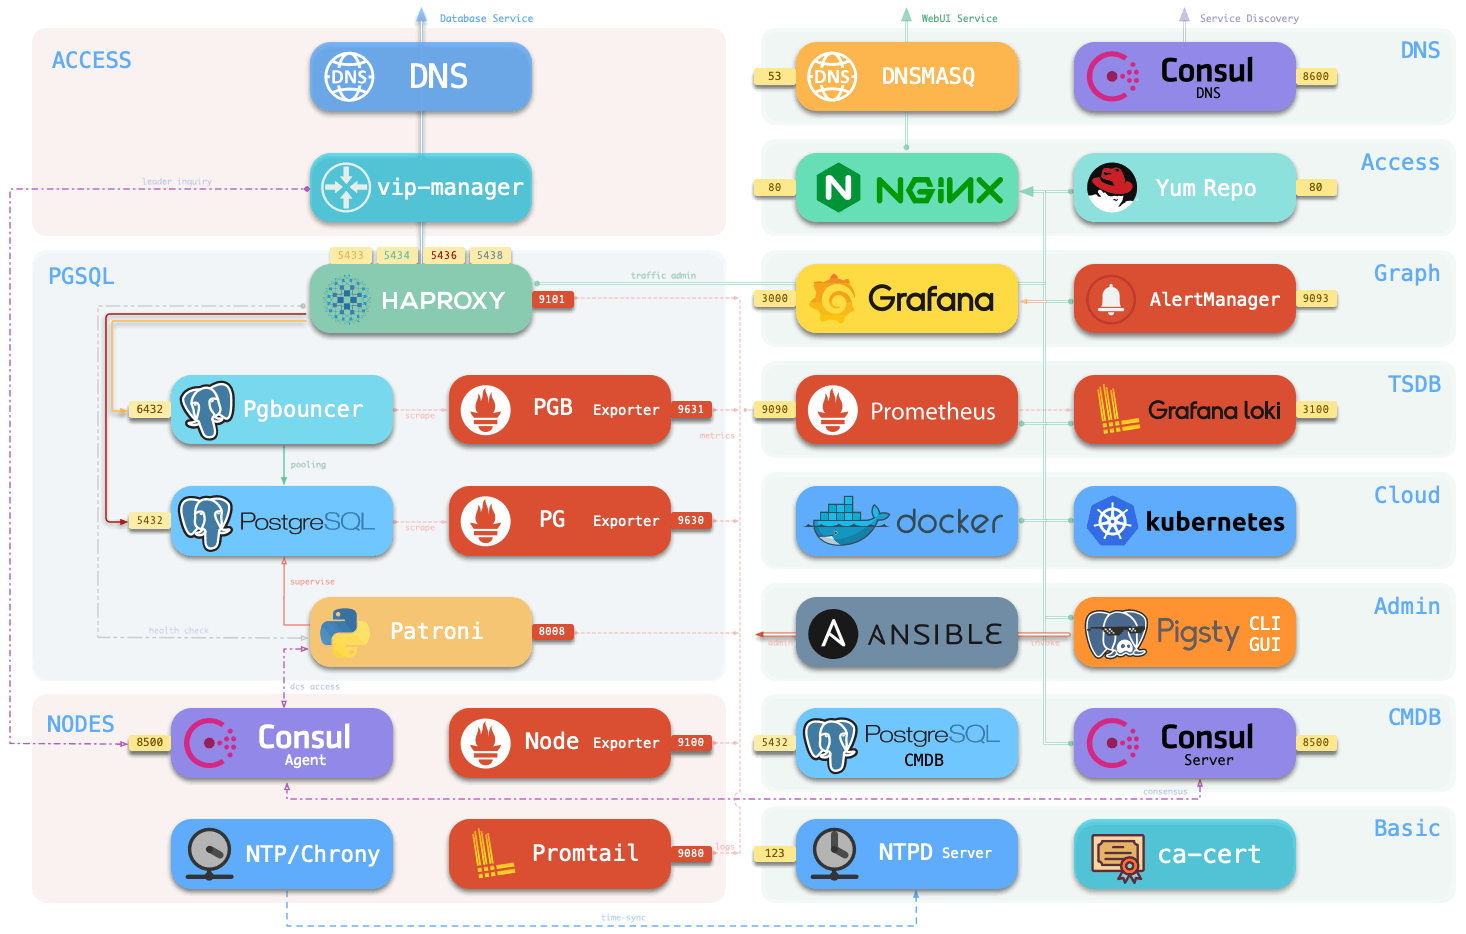
Sandbox
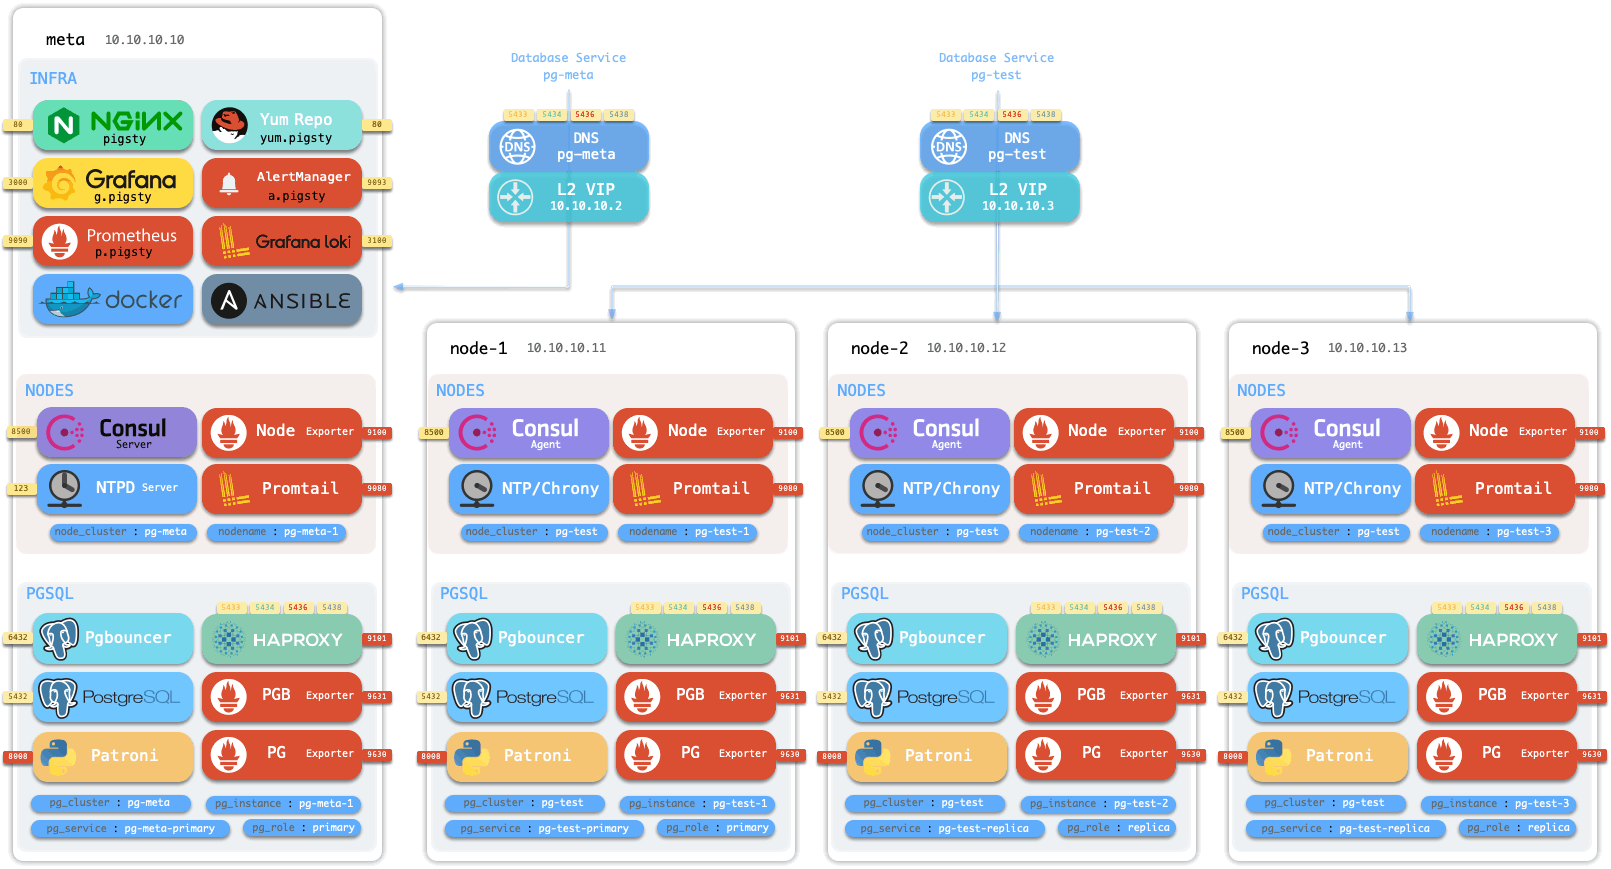
Provisioning
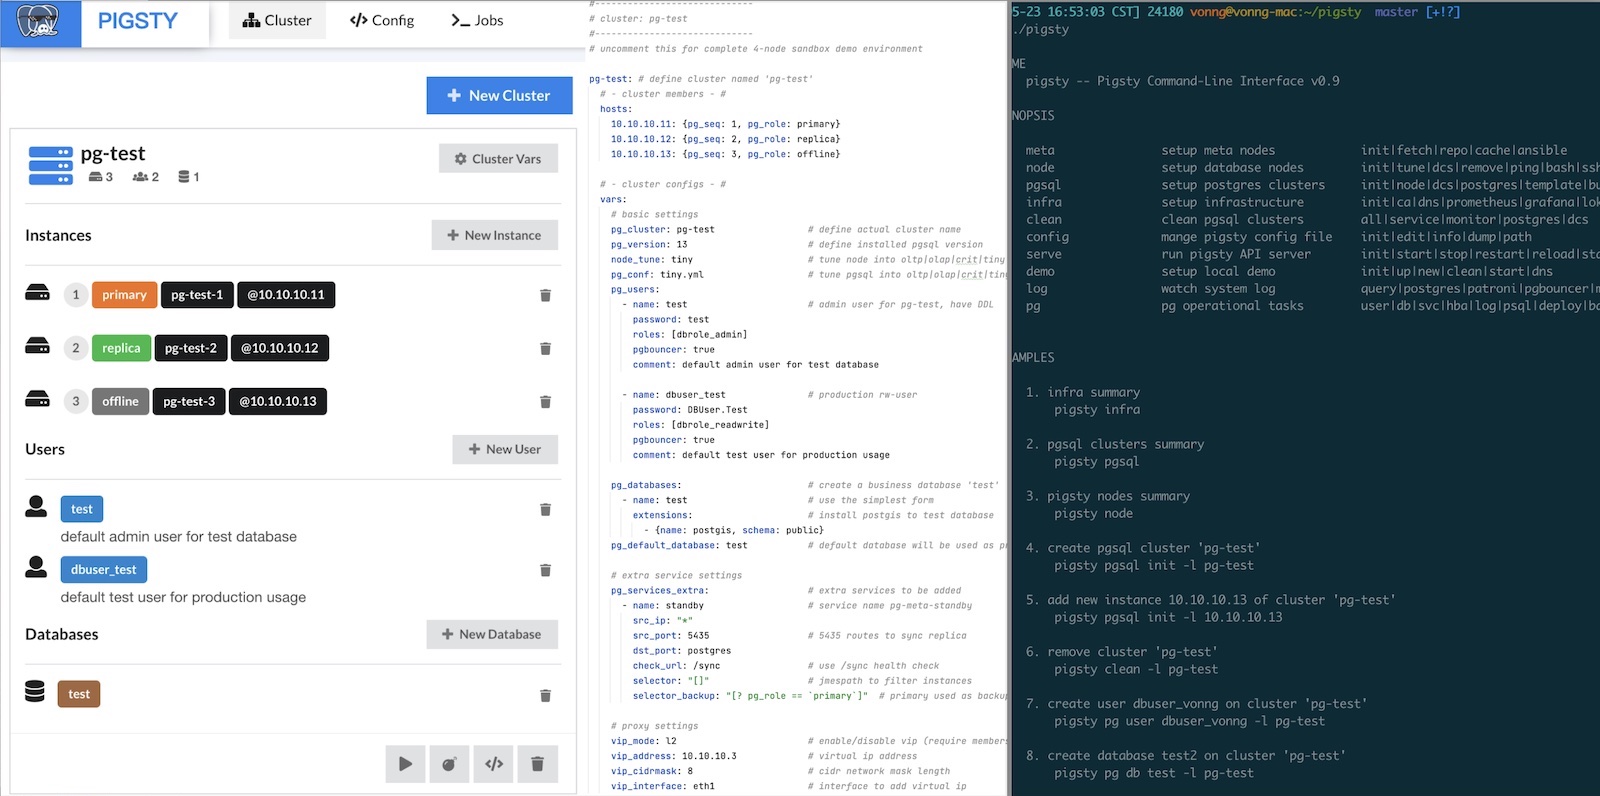
User Interface
Application
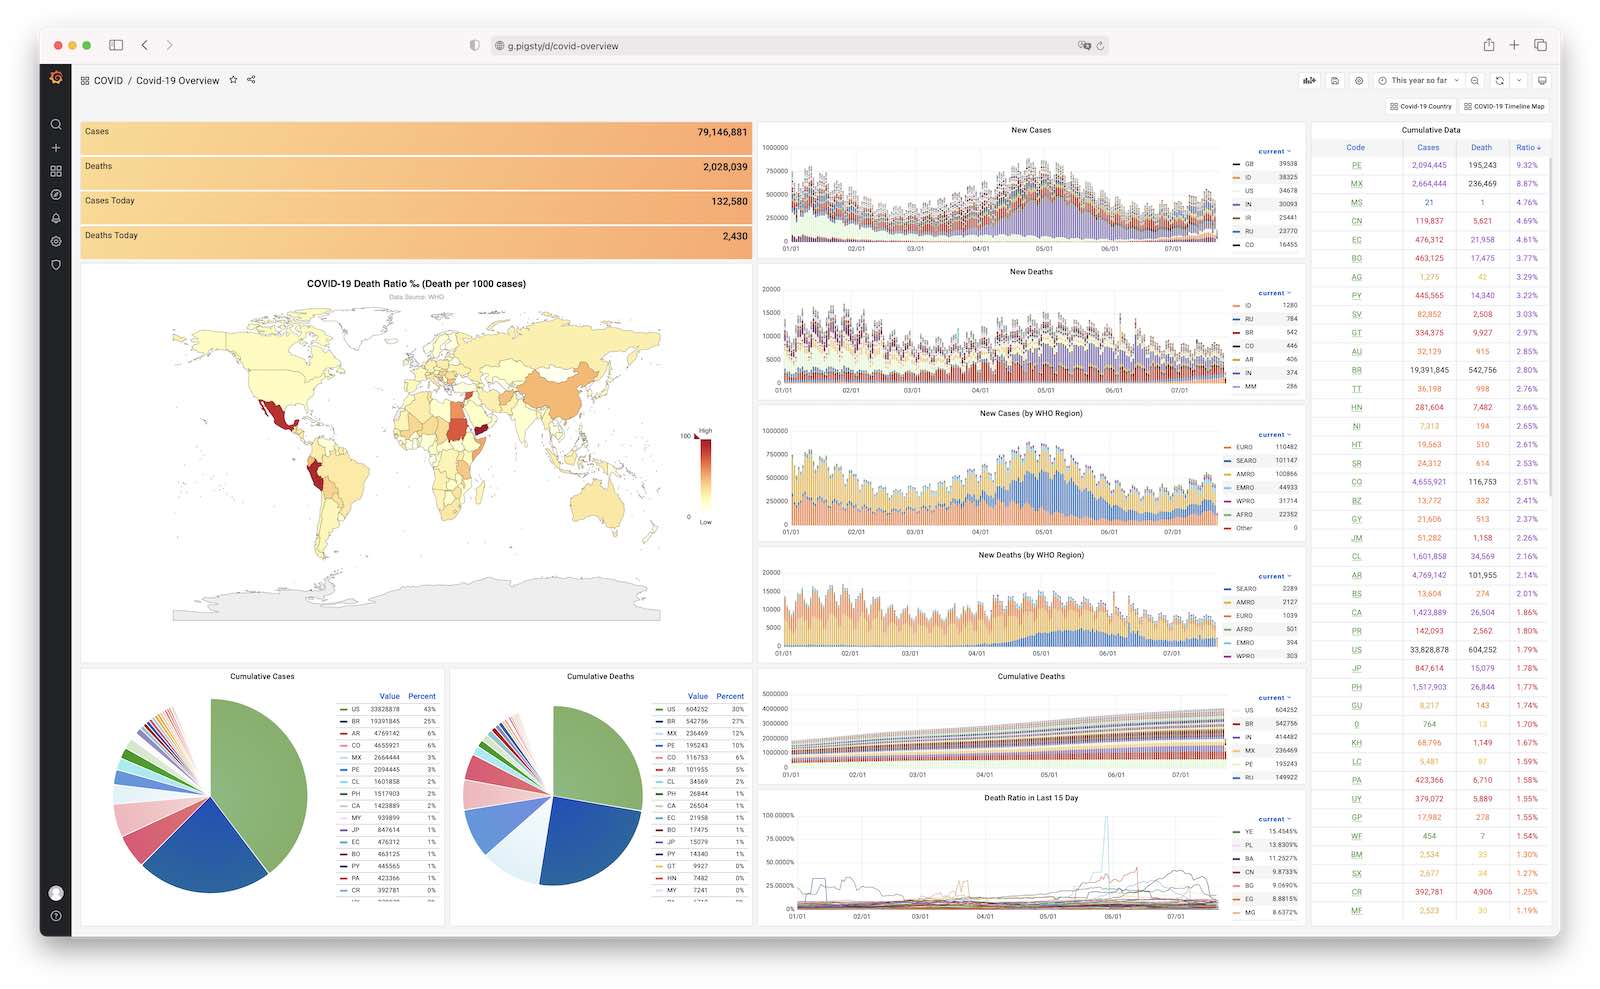
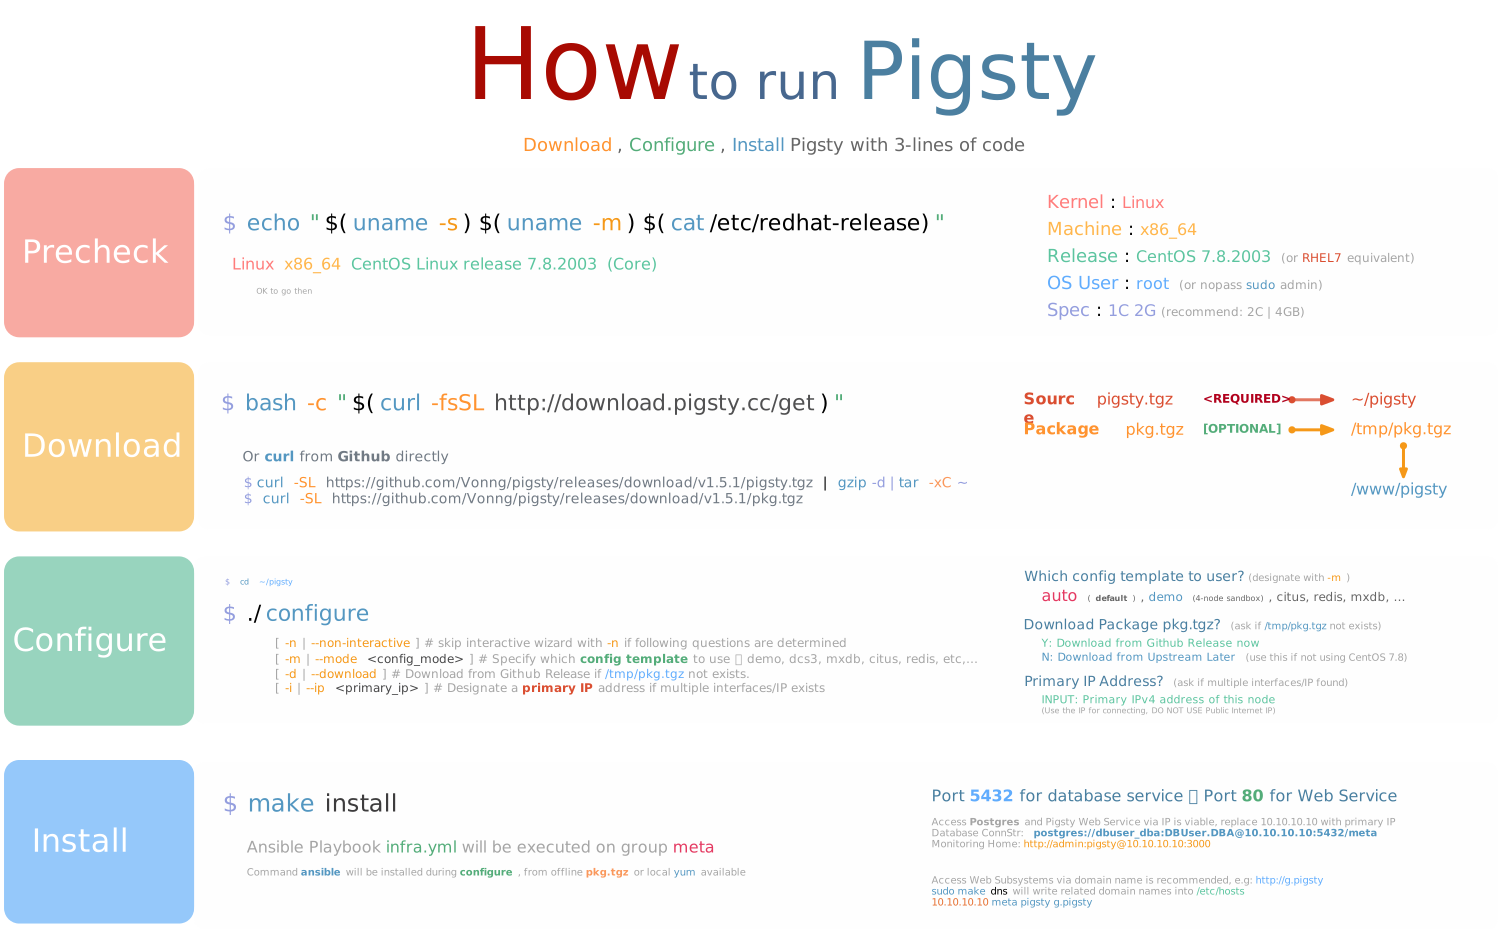
TL; DR
Get a new Linux x86_64 CentOS 7.8 node. with nopass sudo & ssh access, then:
Now you have a battery-included Postgres on port 5432 and infra web services available on port 80.
Check Installation & Demo for details.
Download Packages Directly
Pigsty source & software packages can be downloaded directly via curl in case of no Internet connection:
Mange More Nodes
You can add more nodes to Pigsty with nodes.yml after installing the meta node with infra.yml.
Define Postgres Cluster
You can define a HA Postgres Cluster with streaming replication in a few lines of code:
You can create Postgres with different roles by declaring them: primary, replica, standby, delayed, offline, cascade, etc…
Deploy Databases Clusters
You can deploy different types of databases & clusters with corresponding playbooks.
pgsql.yml: Deploy HA PostgreSQL clusters.redis.yml: Deploy Redis clusters.pgsql-matrixdb.yml: Deploy matrixdb data warehouse (greenplum7).
About
Pigsty (/ˈpɪɡˌstaɪ/) is the abbreviation of “PostgreSQL In Graphic STYle.”
Author: Vonng ([email protected])
License: Apache 2.0 License
Beian: 浙ICP备15016890-2号
1 - Introduction
Different users have different concerns. If you encounter problems, you are welcome to check the FAQ, submit an Issue, or ask the Community for help.
Beginners
Beginners can visit the Pigsty demo site: http://demo.pigsty.cc for a quick glance.
There are several data applications that are built upon Pigsty to illustrate this distribution: pglog, covid, isd, dbeng, worktime.
You can also deploy SaaS software with docker and get production-grade durability with an external pigsty database.
Developer
Developers are more concerned about the fastest way to download, install and access the database, please refer to Installation.
Pigsty aims at simplicity: you can launch pigsty on fresh CentOS 7.8 nodes with one command without Internet Access.
Pigsty provides Vagrant & Terraform templates for pulling up 4 VMs with one click to deploy a sandbox on a local x86 laptop/PC or cloud. Users can also prepare VMs, cloud VMs, or physical machines for the standard deployment process.
The user can access database service through connstr, and perform essential operation tasks with SOP.
For a deeper understanding of Pigsty’s design and architecture, you can refer to the concept chapter.
- Architecture
- Infrastructure
- Meta Node & Node
- PGSQL Cluster
- PGSQL Service / PGSQL Access
- PGSQL Privilege / PGSQL Authentication
- PGSQL Biz User / PGSQL BIZ DB
Operators
Operators are more concerned with the details of the deployment. The following tutorials provide the details of Pigsty’s installation and deployment.
The tutorial Grafana Backend Database Upgrade shows a complete and representative example of preparing a Postgres cluster exclusively for Grafana.
DBA
DBAs are usually more concerned with the usage of monitoring systems and the specific ways in which they are maintained daily.
DBAs are more concerned with the usage of monitoring systems and the way of daily maintenance.
Monitoring System Tutorial
- Introduction of Monitoring Metrics
- Introduction of Monitoring Dashboard
- Introduction of Alerting System
- Service Discovery Mechanism
- Analysis of CSVLOG
Daily maintenance management
- Cluster Create/Expand
- Cluster Destruction/Downsize
- Cluster Config Change/Restart
- Create PGSQL BIZ User
- Create PGSQL BIZ DB
- Apply PGSQL HBA
- PGSQL LB Traffic Control
- PGSQL Role Adjustment
- Monitor Targets
- Cluster Switchover
- Reset Component
- Switching DCS Servers
Professional
For professional users (deep customization, secondary development), Pigsty provides a rich config entry with a customization interface.
2 - Installation
It takes 3 steps to install Pigsty: Prepare, Configure, Execute Playbook
There are two typical modes: Singleton & Cluster Management
- Singleton Meta: Install pigsty on one single meta node. (for PostgreSQL dev/test, RDS monitoring, etc…)
- Cluster Manage: Initiate control from meta node, and manage & monitoring more nodes & databases.
Singleton Meta
When Pigsty is installed on one single node. It will init pigsty infra with a battery including Postgres as CMDB. You may use that database directly.
TL; DR
Prepare a new node : Linux x86_64 CentOS 7.8.2003, with root or sudo access, then download pigsty
If you have available Mac/PC/Laptop/Cloud Account, Sandbox could be handy to create vm for you.
After installation. port 5432 is ready for postgres database connection @ postgres://dbuser_dba:[email protected]:5432/meta.
And a Nginx is serving & proxy all WebUI services @ port 80.
Download Directly via Curl
Access Web Services
Nginx port 80 is the default access endpoint for all Web GUI services. Although it is possible to bypass Nginx add access services directly by port, such as Grafana on 3000, it is highly recommended to use domain names. If you don’t have public domain names, considering use Static DNS on your localhost with make dns.
http://g.pigsty or
http://<primary_ip>:3000is the portal of the monitoring system (username: admin, password: pigsty)
Visit
http://<primary_ip>:3000/ http://g.pigsty to visit Pigsty Grafana (username:admin, password:pigsty)
Cluster Manage
Pigsty can also be used as a controller & monitoring infrastructure for production-grade large-scale nodes & databases.
You can initiate control from meta node, and add more nodes into Pigsty.
You can deploy different types of High available PostgreSQL Clusters, Redis clusters, or Greenplum/MatrixDB data warehouse.
Sandbox
There’s a standard 4-node demo env for pigsty, named ‘Sandbox’. You can create a sandbox on your laptop with Vagrant, or create them on public cloud with Terraform. The same deployment procedure could apply to production deployment.
Take sandbox as an example, install pigsty on meta node 10.10.10.10 with:
Nodes Init
Now add 3 more nodes 10.10.10.11, 10.10.10.12, 10.10.10.13 into pigsty nodes.yml
After that, these 3 nodes are set with DCS service, node exporter & promtail logger. And can be used for subsequent database deployment. check Config: Nodes & Playbook: Nodes for details.
PostgreSQL Deploy
Create a classic 1 primary & 2 replicas HA PostgreSQL cluster with pgsql.yml playbook.
Once complete, you can check the newly created PostgreSQL cluster from Monitoring Dashboards.
Check Config: PGSQL, Customize: PGSQL, and Playbook: PGSQL for more details.
Redis Deployment
In addition to the PostgreSQL cluster, you can deploy various other types of clusters and even other types of databases.
For example, to deploy Redis:
Check Config: REDIS and Playbook: REDIS for more details.
MatrixDB Deployment
To deploy the open-source time-series data warehouse MatrixDB (Greenplum7):
3 - Features
The battery-include, auto-piloting, handy & thrifty distribution for open-source databases.
- Battery-Include Open-Source Postgres Distribution
- Auto-Piloting monitoring and management SRE Solution
- Easy-to-use Database-as-Code Developer Toolbox
- Safe & Thrifty open-source alternative to Cloud RDS/PaaS
High Availability / Ultimate Observability / Handy Toolbox / Database as Code / Versatile Scenario / Safety & Thrifty
PostgreSQL Distribution
RedHat for Linux!
-
Pigsty deeply integrates the PostgreSQL 14.4 with powerful extensions: TimescaleDB 2.7, PostGIS 3.2, and Citus 11.0, and hundreds+ of extensions, all Battery-include.
-
Pigsty packs the infrastructure needed for large-scale production environments: Grafana, Prometheus, Loki, Ansible, Consul, Docker, etc. It can also be used as a deployment monitor for other database and application runtimes.
-
Pigsty integrates with common tools for data analysis ecology: Jupyter, ECharts, Grafana, PostgREST, Postgres, which can be used as a data analysis environment, or a low-code data visualization application development platform.
SRE Solution
Auto-Pilot for Postgres! Auto-Pilot! From something to something better for users Use it for fun!
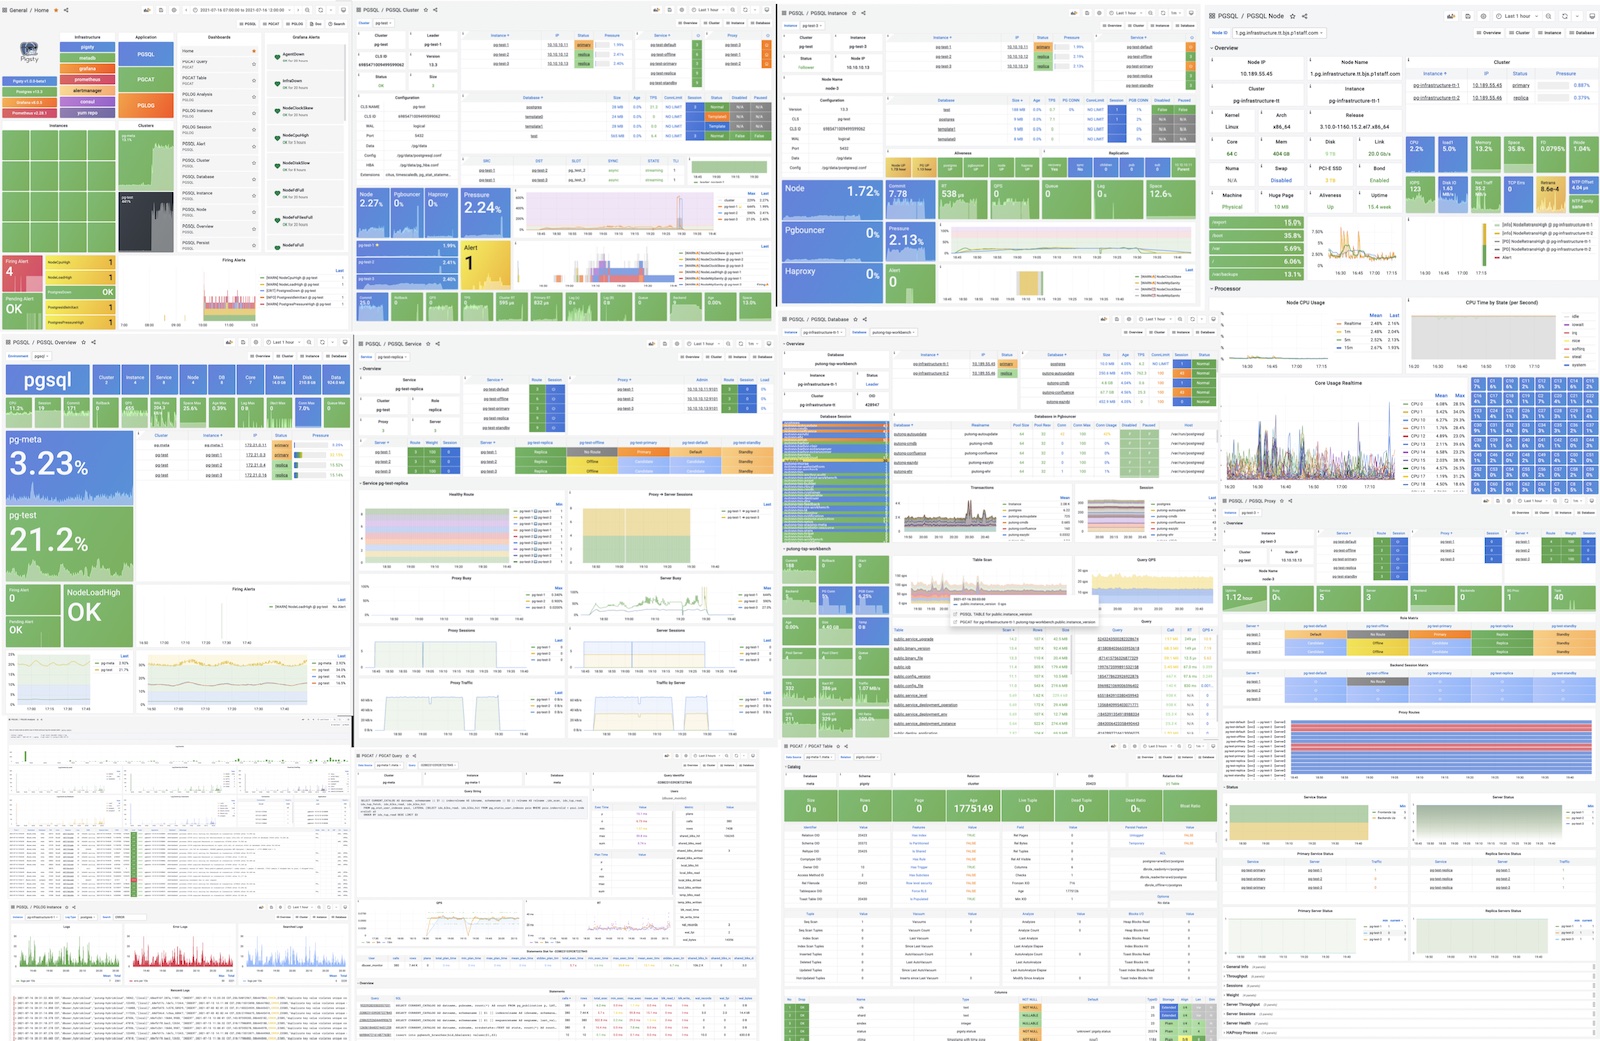
- Pigsty comes with an unparalleled database monitoring system that presents over 1200 types of metrics through 30+ carefully designed and organized monitoring panels, providing the ultimate observability from a global overview to individual repository objects at a glance!
- Pigsty provides a highly available PostgreSQL database cluster, with any member surviving to provide normal services to the public; each instance is idempotent, providing a distributed database-like experience; self-healing from failure, greatly simplifying operations and maintenance work!
- Pigsty supports the deployment of different kinds of database clusters and instances: classic PGSQL Primary-Replica Cluster/Standby Cluster, Sync Standby/Delayed/Offline/Cascade Instance, Citus/Greenplum Cluster, Redis Standalone/Sentinel/Native Cluster.
Developer Toolbox
HashiCorp for Database!
- Pigsty upholds the Infra as Data design philosophy, users can create it in one click using an idempotent playbook with just a few lines of declarative config file describing the database they want. Just like Kubernetes!
- Pigsty delivers an easy-to-use database toolkit to developers: one-click download installation, automatic configuration; one-click deployment of various open-source databases, one-click migration backup, expansion, and reduction, greatly lowering the threshold of database management use, mass production DBA!
- Pigsty can simplify database deployment and delivery, solve the problem of unified environment configuration: whether thousands of databases tens of thousands of core production environments, or a local 1C1G laptop can be fully operational; Vagrant-based local sandbox and Terraform-based multi-cloud deployment, cloud on cloud off, pull up with one click!
Open Source RDS
Alternative for RDS!
-
Pigsty can save 50% - 80% of database hardware and software costs compared to cloud vendor RDS with a lower usage threshold and richer features, and junior R&D staff can manage hundreds of databases on their own.
-
Pigsty is modular and can be freely combined and extended on demand. It can deploy and manage various databases in a production environment, or just use them as a host to monitor; it can be used to develop data database visualization demos or support various SaaS applications.
-
Open source, free production-grade database solution to fill in the last missing piece of the cloud-native ecosystem. Stable and reliable, proven over time in large-scale production deployments, with optional professional technical support services.
High Availability
Self-healing & Auto-Piloting.
Taking PostgreSQL as an example, Pigsty creates a database cluster that is distributed and highly available database cluster. As long as any instance of the cluster survives, the cluster can provide complete read-write service and read-only service to the outside world.
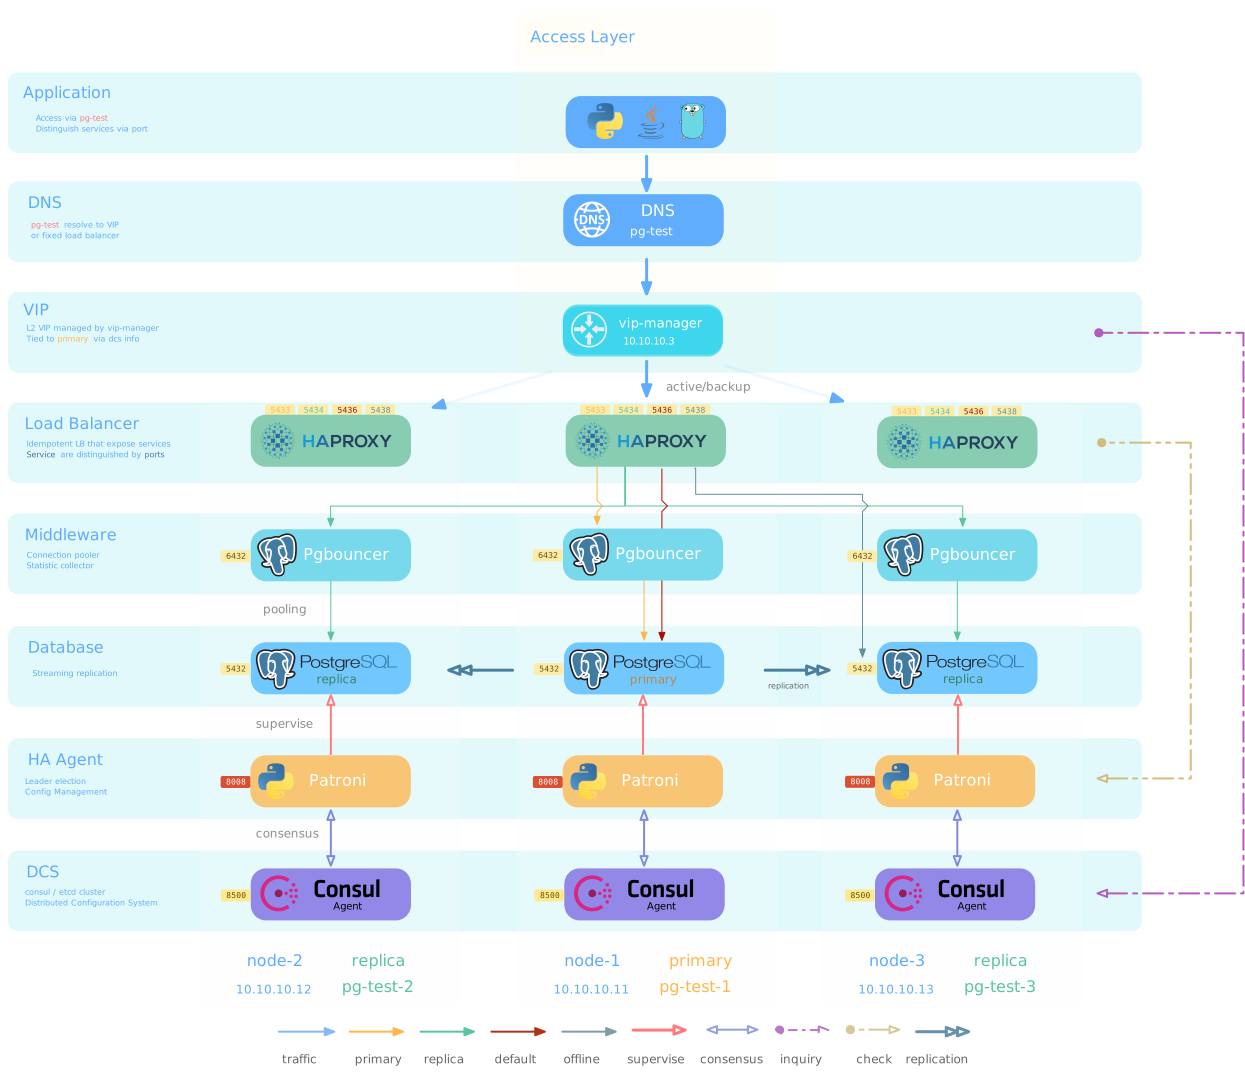
Pigsty’s high availability architecture has been tested in production environments. Pigsty uses Patroni + Consul for fault detection, Fencing, automatic failover, and HAProxy, VIP, or DNS for automatic traffic switching, achieving a complete high availability solution at a very low complexity cost, allowing the master-slave architecture of the database to be used with a cloth-like experience. Database-like experience.
The database cluster can automatically perform fault detection and master-slave switching, and common faults can be self-healing within seconds to tens of seconds: RTO < 1min for master failure, read-only traffic is almost unaffected, sync standby cluster RPO = 0 without data loss.
Each database instance in the database cluster is idempotent in use, and any instance can provide full read and write services through the built-in load balancing component HAProxy. Anyone or more Haproxy instances can act as a load balancer for the cluster and distribute traffic through health checks, shielding the cluster members from the outside world. Users can flexibly define services through config and access through various optional methods.
Ultimate Observability
You can’t manage you don’t measure.
Monitoring systems provide metrics on the state of the system and are the cornerstone of operations and maintenance management. [DEMO]
Pigsty comes with a professional-grade monitoring system designed for large-scale database cluster management, based on industry best practices, using Prometheus, Alertmanager, Grafana, and Loki as the monitoring infrastructure. Open source, easy to customize, reusable, portable, no vendor lock-in.
Pigsty is unmatched in PostgreSQL monitoring, presenting about 1200+ categories of metrics through 30+ monitoring panels and thousands of dashboards, covering detailed information from the big global picture to individual objects. Compared with similar products, the coverage of metrics and the richness of monitoring panels are unparalleled, providing irreplaceable value for professional users. The appropriate level of detail is designed to provide an intuitive and convenient management experience for amateur users.
Pigsty’s monitoring system can be used to monitor all kinds of database instances deployed natively: PGSQL, REDIS, GPSQL, etc. It can also be used standalone to monitor existing database instances or remote cloud vendor RDS, or just as a host monitoring, it can also be used as a showcase for data visualization works.
Handy Toolbox
Every additional command line in the install script halves the number of users.
Pigsty takes ease-of-use to the extreme: one command installs and pulls up all components, ready to install in 10 minutes, no dependency on containers and Kubernetes, no Internet access required when using offline packages, and a very low threshold for getting started.
Pigsty has two typical usage models: Standalone and Cluster. It can run completely on local single-core virtual machines and can be used for large-scale production environment database management. Simple operation and maintenance, no worries, no fuss, a one-time solution to all kinds of problems in production environments and personal use of PG.
In standalone mode, Pigsty deploys a complete infrastructure runtime with a single-node PostgreSQL database cluster on that node. For individual users, simple scenarios, and small and micro businesses, you can use this database right out of the box. The single-node model itself is fully functional and self-manageable and comes with a fully-armed and ready-to-use PG database for software development, testing, experiment, demonstration; or data cleansing, analysis, visualization, storage, or direct support for upper-tier applications: Gitlab, Jira, Confluence, UF, Kingdee, Qunhui, etc.
Pigsty has a built-in database management solution with Ansible as the core and is based on this package of command-line tools and graphical interface. It integrates the core functions of database management, including database cluster creation, destruction, expansion and contraction, user, database and service creation, etc.
What’s more, Pigsty packages and provides a complete set of application runtime, which allows users to use the node to manage any number of database clusters. You can initiate control from the node where Pigsty is installed (aka “meta node”) to bring more nodes under Pigsty’s management. You can use it to monitor existing database instances (including cloud vendor RDS) or deploy your own highly available fail-safe PostgreSQL database cluster directly on the node, as well as other kinds of applications or databases, such as Redis and MatrixDB, and Get real-time insights about nodes, databases, and applications.
In addition, Pigsty provides templates for Local Sandbox and Multi-Cloud Deployment based on Vagrant and Terraform, so you can prepare the resources you need for your Pigsty deployment with one click.
Database as Code
A database is a software that manages the data, and a control system is software that manages the database.
Pigsty adopts the design philosophy of Infra as Data, using a declarative configuration similar to Kubernetes, with a large number of optional configuration options to describe the database and the operating environment, and an idempotent preconfigured script to automatically create the required database clusters, providing a private cloud experience.
Pigsty creates the required database clusters from bare metal nodes in minutes based on a list of user config files.
For example, creating a one-master-two-slave database cluster pg-test on three machines requires only a few lines of config and a single command pgsql.yml -l pg-test to create a highly available database cluster as described in the following section.
Example: Customize PGSQL Clusters
In addition, in addition to PostgreSQL, support for Redis deployment and monitoring has been provided since Pigsty v1.3
Example: Redis Cache Cluster
Starting with Pigsty v1.4, initial support for MatrixDB (Greenplum7) is provided
Example: MatrixDB Data WareHouse
Ubiquitous Deployment
Pigsty can use Vagrant and Virtualbox to pull up and install the required virtual machine environment on your own laptop, or through Terraform, automatically request ECS/VPC resources from your cloud provider, creating and destroying them with a single click.
The virtual machines in the sandbox environment have fixed resource names and IP addresses, making them very suitable for software development testing and experimental demonstrations.
The default sandbox configuration is a single node with 2 cores and 4GB, IP address 10.10.10.10, with a single database instance named pg-meta-1 deployed.
A full version of the sandbox is also available in a four-node version with three additional database nodes, which can be used to fully demonstrate the capabilities of Pigsty’s highly available architecture and monitoring system.
System Requirements
- Linux kernel, x86_64 processor
- Use CentOS 7 / RedHat 7 / Oracle Linux 7 or other equivalent operating system distribution
- CentOS 7.8.2003 x86_64 is highly recommended and has been tested in production environments for a long time
Single Node Basic Specifications
- Min specification: 1 core, 1GB (OOM prone, at least 2GB of RAM recommended)
- Recommended specifications: 2 cores, 4GB (sandbox default configuration)
- A single PostgreSQL instance
pg-meta-1will be deployed - In the sandbox, the IP of this node is fixed to
10.10.10.10
Four node basic specifications
-
The meta node requirements are the same as described for a single node
-
Deploy an additional three-node PostgreSQL database cluster
pg-test -
Common database node with min specs: 1 core, 1GB, 2GB RAM recommended.
-
Three nodes with fixed IP addresses:
10.10.10.11,10.10.10.12,10.10.10.13
Versatile Scenario
One-click to pull up production SaaS applications, data analysis quickly, low code development visualization large screen
SaaS Software
Pigsty installs Docker by default on the meta node, and you can pull up all kinds of SaaS applications with one click: Gitlab, an open-source private code hosting platform; Discourse, an open-source forum; Mastodon, an open-source social network; Odoo, an open-source ERP software; and UFIDA, Kingdee, and other software.
You can use Docker to pull up stateless parts, modify their database connection strings to use external databases, and get a silky smooth cloud-native management experience with production-grade data persistence. For more details, please refer to Tutorial: Docker Application.
Data Analysis
Pigsty is both a battery-include PostgreSQL distribution and can be used as a data analysis environment, or to make low-code visualization applications. You can go directly from SQL data processing to Echarts plotting in one step, or you can use more elaborate workflows: for example, using PG as the main database, storing data and implementing business logic with SQL; using the built-in PostgREST to automate the back-end API, using the built-in JupyterLab to perform complex data analysis in Python, and using Echarts for data visualization, and Grafana for interaction capabilities.
Pigsty comes with several sample applications for reference.
- Analysis of PG CSV log samples
pglog - Visualization of new crown outbreak data
covid - The global surface weather station data query
isd - Database prevalence ranking trend
dbeng - Query the work commuting schedule of a large factory’s
worktime
Safety and Thrifty
Pigsty can reduce the total cost of ownership of a database by 50% to 80% and put the data in the hands of the users themselves!
The public cloud database/RDS is a so-called “out-of-the-box” solution, but it delivers a long way from satisfying users: expensive compared to building your own database, many features that require super-user privileges are neutered, stupid UI and pot-luck features, but among all the problems, the most important one is the cloud software safty and cost issues.
Safty
- Software that runs on your own computer can continue to run even if the software provider goes out of business. But if the company/department providing the cloud software goes out of business or decides to stop supporting it, that software won’t work, and the data you created with that software is locked up. Because the data is only stored in the cloud, not on your own server’s disk, and the only compensation you can expect is usually a chicken scratch voucher.
- The problem of not being able to customize or scale is further exacerbated in cloud databases. Cloud databases typically do not offer database super users to users, which locks out a whole host of advanced features, as well as the ability to add extensions on your own. In contrast, ‘stream replication’, ‘high availability’, which should be standard in databases, are often sold to users as value-added items.
- Cloud services may suddenly suspend your account without warning or recourse. You could be judged by an automated system to be in violation of the TOS when you are completely innocent: undocumented use of ports 80 & 53, account blasted and used to send malware or phishing emails, triggering a breach of the TOS. Or hammered over by a cloud vendor for some political reason, such as Parler.
- The domestic habit of not using SaaS to insist on self-research or open-source is educated by the poor ecological industrial environment for real money. Putting your core asset – data, on someone else’s storage is just like leaving gold over the counter. There is nothing you can do to prevent, monitor, or even be aware of cloud vendors, or simply malicious or curious OPS and DBAs snooping around and stealing your precious data.
Not so with Pigsty, which can be deployed anywhere, including on your own servers. It is open source and free, requires no License, no Internet access, and does not collect any user data. You can run it on your own server until the sea runs out.
Thrifty
The cost of cloud databases is another issue: saving money is an immediate need for users. Public cloud vendors’ RDS may have advantages over traditional commercial databases, but they are still sky-high before building their own open-source databases. According to statistics, the comprehensive holding cost of RDS is up to 2~3x higher than self-build based on cloud servers, and even higher 5~10 times higher than self-build hosted by IDC.
| 52C/400GB/3TB x 2 | Price 5Y | Cost/Year |
|---|---|---|
| IDC & Your own | 810K ¥ | 160K ¥ |
| ECS | 310K ¥ | 63K ¥ |
| RDS | 150K ¥ | 30K ¥ |
Pigsty has significant cost advantages over using a cloud database. For example, you can buy the same size cloud server for half the overhead of a cloud database and deploy the database yourself using Pigsty. In this case, you can enjoy most of the ease and convenience of managing a public cloud (IaaS), while instantly saving more than half the overhead.
What’s more, Pigsty can significantly improve user performance: it allows one or two senior DBAs to leave all the trivial chores to the software and easily manage hundreds of database clusters; it also allows a junior R&D staff, after a simple learning training, can quickly reach a senior DBA’s cheap 70% correct level.
Pigsty open source and free, in the premise of providing similar or even exceed the cloud vendor RDS experience, can reduce the comprehensive cost of ownership of the database by 50% ~ 80%, and let the data really control in the hands of the user.
4 - FAQ: Frequently Asked Questions
Here are some frequently asked questions. If you have some unlisted questions, Contact Us, or submit an Issue.
Preparation
It would help if you ensured that the machine node hardware specifications and OS meet the installation requirements, see: preparation.
Node Requirement
At least 1Core/2GB is required from singleton meta installation. An x86_64 Processor is needed. ARM is not supported yet.
Pigsty installation requires at least one node: a minimum specification of 1 core and 2 GB.
If you wish to deploy a self-managed HA PostgreSQL database cluster, it is recommended to use a minimum of 3 nodes with the exact specifications.
OS requirements
**Pigsty strongly recommends using CentOS 7.8 to avoid meaningless efforts. **
Pigsty development, testing, and packaging are based on CentOS 7.8 by default. CentOS 7.6 is also fully validated. Other CentOS 7. x and its equivalents RHEL7 and Oracle Linux 7 are theoretically OK but have not been tested and verified.
Versioning Policy
Please use a version-specific Release, not the Github Master branch directly, which may be in an inconsistent state.
Pigsty follows the semantic version numbering rule: <major>. <minor>. <release>.
Major updates imply major fundamental architectural changes, minor version number increases imply package version updates, minor API changes, and other incremental feature changes, and usually include a note on upgrade considerations.
The release is usually used for bug fixes and doc updates, and Release version increases do not change package versions (i.e., v1.0.1 and v1.0.0 correspond to the same pkg.tgz).
Pigsty plans to release a Minor Release every 1-3 months and a Major Release every 1-2 years.
Sandbox provisioning
Use Vagrant to pull up the local sandbox with one click, or use Terraform to create a cloud sandbox at public cloud vendors.
Deploying Pigsty requires physical/VM nodes, and you can provide physical/VMs. However, Pigsty provides IaaS tier resource templates based on Vagrant and HashiCorp to get the VM resources needed to deploy Pigsty 4-node sandbox in one click.
A sandbox is an environment with configuration specifications, object identifiers, IP, and default database predetermined, consisting of a meta node and three nodes, consistent for both local and cloud versions, for development/testing/demo/explanation. Pull up the Vagrant local sandbox using the following command.
Download
The Pigsty source package is mandatory for installing Pigsty. The offline package is recommended. Please refer to the software download.
Where to download Pigsty source code?
curl -SL https://github.com/Vonng/pigsty/releases/download/v1.5.1/pigsty.tgz | gzip -d | tar -xC ~
Executing the above command will automatically download the latest stable version of pigsty.tgz and extract it to the ~/pigsty dir. You can also manually download a specific version of Pigsty source code from the following location. If you need to install it in an environment without Internet, you can download it in advance and upload it to the production server via scp/sftp, etc.
Where to download other Pigsty packages?
./download pigsty pkg app matrix
A download script is provided inside the Pigsty source package for downloading Pigsty-related resources: Pigsty source package: pigsty.tgz / Offline software package: pkg.tgz / MatrixDB/Greenplum package: matrix.tgz / Some SaaS Mirroring and visualization application examples: app.tgz. The source package is mandatory, and the offline package pkg.tgz is recommended ./download pkg will automatically download and extract offline packages.
Where to download Pigsty offline software packages?
./download pkg or download it automatically when prompted during configuration.
Pigsty’s offline package pkg.tgz packs the required software dependencies.
In ./configure, if the offline package /tmp/pkg.tgz does not exist, the wizard will prompt the user to download it, “Y” will automatically download it from Github or CDN; “N “, the download will be skipped. You can also download the offline package manually from the following location and place it in /tmp/pkg.tgz. Then, it will be used automatically when installing.
Download RPMs too slow
Download from upstream without offline packages, or just remove the problem package and fill in the gaps from available sources
Pigsty offline packages are made based on CentOS 7.8. Otherwise, there may be RPM package dependency issues.
If it is only an isolated RPM dependency issue, you can remove the RPM package in /www/pigsty and delete the marker file /www/pigsty/repo_complete.
And then, when performing the normal installation process, Pigsty will download the missing dependent RPM packages from the upstream or other locally available source specified by repo_upsteram. If there is no available Internet access or local source, please use the same OS environment with a networked node to make an offline package, and then copy it to the production environment for use.
Configuration
Pigsty’s installation, configuration, and deployment are all one-click, with the only configuration being the core of Pigsty.
What is the configured doing?
Detect the environment, generate the configuration, enable the offline package (optional), and install the essential tool Ansible.
After downloading the Pigsty source package and unpacking it, you need first to execute ./configure to complete the environment configure.
Pigsty will check if the current environment meets the installation requirements and generate the recommended config file pigsty.yml based on the current machine environment. In the files/conf/ directory, there are a series of config files named pigsty-*.yml that can be used as reference templates for configuration in different scenarios, specified by -m.
The Configure installs Ansible, which generally comes with this package as the default source for the node, or from within the offline pkg if it exists.
Where is Pigsty’s config file?
The source root pigsty.yml is the default, unique config source.
Pigsty has one and only one config file: pigsty.yml in the source root dir, which describes the state of the entire environment.
In ansible.cfg in the same dir: inventory = pigsty.yml specifies this file as the default config file, or you can use the -i parameter when executing the playbook, restricting the use of a config file from another location. In addition, if you use CMDB as the config source, please modify the config in CMDB.
Placeholder IP in the config file
Pigsty uses 10.10.10.10 as a placeholder for the current node IP, which will be replaced with the primary IP of the current node during the configure.
When the configure detects multiple NICs with multiple IPs on the current node, the config wizard will prompt for the primary IP to be used, i.e., the IP used by the user to access the node from the internal network. Note that please do not use the public IP.
This IP will be used to replace 10.10.10.10 in the config file template.
Does the user need to modify any config?
Usually, in a singleton installation, there is no need to make any adjustments to the config files.
Pigsty provides 220+ config parameters to customize the entire infra/platform/database. However, there are a few parameters that can be adjusted in advance if needed:
- When accessing web service components, the domain name is
nginx_upstream(some services can only be accessed using the domain name through the Nginx proxy). - Pigsty assumes that a
/datadir exists to hold all data; you can adjust these paths if the data disk mount point differs from this.
Installation
What was executed during installation?
When running make install, ansible-playbook is called to perform the preconfigured playbook infra.yml to complete the installation on the meta node.
The configure generates the config file by default and marks the current node as a meta node. And make install executes the Pigsty meta node initialization playbook infra.yml, deploys the infra components, and initializes the meta node like a normal node on which a singleton PostgreSQL is deployed as CMDB.
Downloading RPM packages is too slow
It is best to use offline packages or configure a proxy server or a local repo.
Pigsty has used domestic yum repos for downloads whenever possible. However, a few packages are still affected by GFW, resulting in slow downloads, such as related software downloaded directly from Github. The following solutions are available.
-
Pigsty provides an offline package, which pre-packages all software and its dependencies, and can skip the step of downloading software from the Internet.
-
Specify a proxy server via
proxy_envto download via proxy server. -
Use other domestic available repos via
repo_upsteram.
Remote nodes are not accessible via SSH commands
Specify a different port via the host instance-level ansible connection parameters.
Consider using Ansible connection parameters if the target machine is hidden behind an SSH springboard machine or if some customizations have been made that cannot be accessed directly using ssh ip. Additional SSH ports can be specified with ansible_port or ansible_host for SSH Alias.
Password required for remote node SSH and SUDO
Use the -k and -K parameters, enter the password at the prompt, and refer to admin provisioning.
When performing deployments and changes, the admin user used must have ssh and sudo privileges for all nodes. Password-free is not required. You can pass in ssh and sudo passwords via the -k|-K parameter when executing the playbook or even use another user to run the playbook via -eansible_host=<another_user>. However, Pigsty strongly recommends configuring SSH passwordless login with passwordless sudo for the admin user.
Sandbox
The Pigsty sandbox provides a standard development/test/demo environment that can be quickly pulled up locally with Vagrant or in the cloud with Terraform.
Vagrant sandbox is too slow to start for the first time
The first time you use Vagrant to pull up a particular OS repo, it will download the corresponding BOX.
Pigsty sandboxes use CentOS 7 by default, and Vagrant will download the CentOS/7 ISO repo Box the first time the VM is started.
Using a proxy may increase the download speed. Downloading CentOS7 Box only needs to be done the first time the sandbox is started, and will be reused directly when the sandbox is subsequently rebuilt.
Users can also choose to create the required VM manually by downloading the CentOS 7 installation ISO repos.
RPMs error on Aliyun CentOS 7.8 VM
Aliyun CentOS 7.8 server has DNS caching service nscd installed by default. Just remove it.
Aliyun’s CentOS 7.8 repo has nscd installed by default, locking out the glibc version, which can cause RPM dependency errors during installation.
Run yum remove -y nscd on all nodes to resolve this issue, and with Ansible, you can batch.
Virtual machine time out of sync
sudo ntpdate -u pool.ntp.org or use make sync4.
The time within the VM may not be consistent with the host after the Virtualbox shutdown. You can try the following command: make sync to force NTP time sync.
It can solve the problem of no data on the monitoring system after a long hibernation or shutdown and reboot. In addition, restarting the VM can also force a time reset without Internet access: make dw4; make up4.
Why not use containers to hold the database?
Using Docker/Kubernetes to bloom databases is not mature.
While Docker is good for improving environment compatibility, databases are not among the best scenarios for container use. Docker and Kubernetes have usage thresholds. Pigsty uses bare-metal deployment.
Pigsty was designed initially with a containerized cloud in mind, which is reflected in its declarative implementation of config definitions. It does not require much modification to migrate and transform to a cloud-native solution. It will be refactored using the Kubernetes Operator approach.
Monitoring
How much is the performance storage overhead?
The monitoring query overhead is negligible, on the order of 100 ms, once every 10 seconds, and a typical instance generates about 2k ~ 5k time series.
Storage depends on the complexity of the user database (workload). For reference: 200 production database instances produce about 16GB of monitoring data in 1 day. Pigsty keeps two weeks of monitoring data by default, which parameters can adjust.
Can you monitor existing PG instances?
Pigsty does not commit to the quality of monitoring of external instances: PostgreSQL created by Pigsty performs significantly better than hand-crafted instances in most cases.
External databases created by non-Pigsty provisioning modes can be deployed using monly mode.
If Pigsty can manage the instance, consider deploying components such as node_exporter, pg_exporter, and promtail on the target node in the same way as the standard deployment.
Suppose only the URL to access that database (e.g., RDS cloud database instance) is available; in this case, you can use the Monly Deployment mode, where Pigsty monitors the remote PG instance through the pg_exporter instance deployed locally on the meta node.
How do we monitor existing PG instances?
Why can you still see the removed monitoring objects?
Use pgsql-remove.yml playbook to remove the monitor target.
INFRA
What components are included in the infra?
Pigsty provides a complete PaaS environment. Please refer to System Architecture: Infra for more details.
Ansible/Pigsty CLI for launch management and deployment; PostgreSQL on meta nodes as CMDB; Consul Server as meta DB for HA; NTPD and DNS for time and domain name resolution base services; Docker as stateless application deployment base; Prometheus for monitoring metrics, Loki for log collection, Grafana for monitoring/visualization, AlertManager for aggregated alerts, YumRepo for providing local software sources, and Nginx for collecting all WebUI class service access portals externally.
Can you use an existing DCS cluster?
Pigsty will provide DCS services on a meta node by default, but it is more recommended to use an external cluster of multiple nodes for HA DCS services.
Fill in the dcs_servers with the corresponding cluster, i.e., the external DCS cluster.
There is no correspondence between DCS Server and the meta node: by default, Pigsty installs a single-node Consul Server on the meta node. If the IP of the current node is defined in dcs_servers when performing node initialization, the node is configured with DCS Server services. DCS is used for HA, the primary selection of another database. It is recommended to use a dedicated external DCS cluster of 3 to 5 nodes in a production environment.
NODES
Abort because consul instance already exists
Pigsty provides a DCS misdeletion protection mechanism, configuring dcs_clean = true.
When the Consul service of the target node already exists, nodes.yml will act on the dcs_clean parameter, and if true, the existing Consul will be erased during initialization.
Pigsty also provides the corresponding SafeGuard parameter: dcs_safeguard.
These parameters can be modified in the config file pigsty.yml or specified at playbook execution time with the extra parameter mechanism.
PGSQL
Abort because Postgres instance already exists
Pigsty provides a DCS misdeletion protection mechanism, configuring dcs_clean = true.
When the Consul service of the target node already exists, nodes.yml will act on the dcs_clean parameter, and if true, the existing Consul will be erased during initialization.
Pigsty also provides the corresponding SafeGuard parameter: dcs_safeguard.
These parameters can be modified in the config file pigsty.yml or can be specified at playbook execution time with the extra parameter mechanism.
How to ensure HA of PostgreSQL?
Patroni as HA Agent, Consul as DCS, Haproxy as default traffic distributor, see HA Cluster.
Pigsty uses Patroni to host Postgres, and Patroni uses Consul to reach a consensus on the leader. When the primary fails beyond a threshold (30 seconds), a new election is triggered, and the winner becomes the new cluster primary, with all other replicas following the new cluster primary. The original failed primary is automatically demoted to replica and follows the new primary when it comes online.
The client uses the HAProxy service to access the database, and HAproxy uses an HTTP health check to get the primary-replica role information from Patroni and distribute the traffic accordingly. Pigsty’s database cluster members are idempotent, so as long as anyone instance of the cluster is still alive, read-write and read-only traffic can continue to work and access port 5433 of any one instance. Access to port 5433 of any instance ensures access to the cluster’s central database read and write services.
The availability of DCS is guaranteed by multi-node consensus, so deploying three or more multi-nodes in production environments or using external DCS clusters is recommended.
How to ensure PostgreSQL cluster failure without data loss?
Use the pg_conf: crit.yml template, or enable sync replication manually.
Crit templates are optimized for data consistency and persistence, with sync commits and data checksums enabled by default. It can ensure no data loss during failover and timely detection of reported silent data corruption due to storage failure, power failure, and other abnormal conditions.
Data corruption causes replica failure
Find the machine in question, modify the patroni config file clonefrom: false and reload it to take effect.
Pigsty enables the cloneform: true feature by default for all the PGSQL clusters. Suppose an instance cannot complete replica production because of corrupt data files. You can modify the Patroni config file on that instance to set clonefrom to false to avoid pulling data from the evil instance.
5 - Concepts
Index
Glossary
Node
Meta
Source Package
Offline Software Package
Sandbox
Production Environment/Prod Env
Singleton Meta
Cluster Manage
Database Cluster
Sandbox
Provisioning
Admin Uesr
Admin Provisioning
Software Provisioning
Configure
Inventory
Config Entry
Cluster
Instance
Service
Sharding Cluster
Playbook
Deploy/Deployment
Primary
Replica
Standby
Offline
Delayed
Hot Standby
Cold Standby
Restore
Alert/Alerting
Metric/Metrics
Dashboard
Panel
Monitor Target
Monly Identity
Identity Parameter
HealthCheck
Service Discovery
Redis Standalone
Redis Native Cluster
Redis Sentinel
6 - Architecture
Pigsty consists of several modules that can be combined according to different scenarios.
Module
Pigsty currently offers four modules.
INFRAis Pigsty’s infrastructure module, including monitoring/alerting/visualization/logging/DNS/NTP components.NODESis the node management module for configuring nodes, installing software, and collecting metrics and logs.PGSQLis a PostgreSQL deployment management module, including various PG cluster deployments and monitoring.REDISis the Redis deployment management module, including Redis standalone/native cluster/sentinel deployment and monitoring.
Usage
You can choose which modules to enable on which nodes based on different requirements.
Pigsty will perform a singleton installation by default, initializing the node as a meta node with INFRA, NODES, & PGSQL.
You can join other nodes and install different databases.
Singleton Deploy
If you want to use Pigsty as a battery-included singleton PostgreSQL distribution, install the INFRA, NODES, & PGSQL modules sequentially on a node.
Execute infra.yml playbook to install Pigsty on a singleton meta, deploy infrastructure on the node, and pull up a singleton PostgreSQL database cluster. The node with Pigsty fully installed is called a meta node.
Pigsty is capable of more than that. It can monitor and manage more nodes and databases.
Host Monitoring
If you want to create a large-scale Host Monitoring System, just install the INFRA module on one node and the NODES module on all the monitored nodes. All nodes will be configured with software sources, software packages, DNS, NTP, node monitoring, log collection, and DCS Agent components. Nodes that are included in Pigsty management will come with detailed metrics and can be deployed with various database modules.
Use nodes.yml playbook to install the NODES module on meta nodes for more nodes to be included in Pigsty management.
Database Cluster
After incorporating the nodes into Pigsty, these nodes can be further deployed with various database clusters.
If you want to manage many PostgreSQL clusters, install the PGSQL module again on those nodes included in Pigsty management. You can deploy various PGSQL clusters with one click: singleton, one primary & n replica HA cluster, sync standby cluster, quorum commit cluster, offline replica, standby cluster, delayed replica cluster, Citus cluster, TimescaleDB cluster, MatrixDB data warehouse.
If you want to manage many Redis clusters, install the REDIS module on the included nodes in Pigsty management.
Use pgsql.yml to create a HA PostgreSQL cluster, redis.yml to develop standalone, native, sentinel Redis clusters, and pgsql-matrixdb.yml to deploy the Greenplum/MatrixDB data warehouse.
Pigsty will subsequently add new types of database modules on demand: KAFKA, MINIO, MONGO, etc.
Model
A complete Pigsty system can be called a Deployment or Environment.
For example, production environment, test environment, pre-distribution environment, etc.
A Pigsty deployment consists of two parts: an infra set & multiple clusters, both described by an Inventory.
- Infra: deployed on meta nodes, monitoring, DNS, NTP, DCS, Yum repos, etc.
- Database Cluster: autonomous (database) service unit deployed on nodes.
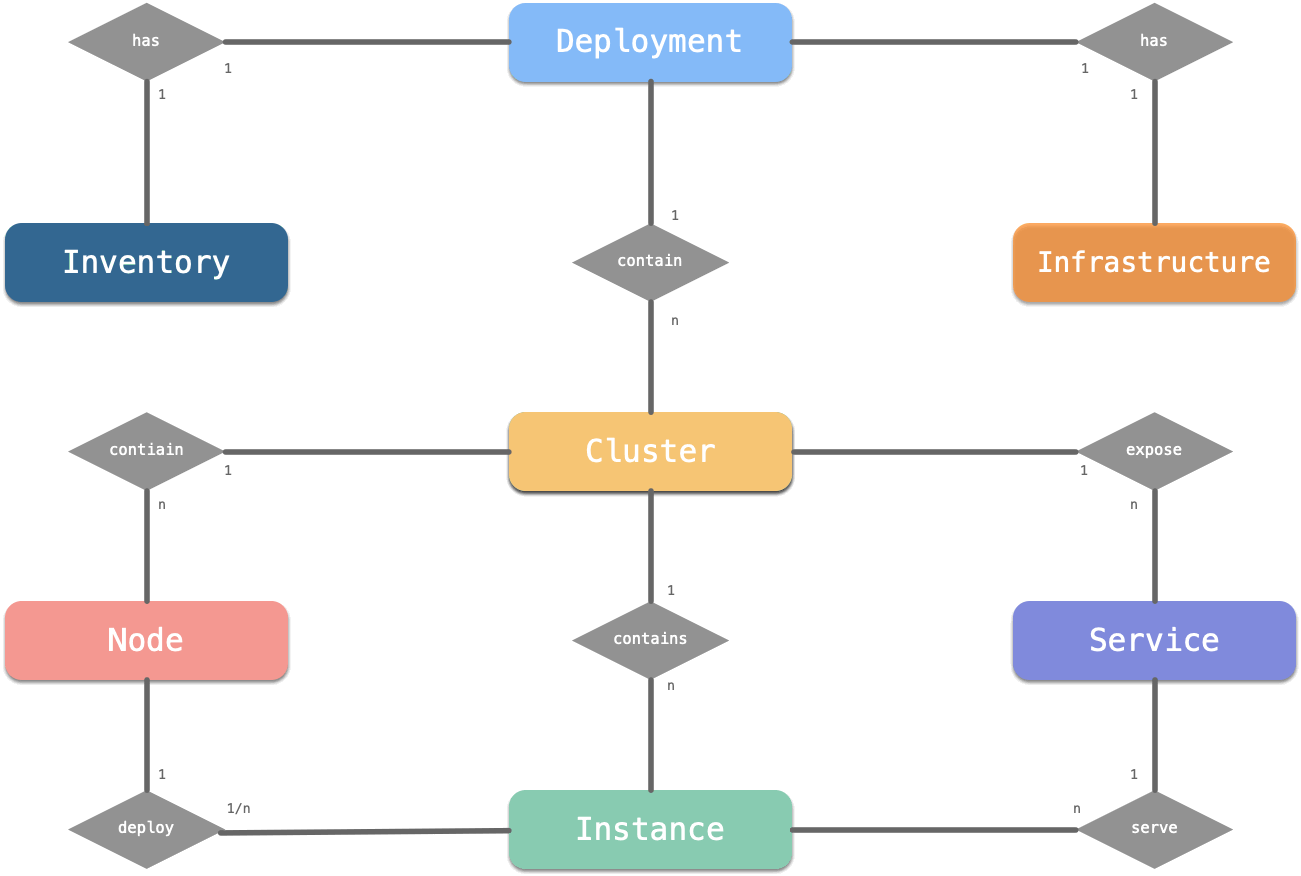
The cluster contains nodes, instances, and services three core resources: a cluster contains multiple instances deployed on multiple nodes, providing various services. Each database instance will have a more subdivided ER model.
7 - Infrastructure
Pigsty provides a complete, battery-included PaaS infra.
Pigsty, as a battery-included PaaS solution, will integrate the basic infra into the provisioning solution.
Overview
Pigsty deploys a complete set of infra on meta nodes (the currently installed node), including:
| Component | Port | Default Domain | Description |
|---|---|---|---|
| Nginx | 80 | pigsty |
Web Service Portal |
| Yum Repo | 80 | yum.pigsty |
LocalYum Repo |
| Grafana | 3000 | g.pigsty |
Monitoring System/Visualization Platform |
| AlertManager | 9093 | a.pigsty |
Alert aggregation management component |
| Prometheus | 9090 | p.pigsty |
Monitoring Time Series Database |
| Loki | 3100 | l.pigsty |
Log Collection |
| Consul | 8500 | c.pigsty |
Distributed Configuration Management and Service Discovery |
| Docker | 2375 | - | Container Platform |
| PostgreSQL | 5432 | - | Pigsty CMDB |
| Ansible | - | - | Initiate management commands |
| Consul DNS | 8600 | - | DNS Service(Optional) |
| Dnsmasq | 53 | - | DNS Server(Optional) |
| NTP | 123 | - | NTP Time Server(Optional) |
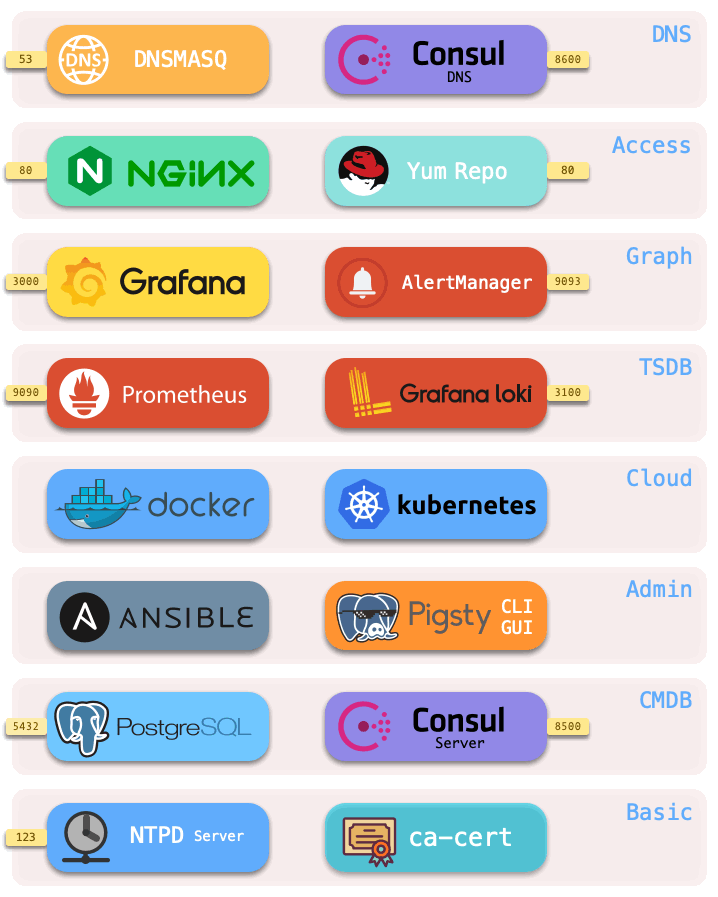
A set of environments contains one or more meta nodes for infra deployment. All infrastructure components are deployed replica-style, except for DCS.
If multiple meta nodes are configured, the DCSs (etcd/consul) on the meta nodes act together as a cluster of DCS servers.
Nginx
Nginx is the portal for all Pigsty’s WebUI services, default port 80.
Many infra components with WebUIs are exposed for service through Nginx, such as Grafana, Prometheus, AlertManager, Consul, and HAProxy traffic management pages. In addition, static file sources such as YumRepo, document, and execution plan visualizers are also served through Nginx.
Nginx forwards access requests to the corresponding upstream component via domain name based on the contents of nginx_upstream.
Pigsty strongly recommends using domain names to access the Pigsty UI system for several reasons:
- Some components only listen to 127.0.0.1 by default.
- Access via domain name allows you to use Nginx, audit all requests, and facilitate the integration of authentication mechanisms.
- Domain names are easier to remember and more flexible to configure.
If you do not have an Internet domain name or local DNS resolution, you can add a local static resolution record in /etc/hosts or C:\Windows\System32\drivers\etc\hosts.
Nginx configuration parameters are located at Config: INFRA - NGINX.
Yum Repo
Pigsty will first build a LocalYum repo, which is served by Nginx and is located at /www/pigsty and is available at http://yum.pigsty/pigsty. Pigsty’s offline software package is a compressed Yum Repo dir.
When Pigsty tries to build a local source, if it finds the dir /www/pigsty with the /www/pigsty/repo_complete marker file, it assumes that the local source is built and skips the step of downloading the software from the upstream repo.
The Repo file is located at /www/pigsty.repo and is available by default at http://yum.pigsty/pigsty.repo.
You can also use the file local sources without Nginx.
Yum Repo configuration parameters are located at Config: INFRA - REPO.
Grafana
Grafana is an open-source visualization/monitoring platform, the core of Pigsty WebUI, with default port 3000, which can be accessed via IP:3000 or http://g.pigsty.
Pigsty’s monitoring system is built on Dashboard and connects and jumps via URL. You can quickly locate faults.
In addition, Grafana comes with some visualization plugins, such as the ECharts dashboard.
Grafana configuration parameters are located at Config: INFRA - GRAFANA.
AlertManager
AlertManager is the alerting platform that accompanies Prometheus. The default port is 9093, which can be accessed via IP:9093 or http://a.pigsty.
Prometheus alert events are sent to AlertManager, but if further processing is required, users need to configure it, for example, to provide SMTP service configuration to send alert emails.
Prometheus
Prometheus is the monitoring time-series database, default port 9090, which can be accessed via IP:9090 or http://p.pigsty.
- Prometheus fetches monitoring objects through the local static file service and associates identity information for them.
- Prometheus can use Consul service discovery to get monitoring objects automatically.
- Prometheus pulls monitoring metrics from Exporter, precomputes the processing, and stores them in its TSDB.
- Prometheus calculates alarm rules and sends the alarm events to Alertmanager for processing.
Prometheus configuration parameters are located at Config: INFRA - PROMETHEUS.
Loki
Loki is the database used for log collection, and Promtail on the node pushes logs to Loki on the meta-node.
Loki configuration parameters are located at Config: INFRA - LOKI.
Consul
Consul Server is used to keep the state of DCS, reach consensus, provide metaDB query service, and also provide DCS-based service discovery.
Consul configuration parameters are located at Config: INFRA - DCS.
Docker
Pigsty installs Docker on the meta-node by default, and you can pull up various stateless applications and use an external database to get production-level persistence.
Docker configuration parameters are located at Config: INFRA - DOCKER.
PostgreSQL
PostgreSQL configuration parameters are located at Config: PGSQL, using CMDB as the configuration source, please refer to the CMDB tutorial.
- MetaDB for supporting various advanced features (also a standard database cluster, pulled up by Ansible).
- Ansible for executing playbooks, initiating control, and accessing the CMDB when using dynamic Inventory.
- Timed task controller (supports backups, cleanups, statistics, patrols, etc.) that accesses the CMDB.
Ansible
By default, Pigsty installs Ansible on the meta-node, a popular operations tool with a declarative configuration style and an idempotent playbook design. The command-line tool pigsty-cli invokes the Ansible Playbook to initiate control.
Ansible configuration parameters are located at Config: INFRA - CONNECT.
Dnsmasq
Dnsmasq provides DNS resolution services (optional)
- DNS services are optional and can use existing DNS servers.
- Partial DNS resolution will be forwarded by Consul DNS.
DNSMASQ configuration parameters are located at Config: INFRA - Nameserver.
NTP
NTP service for synchronizing the time of all nodes (optional).
NTP configuration parameters are located at Config: NODES - NTP.
Demo
Pigsty provides a public demo at http://demo.pigsty.cc.
Since the demo is an empty instance of an empty VM with 1 core and 1 GB, please refer to the actual result.
8 - Concept: Nodes
Pigsty use nodes for deployment, nodes cloud be physical machines, VMs, or even Pods.
Pigsty has two types of nodes: meta node and (normal) node.
Meta nodes are used to initiate control, and (normal) nodes are managed under control.
- Meta node: Run
infra.ymlplaybook to install Pigsty, INFRA, NODES, and PGSQL modules. - Node: Run
nodes.ymlplaybook to join Pigsty, and install the NODES module by default.
Meta Node
Meta-Nodes are nodes installed with Pigsty, with admin capability and a complete infra set.
Current node are marked as meta during ./configure, populated in the meta group of inventory.
Pigsty requires at least one meta node per environment. It will be used as a command center for the entire environment. It’s the meta node’s responsibility to keep states, manage configs, launch plays, run tasks, and collect metrics & logs. The infra set is deployed on meta nodes by default: Nginx, Grafana, Prometheus, Alertmanager, NTP, DNS Nameserver, and DCS.
Reuse Meta Node
The meta node can also be reused as a common node, and a PostgreSQL cluster named pg-meta is created by default on the meta. Supporting additional features: CMDB, routine tasks report, extended apps, log analysis & data analysis, etc.
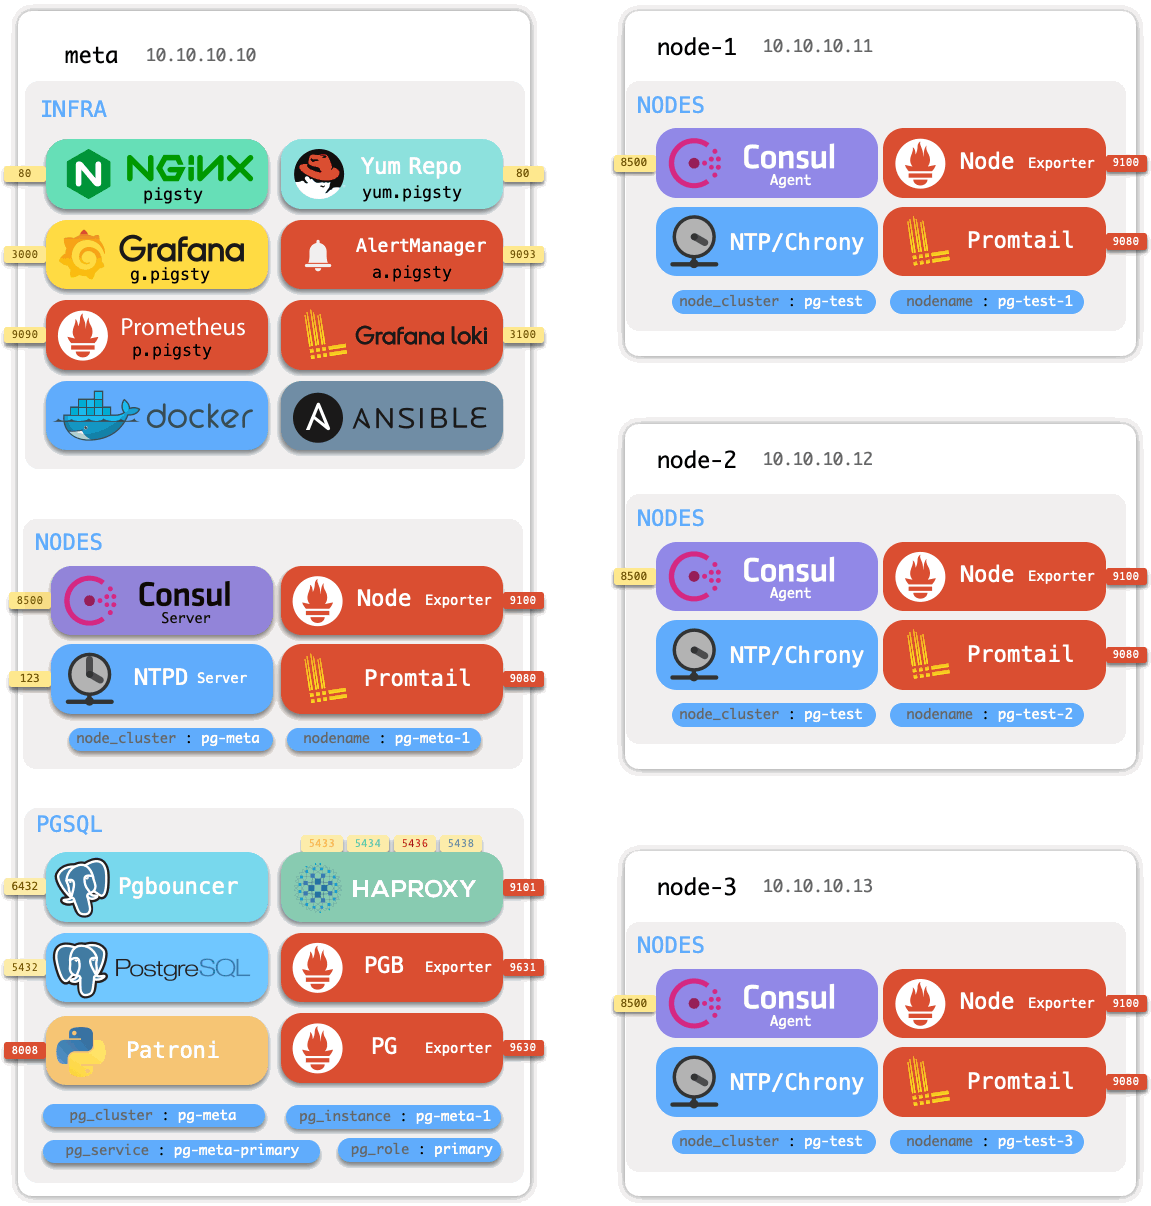
Taking Pigsty Sandbox as an example, the distribution of components on the nodes is shown below.
The sandbox consists of a meta node with 4 nodes. The sandbox is deployed with one set of infra and 2 database clusters. meta is the meta node, deployed with infra and reused as a regular node, deployed with meta DB cluster pg-meta. node-1, node-2, and node-3 are normal nodes deployed with cluster pg-test.
Meta Node Service
The services running on the meta node are shown below.
| Component | Port | Description | Default Domain |
|---|---|---|---|
| Nginx | 80 | Web Service Portal | pigsty |
| Yum | 80 | LocalYum Repo | yum.pigsty |
| Grafana | 3000 | Monitoring Dashboards/Visualization Platform | g.pigsty |
| AlertManager | 9093 | Alert aggregation & notification service | a.pigsty |
| Prometheus | 9090 | Monitoring Time-Series Database | p.pigsty |
| Loki | 3100 | Logging Database | l.pigsty |
| Consul (Server) | 8500 | Distributed Configuration Management and Service Discovery | c.pigsty |
| Docker | 2375 | Container Platform | - |
| PostgreSQL | 5432 | Pigsty CMDB | - |
| lAnsible | - | Controller | - |
| Consul DNS | 8600 | DNS Service Discovery powered by Consul | - |
| Dnsmasq | 53 | DNS Name Server(Optional) | - |
| NTP | 123 | NTP Time Server(Optional) | - |
| Pgbouncer | 6432 | Pgbouncer Connection Pooling Service | - |
| Patroni | 8008 | Patroni HA Component | - |
| Haproxy Primary | 5433 | Primary Pooling: Read/Write Service | - |
| Haproxy Replica | 5434 | Replica Pooling: Read-Only Service | - |
| Haproxy Default | 5436 | Primary Direct Connect Service | - |
| Haproxy Offline | 5438 | Offline Direct Connect: Offline Read Service | - |
| Haproxy Admin | 9101 | HAProxy admin & metrics | - |
| PG Exporter | 9630 | PG Monitoring Metrics Exporter | - |
| PGBouncer Exporter | 9631 | PGBouncer Monitoring Metrics Exporter | - |
| Node Exporter | 9100 | Node monitoring metrics | - |
| Promtail | 9080 | Logger agent | - |
| vip-manager | - | Bind VIP to the primary |
Meta Node & DCS
By default, DCS Servers (Consul or Etcd) will be deployed on the meta nodes, or you can use External DCS Cluster. Any infra outside DCS will be deployed on the meta node as a peer-to-peer copy. The number of meta nodes requires a minimum of 1, recommends 3, and recommends no more than 5.
DCS Servers are used for leader election in HA Scenarios. Shutting down the DCS servers will demote ALL clusters, which reject any writes by default! So make sure you have enough availability on these DCS Servers, at least stronger than PostgreSQL itself. It’s recommended to add more meta nodes or use an external independently maintained, HA DCS cluster for production-grade deployment.
Multiple Meta Nodes
Usually, one meta node is sufficient for basic usage, two meta nodes can be used as standby backup, and 3 meta nodes can support a minimal meaningful production-grade DCS Servers themselves!
Pigsty will set DCS Servers on all meta nodes by default for the sake of “Battery-Included”. But it’s meaningless to have more than 3 meta nodes. If you are seeking HA DCS Servies. Using an external DCS Cluster with 3~5 nodes would be more appropriate.
Meta nodes are configured under all.children.meta.host in the inventory. They will be marked with meta_node: true flag. The node runs configure will be marked as meta, and multiple meta nodes have to be configured manually, check pigsty-dcs3.yml for example.
If you are not using any external DCS as an arbiter. It requires at least 3 nodes to form a meaningful HA Cluster that allows one node failure.
Node
You can manage more nodes with Pigsty, and use them to deploy various databases or your applications.
The nodes managed by Pigsty are adjusted by nodes.yml to the state described by Config: NODES, and the node monitoring and log collection components are installed so you can check the node status and logs from the monitoring system.
Node Identity
Each node has identity parameters that are configured by parameters in <cluster>.hosts and <cluster>.vars.
There are two important node identity parameters: nodename and node_cluster, which will be used as the node’s instance identity (ins) and cluster identity (cls) in the monitoring system. nodename and node_cluster are NOT REQUIRED since they all have proper default values: Hostname and constant nodes.
Besides, Pigsty uses an IP address as a unique node identifier, too. Which is the inventory_hostname reflected as the key in the <cluster>.hosts object. A node may have multiple interfaces & IP addresses. But you must explicitly designate one as the PRIMARY IP ADDRESS. Which should be an intranet IP for service access. It’s not mandatory to use that same IP address to ssh from the meta node, you can use ssh tunnel & jump server with Ansible Connect parameters.
| Name | Type | Level | Attribute | Description |
|---|---|---|---|---|
inventory_hostname |
ip |
- | REQUIRED | Node IP |
nodename |
string |
I | Optional | Node Name |
node_cluster |
string |
C | Optional | Node Cluster Name |
The following cluster configuration declares a three-node cluster.
| host | node_cluster | nodename | instance |
|---|---|---|---|
10.10.10.11 |
node-test |
node-test-1 |
pg-test-1 |
10.10.10.12 |
node-test |
pg-test-2 |
pg-test-2 |
10.10.10.13 |
node-test |
node-3 |
pg-test-3 |
IIn the monitoring system, the time-series monitoring data are labeled as follows.
Node Services
| Component | Port | Description |
|---|---|---|
| Consul Agent | 8500 | Distributed Configuration Management and Service Discovery |
| Node Exporter | 9100 | Node Monitoring Metrics Exporter |
| Promtail | 9080 | Collection of Postgres, Pgbouncer, Patroni logs (Optional) |
| Consul DNS | 8600 | DNS Service |
PGSQL Node
A PGSQL Node is a node with a PGSQL module installed.
Pigsty uses exclusively deploy policy for PGSQL. This means the node’s identity and pgsql’s identity are exchangeable. The pg_hostname parameter is designed to assign the Postgres identity to its underlying node: pg_instance and pg_cluster will be assigned to the node’s nodename & node_cluster.
In addition to node default services, the following services are available on PGSQL nodes.
| Component | Port | Description |
|---|---|---|
| Postgres | 5432 | Pigsty CMDB |
| Pgbouncer | 6432 | Pgbouncer Connection Pooling Service |
| Patroni | 8008 | Patroni HA Component |
| Consul | 8500 | Distributed Configuration Management and Service Discovery |
| Haproxy Primary | 5433 | Primary connection pool: Read/Write Service |
| Haproxy Replica | 5434 | Replica connection pool: Read-only Service |
| Haproxy Default | 5436 | Primary Direct Connect Service |
| Haproxy Offline | 5438 | Offline Direct Connect: Offline Read Service |
Haproxy service |
543x | Customized Services |
| Haproxy Admin | 9101 | Monitoring metrics and traffic management |
| PG Exporter | 9630 | PG Monitoring Metrics Exporter |
| PGBouncer Exporter | 9631 | PGBouncer Monitoring Metrics Exporter |
| Node Exporter | 9100 | Node Monitoring Metrics Exporter |
| Promtail | 9080 | Collection of Postgres, Pgbouncer, Patroni logs (Optional) |
| Consul DNS | 8600 | DNS Service |
| vip-manager | - | Bind VIP to the primary |
Node Interaction
Here’s an example of interactions between a meta node & a common node.
The interaction between the meta node and common nodes are:
- Database cluster/node domain name resolved by Nameserver on meta node. (optional)
- Database node software installation will use Yum Repo on meta.
- Prometheus collects database cluster/node monitoring metrics on meta.
- Database logs are collected by Promtail and sent to Loki.
- Pigsty will control database nodes from the meta node:
- Cluster creation, scale in / scale out, instance/cluster recycling
- Creating business users & databases, modifying services routes & HBA rules.
- Log collection, vacuum analyze, backup, and other routine tasks, etc.
- Node’s Consul will sync locally registered services to the DCS Servers.
- The database node will synchronize time from the meta node (or other NTP server).
9 - Concept: PGSQL
This article introduces the core concepts required for PostgreSQL cluster management.
- PGSQL Cluster / ER Model / Identity Parameter
- Cluster / Instance / Node / Service
- PostgreSQL HA
- Deploy: PGSQL |Config: PGSQL | Playbook: PGSQL | Custom: PGSQL
- PGSQL Service and PGSQL Access
- PGSQL Privilege and PGSQL Authentication
- PGSQL Users and PGSQL Database
PGSQL Cluster
PGSQL for production environments is organized in clusters, which clusters are logical entities consisting of a set of database instances associated by primary-replica. Each database cluster is a self-organizing business service unit consisting of at least one database instance.
Sandbox
Clusters are the basic business service units, and the following diagram shows the replication topology in a sandbox where pg-meta-1 constitutes a database cluster pg-meta. In contrast, pg-test-1, pg-test-2, and pg-test-3 form another logical cluster pg-test.
High-Availability
Primary Failure RTO ≈ 30s~1min, RPO < 10MB, Replica Failure RTO≈0 (reset current conn)
Pigsty creates a HA PostgreSQL cluster by default. Pigsty can automatic failover, and read-only business traffic is not affected; the impact of reading and write traffic depends on the specific configuration and load, usually in a few seconds to tens of seconds.
By default, Pigsty deploys clusters in availability first mode. When the primary goes down, data not replicated to the replica part may be lost (generally about a few hundred KB, no more than 10 MB); you can refer to Sync Standby and use consistency first mode, RPO = 0 in this mode.
Pigsty’s HA is achieved using Patroni + HAProxy, with the former failing over and the latter switching over traffic.
Patroni uses DCS service for heartbeat preservation, and the primary will register a 15-second lease by default and renew it periodically. When the primary fails to renew the lease, the lease is released, and a new primary election round is triggered. Usually, the one with the lowest delay is elected as the new primary. The cluster enters a new timeline, and all other clusters, including the old primary, re-follow the new primary.
HAProxy automatically detects the state of the instances and distributes the traffic correctly. Haproxy is stateless and deployed uniformly on each node/instance. All HAProxy can act as service access for the cluster. For example, the Primary service on port 5433 will use HTTP GET ip:8008/primary health check to get information from all Patroni in the cluster, find out the primary, and distribute traffic to the primary.
Interaction
On a singleton node/instance, the components work with each other through the following connections.
- vip-manager gets the primary information by querying the Consul and binds the cluster-specific L2 VIP to the primary (default sandbox access).
- Haproxy is the database traffic portal for exposing services, with different ports (543x) distinguishing between different services.
- Haproxy port 9101 exposes Haproxy monitoring metrics and provides Admin interface traffic control.
- Haproxy port 5433 defaults point to primary connection pool port 6432
- Haproxy port 5434 defaults point to replica connection pool port 6432
- Haproxy port 5436 defaults point to primary 5432 port.
- Haproxy port 5438 defaults point to offline 5432 port.
- Pgbouncer is used for pooling database connections, buffering failures, and exposing additional metrics.
- Production services (HF non-interactive, 5433/5434) must be accessed via Pgbouncer.
- Directly connected services (management and ETL, 5436/5438) must be directly connected, bypassing Pgbouncer.
- Postgres provides database services that form a primary-replica cluster via streaming replication.
- Patroni oversees the Postgres service, primary-replica election and switchover, health checks, and config management.
- Patroni uses Consul to reach Consensus, the basis for the primary election.
- The Consul Agent is used to issue configs, accept service registrations, service discovery, and provide DNS queries.
- All services that use the port are registered with Consul.
- PGB Exporter, PG Exporter, and Node Exporter are used to expose database, connection pool, and node monitoring metrics.
- Promtail is the log collection component used to send the collected PG, PGB, Patroni, and node logs to the infrastructure Loki.
ER Model
In Pigsty, PostgreSQL has four types of core entities.
- PGSQL Cluster, Hereafter referred to as clusters
- PGSQL Service, Hereafter referred to as services
- PGSQL Instance, Hereafter referred to as instances
- PGSQL Node, Hereafter referred to as nodes
Entities
- Cluster is the basic autonomous unit, uniquely identified by user designation, expressing business meaning, and serving as a top-level namespace.
- The clusters contain a series of Nodes at the hardware level, i.e., physical machines and VMs (or Pods) that IP can uniquely identify.
- The cluster contains a series of Instances at the software level, i.e., software servers, which can be uniquely identified by IP: Port.
- The cluster contains a series of Services at the service level, i.e., accessible domains and ports that can be uniquely identified by domains.
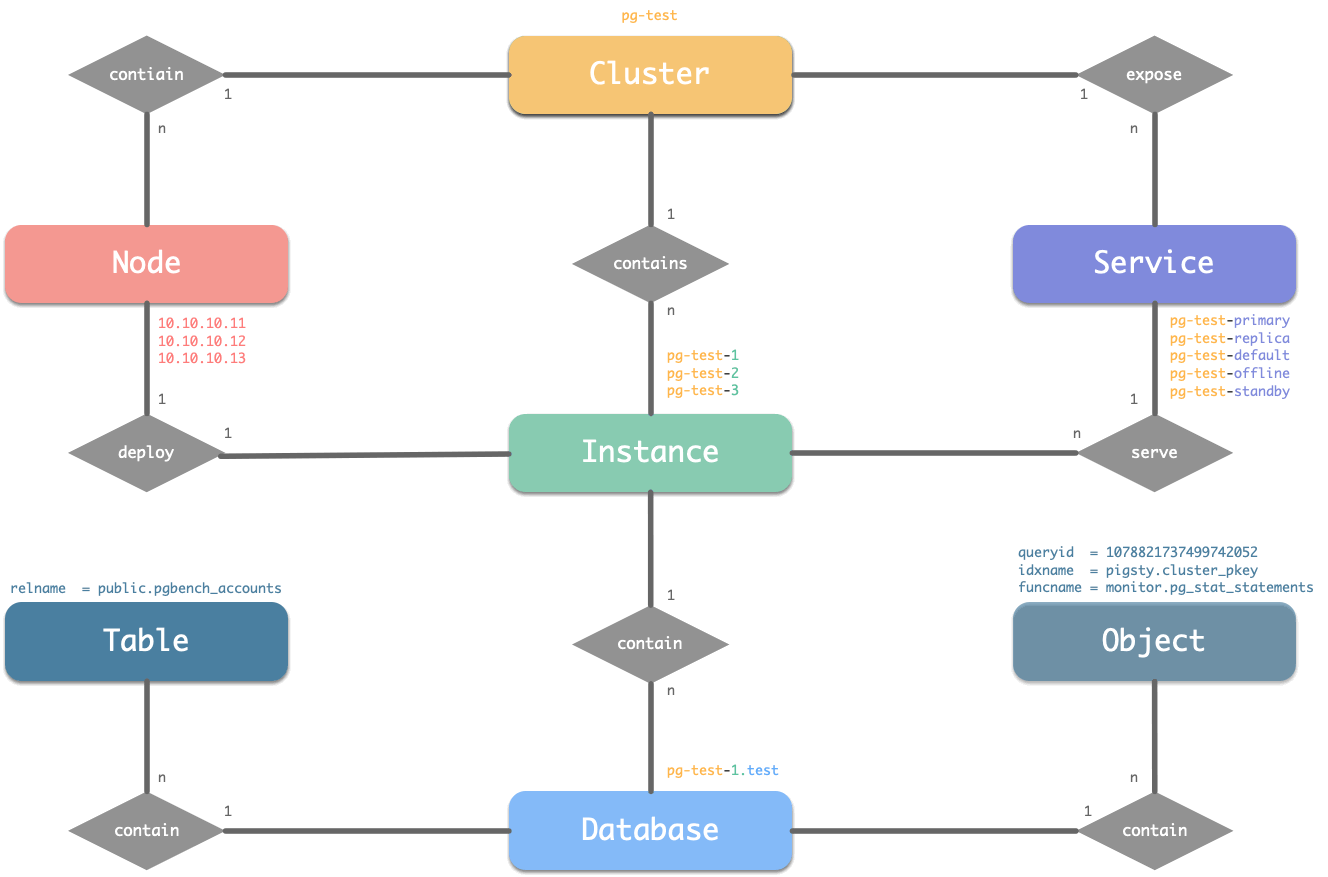
Naming Pattern
- Cluster naming can use any name that satisfies the DNS domain name specification, not with a dot (
[a-zA-Z0-9-]+). - Node naming uses the cluster name as a prefix, followed by
-and an ordinal integer number. - Instance naming can be consistent with the node naming, i.e.,
${cluster}-${seq}. - Service naming also uses the cluster name as the prefix, followed by
-to connect the service specifics, such asprimary,replica,offline,delayed, etc.
Take the test database cluster pg-test for a sandbox as an example.
- One cluster: The database cluster for testing is named
pg-test. - Two roles:
primaryandreplica. - Three instances: The cluster consists of three database instances:
pg-test-1,pg-test-2,pg-test-3. - Three nodes: The cluster is deployed on three nodes:
10.10.10.11,10.10.10.12, and10.10.10.13. - Four services:
- read-write service:
pg-test-primary - read-only service:
pg-test-replica - directly connected management service:
pg-test-default - offline read service:
pg-test-offline
- read-write service:
Identity Parameter
Entities and identities are a conceptual model, and the following describes the implementation in Pigsty.
pg_cluster,pg_role, and pg_seq are identity parameters used to generate entity identities.
In addition to the IP address, these three parameters are the minimum set of parameters necessary to define database clusters.
- Cluster Identity:
pg_cluster:{{ pg_cluster }} - Instance Identity:
pg_instance:{{ pg_cluster }}-{{ pg_seq }} - Service Identity:
pg_service:{{ pg_cluster }}-{{ pg_role }} - Node Identity:
nodename:pg_hostname: true: Use the same aspg_instance:{{ pg_cluster }}-{{ pg_seq }}pg_hostname: false: Explicitly specifying{{ nodename }}is used directly. Otherwise, the existing hostname is used.
The following is a sample definition of a pg-test cluster in a sandbox.
The three members of the cluster are identified as follows.
| host | cluster | instance | service | nodename |
|---|---|---|---|---|
10.10.10.11 |
pg-test |
pg-test-1 |
pg-test-primary |
pg-test-1 |
10.10.10.12 |
pg-test |
pg-test-2 |
pg-test-replica |
pg-test-2 |
10.10.10.13 |
pg-test |
pg-test-3 |
pg-test-replica |
pg-test-3 |
In the monitoring system, the monitoring time series data is labeled as:
Cluster
A cluster is the basic autonomous business unit, which means that the cluster can provide services as a whole. Note that cluster here is a software-level concept, not to be confused with PG Cluster (database set cluster, i.e., a data directory containing multiple PGs of a singleton) or Node Cluster (machine cluster).
A cluster is one of the basic management units, and an organizational unit is used to unify various sources. A PG cluster may include.
- Three physical machine nodes
- One primary instance provides database read and writes services to.
- Two replica instances provide read-only copies of the database.
- Two exposed services: read-write service, and read-only copy service.
Cluster Naming Pattern
Each cluster has a unique identity. In this case, a database cluster named pg-test is defined.
The cluster name is similar to the role of a namespace. All sources belonging to this cluster will use this namespace.
The cluster identity (cls) must be unique within a set of environments, and naming patterns that conform to the DNS standard RFC1034 is recommended.
A good cluster name should use only lowercase letters, numbers, and the hyphen -and use letter starters.
Cluster naming should not include the dot. A popular naming pattern uses dot-separated hierarchical identities, such as com.foo.bar. This naming is simple, but the number of domain hierarchies is not controllable. The most intuitive example is Pods in Kubernetes, where Pod naming patterns do not allow.
Connotation of cluster naming is recommended by-separated two-paragraph and three-paragraph names.
Typical cluster names include: pg-meta, pg-test-fin, pg-infrastructure-biz.
Instance
An instance refers to a specific database server, which can be a single process, a group of processes, or several associated containers within a Pod. The critical elements of an instance are.
- Can be uniquely identified by the instance identity (
ins). - Can handle requests (regardless of whether the request is received from a database, a connection pool, or a load balancer).
Instance Naming Pattern
Instances belong to clusters, and each instance has its unique identity within the cluster. The instance identity ins is recommended to use a naming pattern consistent with Kubernetes Pods: i.e., cluster name linked to an ordinal integer number in increments from 0/1 <cls>-<seq>.
Pigsty names the database instances in a cluster by default, increasing order starting from 1. For example, the database cluster pg-test has three database instances: pg-test-1, pg-test-2, and pg-test-3.
Once the instance name ins is assigned immutable, the instance will be used for the entire lifetime of the cluster.
In addition, with a singleton deployment, the database instance and the machine node can use each other’s identities.
Node
A Node is an abstraction of a hardware resource, usually referring to a working machine, whether a physical machine (bare metal), a VM or a Pod in Kubernetes.
Note that Node in Kubernetes is an abstraction of hardware sources, but in reality, the concept of Node is similar to the concept of Pod in Kubernetes.
The key features of a Node are.
- Nodes are abstractions of hardware sources that can run software services and deploy database instances.
- Nodes can use IP as unique identities.
Node Naming Pattern
Pigsty uses ip as the node’s unique identity. If the machine has more than one IP, the actual access IP specified in the inventory will prevail. The hostname nodename, database instance identity ins, and node identity ip correspond to each other in Pigsty and can be cross-used as identities for database instances, machine nodes, and HAProxy load balancers.
The node naming is consistent with the database instance and remains the same throughout the cluster’s life.
Service
A service is a named abstraction of a software service (e.g., Postgres, Redis). Services have various implementations, but the key elements are:
- An addressable and accessible service name for providing access:
- A DNS domain name (
pg-test-primary) - An Nginx/Haproxy Port
- A DNS domain name (
- Service traffic routing and load balancing mechanism for deciding which instance handles requests:
- DNS L7: DNS resolution records
- HTTP Proxy: Nginx/Ingress L7: Nginx Upstream Config
- TCP Proxy: Haproxy L4: Haproxy Backend Config
- Kubernetes: Ingress: Pod Selector.
- The service also needs to decide which component will handle the request: the connection pool, or the database itself.
For more information about services, see the chapter Services.
Service Naming Pattern
The service identity (svc) consists of cls as a namespace and (role) as the service bearer.
In a PostgreSQL cluster, instances have different identities: primary, replica, standby, offline, and delayed. Different instances will provide different services; direct connection to the database and access to the database through connection pools are services of varying nature. It is common to use the role of the service target to identify the service, e.g., in the database cluster pg-test.
- A service that points to the primary connection pool (primary) role instance is called
pg-test-primary. - A service that points to a replica connection pool (
replica) role is calledpg-test-replica. - A service that points to an (
offline) is calledpg-test-offline. - A service that points to a (
standby) is calledpg-test-standby.
Note that services are not enough to divide pairs of instances. The same service can point to multiple instances. However, the same instance can also handle requests from different services.
10 - Concept: Redis
This article introduces the core concepts required for Redis cluster management.
Deploy: Redis |Config: Redis | Playbook: Redis
ER Model
The Redis entity concept model is almost identical to PostgreSQL and includes the Cluster and Instance. Note that Cluster here does not refer to the clusters in Redis’ native clusters.
The core difference is that Redis typically uses multiple singleton instances, with multiple Redis instances typically deployed on a single physical/VM to take advantage of multi-core CPUs.
In Pigsty-managed Redis, it is not yet possible to deploy two Redis instances from different clusters on a node, but this does not affect the deployment of multiple independent Redis instances on a node.
Redis Identity
The identity parameters are the information that must be provided when defining a Redis cluster.
| Name | Attribute | Description | Example |
|---|---|---|---|
redis_cluster |
MUST, cluster level | cluster name | redis-test |
redis_node |
MUST,node level | Node Number | 1,2 |
redis_instances |
MUST,node level | Instance Definition | { 6001 : {} ,6002 : {}} |
redis_cluster: Identifies the Redis cluster name, configured at the cluster level, as the top-level namespace for cluster sources.redis_node: Identifies the number of the node in the cluster.redis_instances: A JSON object with the Key as the instance port and the Value as a JSON object containing the instance-specific configuration.
11 - PGSQL Service & Access
Defining PostgreSQL service and achieving stable, reliable, and HA access through LB and connection pooling.
The concepts of Service and Access are proposed for HA PostgreSQL clusters.
Personal User
After completing the singleton deployment, port 5432 of this node provides PostgreSQL services, and port 80 provides UI class services.
On the current meta node, executing psql with no parameters using the admin user can connect directly to the local pre-defined meta database.
When accessing PG from the host using the client tool, you can use the URL.
You can use the admin user specified by pg_admin_username and pg_admin_password or a business user (dbuser_meta) pre-defined in the meta database to access this database.
When using a HA database cluster deployed with Pigsty, it is not recommended to access the database service using IP direct connection.
Service
Service in the form of functionality that a database cluster provides.
In a production env, a replication-based primary-replica database cluster is used. There is one and only one primary in the cluster that can accept writes, while the other replicas will continuously get logs from the primary to keep up with it. Also, replicas can host read-only requests.
In addition, for production envs with short high-frequency connections, we also pool requests via Pgbouncer to reduce connection creation overhead. However, in ETL and change execution scenarios, we need to bypass the connection pool and access the database directly.
In addition, HA clusters have a failover feature that causes changes to the cluster’s primary. HA clustering solutions, therefore, require that write traffic can automatically adapt to changes in the cluster’s primary.
These different access requirements (read/write separation, pooling, and direct connection, failover auto-adaptation) are eventually abstracted into the concept of Service.
In general, a database cluster must provide a service.
- read-write service (primary): can write to the database
For a production database cluster, at least two services should be provided.
-
read-write service (primary): can write to the database
-
read-only service (replica): access to the replica
There may be other services.
- offline: For ETL and personal queries.
- standby: Read-only service with synchronous commit and no replication delay.
- delayed: Allows to access old data before a fixed time interval.
- default: Service that allows admin users to manage the database directly, bypassing the connection pool.
Default Services
Pigsty provides four services by default: primary, replica, default, and offline.
New services can be defined for global or individual clusters via config files.
| service | port | purpose | description |
|---|---|---|---|
| primary | 5433 | production read/write | connect to primary via connection pool |
| replica | 5434 | production read-only | connection to replica via connection pool |
| default | 5436 | management | direct connection to primary |
| offline | 5438 | ETL/personal user | direct connection to offline |
Take the meta DB pg-meta as an example:
These four services are described in detail below.
Primary Service
The Primary service is used for online production read and write access, and it maps the cluster’s port 5433 to the primary connection pool (default 6432) port.
The Primary service selects all instances in the cluster as members, but only the primary can take on traffic because there is one and only one instance /primary with a true health check.
The HA component Patroni on the primary returns 200 against the Primary health check and is used to ensure that the cluster does not have another primary.
When the cluster fails over, the health check is true for the new primary and false for the old one, so traffic is migrated to the new primary. The business side will notice about 30 seconds of Primary service unavailability time.
Replica Service
The Replica service is used to online produce read-only access, and it maps the cluster’s port 5434, to the replica connection pool (default 6432) port.
The Replica service selects all instances in the cluster as members, but only those with an accurate health check /read-only can take on traffic, and that health check returns success for all instances that can take on read-only traffic.
By default, only replicas carry read-only requests, and the Replica service defines selector_backup, a selector that adds the cluster’s primary as a backup instance to the Replica service. The primary will only start taking read-only traffic when all replicas are down.
Another role as a backup instance is offline, which is usually dedicated to OLAP/ETL/personal queries and is not suitable for mixing with online queries, so offline is only used to take on read-only traffic when all replicas are down.
Default Service
The Default service is used for online primary direct connections, which map the cluster’s port 5436 to the primary Postgres (default 5432) port.
Default service targets interactive read and writes access, including executing admin commands, performing DDL changes, connecting to the primary to perform DML, and performing CDC. Default service forwards traffic directly to Postgres, bypassing Pgbouncer.
The Default service is similar to the Primary service, using the same config entry.
Offline Service
Offline service is used for offline access and personal queries. It maps the cluster’s 5438 port, to the offline Postgres (default 5432) port.
The Offline service targets interactive read-only access, including ETL, offline analytics queries, and individual user queries. Offline service also forwards traffic directly to Postgres, bypassing Pgbouncer.
Offline instances are those where pg_role is offline or tagged with pg_offline_query. The other replica outside the Offline will act as a backup instance for Offline and will still be able to get services from other replicas when the Offline is down.
User-Defined Service
In addition to the default services configured by pg_services above, users can define additional services for the PostgreSQL cluster in the pg_services_extra config entry.
A cluster can define multiple services, each containing any number of cluster members, distinguished by port. The following code defines a new service standby that uses port 5435 to provide sync read functionality. This service will read from standby (or primary) in the cluster, thus ensuring that all reads are done without latency.
Required
-
Name (
service.name).The full name of the service is prefixed by the database cluster name and suffixed by
service.name, connected by-. -
Port (
service.port).In Pigsty, services are exposed as NodePort by default, so the port is mandatory. However, if you use an LB service access scheme, you can also differentiate the services in other ways.
-
selector (
service.selector).The selector specifies the instance members of the service, in the form of JMESPath, filtering variables from all cluster instances. The default
[]selector picks all cluster members.
Optional
-
backup selector (
service.selector).The backup selector selects or marks the list of instances for service backup, i.e., the backup instance takes over the service only when all other members of the cluster fail.
-
source_ip (
service.src_ip).Indicates the IP used externally by the service. The default is
*, which is all IP on the localhost. Usingvipwill use thevip_addressvariable to take the value, or you can also fill in the specific IP supported by the NIC. -
Host port (
service.dst_port).Indicates which port the service’s traffic will be directed to on the target instance.
postgreswill point to the port the database is listening on,pgbouncerwill point to the port the connection pool is listening on, or you can fill in a fixed port. -
health check method (
service.check_method):How does the service check the health status of the instance? Currently, only HTTP is supported.
-
Health check port (
service.check_port):Which port does the service check the instance on to get the health status of the instance?
patroniwill get it from Patroni (default 8008),pg_exporterwill get it from PG Exporter (default 9630), or the user can fill in a custom port. -
Health check path (
service.check_url):The URL PATH is used by the service to perform HTTP checks.
/is used by default for health checks, and PG Exporter and Patroni provide a variety of health check methods that can be used to differentiate between primary and replica traffic. For example,/primarywill only return success for the primary, and/replicawill only return success for the replica./read-only, on the other hand, will return success for any instance that supports read-only (including the primary). -
health check code (
service.check_code):The code expected for HTTP health checks, default, is 200.
-
Haproxy-specific configuration (
service.haproxy) :Proprietary config entries about the service provisioning software (HAProxy).
Service Implementation
Pigsty currently uses HAProxy-based service implementation by default and provides a sample implementation based on Layer 4 LB (L4VIP). For details, please refer to the section access.
Access
Access is designed to address high concurrency, HA, and high performance in production envs. Individual users can choose to ignore the access method and access the database directly via IP.
Access default database via
postgres://dbuser_dba:[email protected]:5432/meta(replace IP & password)
In Pigsty’s default config, a fully functional LB(HAProxy) is deployed on each database instance/node, so that any instance can serve as an access point for the entire cluster. The delivery boundary of a Pigsty cluster stops at the access layer LB(HAProxy); it is up to you to decide Access Policy: how to distribute business traffic to one, multiple, or all load balancing instances.
Pigsty provides a rich set of access methods. The Pigsty sandbox uses an L2 VIP bound to the primary and a domain name attached to that VIP as a sample. The application accesses the load-balancing instance on the primary through the L2 VIP via the domain name. When this node becomes unavailable, the VIP is transferred with the primary, and the traffic is carried by the LB on the new primary, as shown in the following figure.
Another classic policy is to use DNS polling to resolve DNS domain names to all instances, and several common access patterns will be given in this article.
User Interface
The interface that Pigsty ultimately delivers to the user is a database connection string.
The formal difference between the different access methods is the difference between host and port in the connection string.
Port
Pigsty uses different ports to distinguish between database services, which provide Postgres equivalent services, as follows
| port | service | type | description |
|---|---|---|---|
| 5432 | postgres | database | Direct access to the current node database |
| 6432 | pgbouncer | connection pool | Accessing the current node database through a connection pool |
| 5433 | primary | service | Load-balancing and accessing the primary through a connection pool |
| 5434 | replica | service | Load-balancing and accessing the primary through a connection pool |
| 5436 | default | service | Direct access to the primary via load balancing |
| 5438 | offline | service | Direct access to the offline via load balancing |
Host
| type | sample | description |
|---|---|---|
| Cluster domain name | pg-test |
Direct access to the current node database |
| Cluster VIP | 10.10.10.3 |
Access the current node database through a connection pool |
| Instance-specific domain name | pg-test-1 |
Load-balancing and accessing the primary through a connection pool |
| Instance-specific IP | 10.10.10.11 |
Load-balancing and accessing the primary through a connection pool |
| All IP | 10.10,10.11,10.12 |
Use Multihost feature |
Depending on the contents of the host section and the available port, multiple connection strings can be combined.
Available Combinations
The following connection strings are available for the test database on the cluster pg-test in a singleton sandbox.
Available Combinations
At the cluster level, users can access the four default services provided by the cluster via cluster domain + service port. Users can also bypass the domain name and access the database cluster directly using the cluster’s VIP (L2 or L4).
At the instance level, users can connect directly to Postgres via the node IP/domain name + port 5432 or port 6432 to access the database via Pgbouncer. Services provided by the cluster to which the instance belongs can also be accessed via Haproxy via 5433~543x.
Access Method
Pigsty recommends using a Haproxy-based access solution (1/2) or, in production envs with infra support, an L4VIP (or equivalent load balancing service) based access solution (3).
| Serial Number | Solution | Description |
|---|---|---|
| 1 | L2VIP + Haproxy | Standard access policy, using L2 VIP to ensure HA of Haproxy |
| 2 | DNS + Haproxy | Standard HA access policy, no single node of system. |
| 3 | L4VIP + Haproxy | A variant of Method 2, using L4 VIP to ensure Haprxoy is HA. |
| 4 | L4 VIP | Large-scale high-performance production envs DPVS L4 VIP access is recommended |
| 5 | Consul DNS | Use Consul DNS for service discovery, bypassing VIPs and Haproxy |
| 6 | Static DNS | Traditional static DNS Access |
| 7 | IP | Using Smart Client Access |
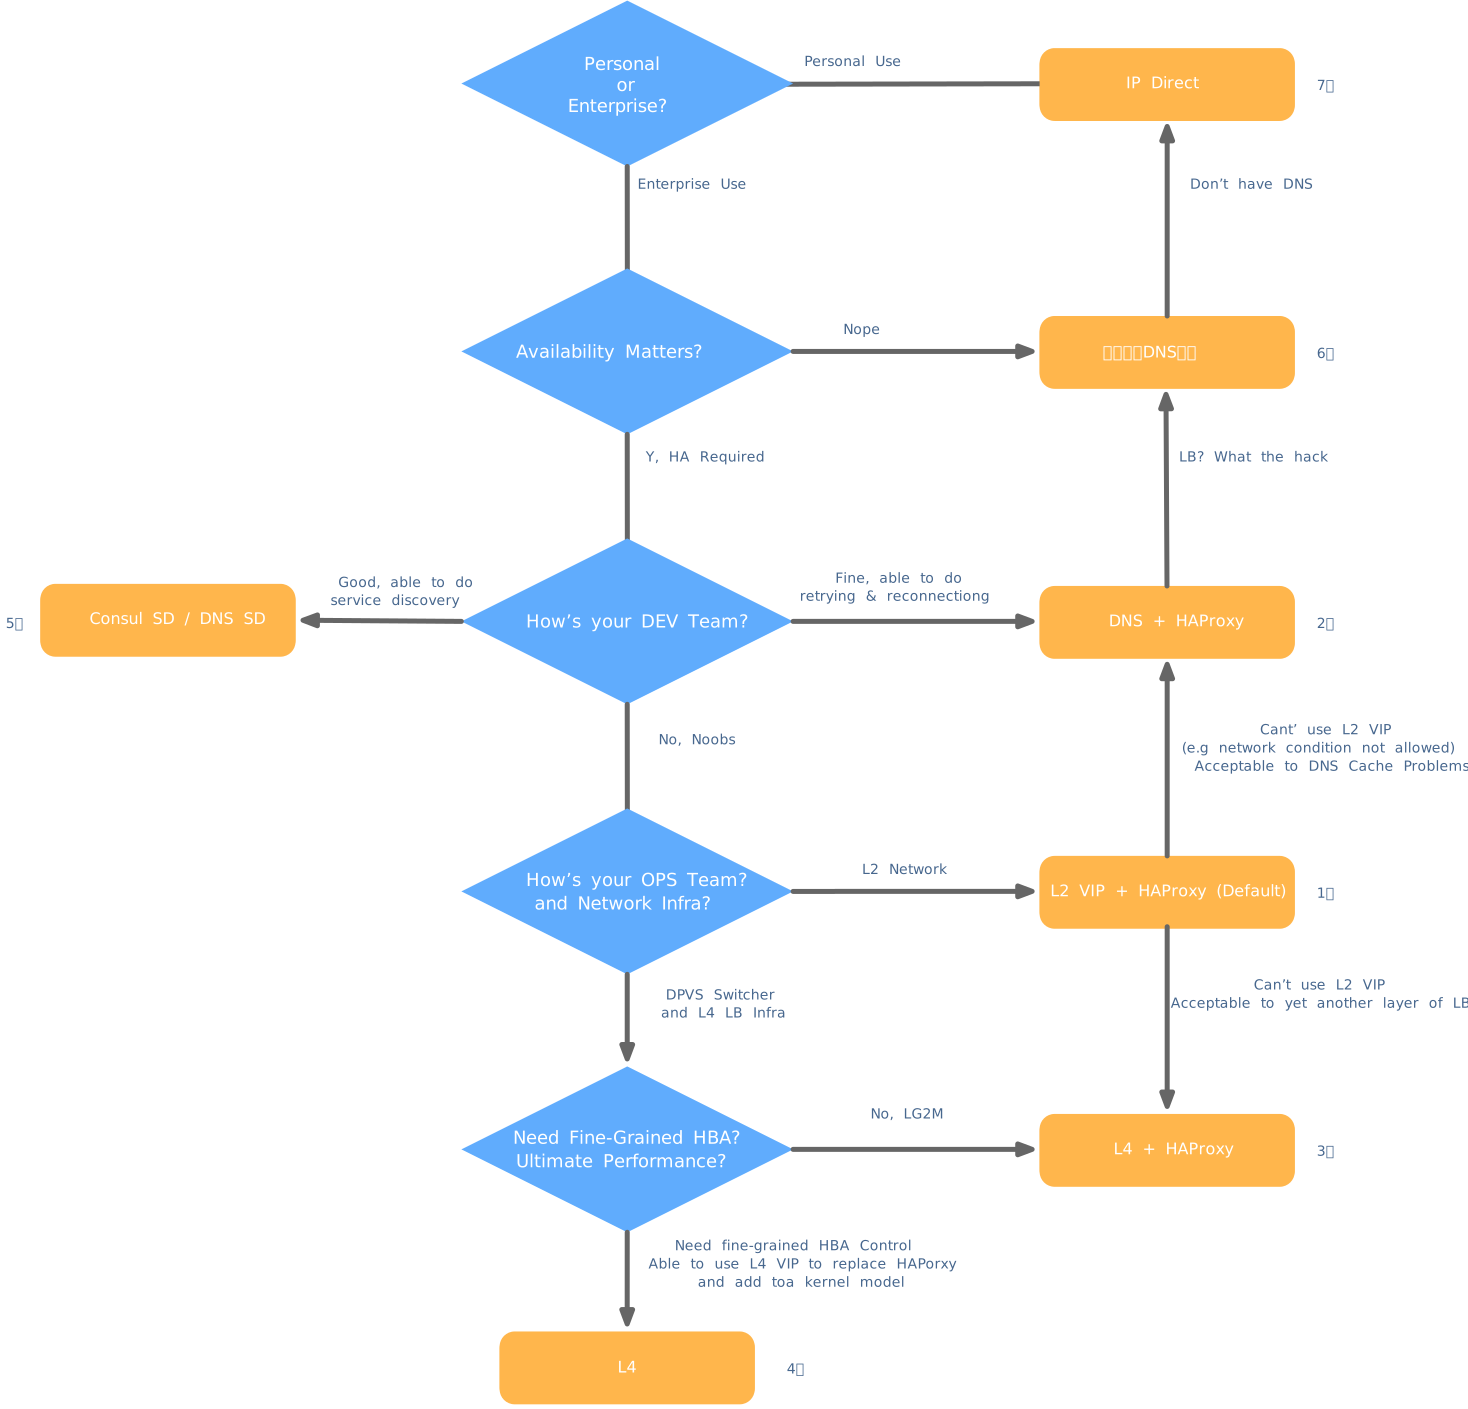
L2 VIP + Haproxy
Solution Description
The standard access method for Pigsty sandboxes uses a single domain name bound to a single L2 VIP, which points to the HAProxy.
The Haproxy uses Node Port to expose service in a unified way. Each Haproxy is an idempotent instance, providing complete load balancing and service distribution. Haproxy is deployed on each database node so that each member of the entire cluster is idempotent.
The availability of Haproxy is achieved through idempotent replicas. Each Haproxy can be used as an access portal, and users can use one, two, or more Haproxy instances, each providing exactly functionality.
Each cluster is assigned one L2 VIP, which is fixedly bound to the primary. When a switchover of the primary occurs, that L2 VIP is moved to the new primary with it. This is achieved through vip-manager: vip-manager will query Consul to get the current primary information, and then listen to the VIP address on the primary.
The L2 VIP of the cluster has a domain name corresponding to it. The domain name is fixed to resolve to that L2 VIP and remains unchanged during the lifecycle.
Solution Superiority
-
No single point, HA
-
VIP fixed binding to the primary, can be flexible access.
Solution limitations
-
One more hop
-
A client’s IP is lost, and some HBA policies cannot take effect normally.
-
All candidate primary must be located in the same Layer 2 network.
- As an alternative, users can also bypass this restriction by using L4 VIP, but there will be one extra hop compared to L2 VIP.
- As an alternative, users can also choose not to use L2 VIP and use DNS to point directly to HAProxy, but may be affected by client DNS caching.
Schematic of the solution
DNS + Haproxy
Solution Description
Standard HA access method with no single point. A good balance of flexibility, applicability, and performance is achieved.
Haproxy in a cluster uses Node Port to expose service in a unified way. Each Haproxy is idempotent, providing complete load balancing and service distribution. Haproxy is deployed on each database node so that each member of the entire cluster is idempotent.
The availability of Haproxy is achieved through idempotent replicas. Each Haproxy can be used as an access portal, and users can use one, two, or multiple Haproxy instances, each providing precisely the same functionality.
The user needs to ensure that the application can access any healthy Haproxy instances. Users can resolve the DNS domain name of the database cluster to several Haproxy instances and enable DNS polling responses. And the client can choose not to cache DNS or use long connections and implement a mechanism to retry after a failed connection is established. Or refer to Method 2 and ensure HA of Haproxy with other L2/L4 VIPs on the architecture side.
Solution Superiority
-
No single point, HA
-
VIP fixed binding to the primary can be flexible access
Solution limitations
-
One more hop
-
A client’s IP is lost, and some HBA policies can not take effect properly.
-
Haproxy is HA through idempotent replica, DNS polling, and client reconnection.
DNS should have a polling mechanism, clients should use long connections, and a failure retry mechanism should be in place. So that Haproxy failures can be transferred to other Haproxy instances in the cluster.
Schematic of the solution
L4 VIP + Haproxy
Four-layer load balancing + HAProxy access
Solution overview
Another variant of access method 1/2, ensuring HA of Haproxy via L4 VIP.
Solution advantages
- No single point, HA.
- Can use all Haproxy instances simultaneously to carry traffic evenly
- All candidate primary does not need to be located in the same Layer 2 network.
- Can operate a single VIP to complete traffic switching.
Solution limitations
- You can use Method 4: L4 VIP direct access for two more hops, which is more wasteful.
- The client’s IP is lost; part of the HBA policy can not correctly take effect.
L4 VIP
Four-layer load-balanced access
Program Description
Large-scale high-performance production env recommended using L4 VIP access (FullNAT, DPVS).
Solution Superiority
- Good performance and high throughput
- The correct client IP can be obtained through the
toamodule, and HBA can be fully effective.
Solution limitation
- Still one more article.
- We need to rely on external infra, which is complicated to deploy.
- Still lose client IP when the
toakernel module is not enabled. - No Haproxy to mask primary-replica differences, and each node is no longer “idempotent”.
Consul DNS
Consul DNS access
Solution Description
The L2 VIP method is unavailable when all candidate primary must be located on the same Layer 2 network. In this case, DNS resolution can be used instead of L2 VIP
Solution Superiority
- One less hop
Solution Limitations
- Reliance on Consul DNS
- User needs to configure DNS caching policy properly
Static DNS
Static DNS Access
Solution Introduction
Traditional static DNS access method
Advantages of the solution
- One less hop
- Simple implementation
Solution Limitations
- No flexibility
- Prone to traffic loss during primary-replica switching
IP
IP Direct Access
Solution Introduction
Direct database IP access using innovative clients
Solution advantages
- Direct connection to database/connection pool, one less
- No reliance on additional components for primary-replica differentiation, reducing system complexity.
Solution limitations
- Too inflexible, cumbersome to expand and reduce cluster capacity.
12 - PGSQL Authentication and Privilege
PostgreSQL provides a standard access control mechanism: Authentication and Privileges, both of which are based on the Role system.
Role
Pigsty’s default role system contains four default roles and four default users:
| name | attr | roles | desc |
|---|---|---|---|
| dbrole_readonly | Cannot login | role for global readonly access | |
| dbrole_readwrite | Cannot login | dbrole_readonly | role for global read-write access |
| dbrole_offline | Cannot login | role for restricted read-only access (offline instance) | |
| dbrole_admin | Cannot login Bypass RLS |
pg_monitor pg_signal_backend dbrole_readwrite |
role for object creation |
| postgres | Superuser Create role Create DB Replication Bypass RLS |
system superuser | |
| replicator | Replication Bypass RLS |
pg_monitor dbrole_readonly |
system replicator |
| dbuser_monitor | 16 connections | pg_monitor dbrole_readonly |
system monitor user |
| dbuser_dba | Bypass RLS Superuser |
dbrole_admin | system admin user |
Default Roles
Pigsty has four default roles:
- Read-only role (
dbrole_readonly): Has read-only access to all data tables. - Read-write role (
dbrole_readwrite): Has to write access to all data tables, inheritsdbrole_readonly. - Admin role (
dbrole_admin): Can execute DDL changes, inheritsdbrole_readwrite. - Offline role (
dbrole_offline): A special read-only role for executing slow queries/ETL/interactive queries, only allowed access to specific instances.
The definition is shown below.
Common users should not change the name of the default role.
Default Users
Pigsty has four default users.
- superuser (
postgres), the owner and creator of the database, the same as the OS user. - Replication user (
replicator), the system user used for primary-replica. - Monitor user (
dbuser_monitor), a user used to monitor database and connection pool metrics. - Admin user (
dbuser_dba), the admin user who performs daily operations and database changes.
The definitions are shown below:
In Pigsty, four important default usernames and passwords are controlled and managed by separate parameters.
It is not recommended to set a password or allow remote access for the default superuser postgres, so there is no dedicated dbsu_password option.
If there is such a need, you can set a password for the dbsu in pg_default_roles.
Be sure to change the passwords of all default users.
In addition, users can define cluster-specific business users in pg_users in the same way as pg_default_roles.
It is recommended to remove the dborle_readony role from dbuser_monitor if there is a higher data security requirement. Some of the monitoring system features will not be available.
Authentication
Pigsty uses md5 password authentication by default and provides access control based on the PostgreSQL HBA mechanism.
HBA(Host Based Authentication)can be treated as an IP blocklist and allowlist.
Config: HBA
In Pigsty, the HBA of all instances is generated from the config file, and HBA rules vary depending on the instance’s role (pg_role).
The following variables control pigsty’s HBAs.
pg_hba_rules: Environmentally uniform HBA rulespg_hba_rules_extra: HBA rules for a specific instance or clusterpgbouncer_hba_rules: HBA rules used for connection poolingpgbouncer_hba_rules_extra: HBA rules for a specific instance or cluster connection pooling
Each variable is an array consisting of the following rules.
Role-Based HBA
The HBA rule set with role = common is installed to all instances,(role: primary) are only installed to instances with pg_role = primary.
As a special case, the HBA rule for the role: offline will be installed to instances with pg_role == 'offline' as well as to instances with pg_offline_query == true.
The rendering priority rules for HBA are:
hard_coded_rulesGlobal hard-coded rulespg_hba_rules_extra.commonCluster common rulespg_hba_rules_extra.pg_roleCluster role rulespg_hba_rules.pg_roleGlobal role rulespg_hba_rules.offlineCluster offline rulespg_hba_rules_extra.offlineGlobal offline rulespg_hba_rules.commonGlobal common rules
Default HBA Rules
Under the default config, the primary and replica will use the following HBA rules:
- Superuser access with local OS auth.
- Other users can access it with a password from local.
- Replica users can access via password from the LAN segment.
- Monitor users can access it locally.
- Everyone can access it with a password on the meta node.
- Admin users can access via password from the LAN.
- Everyone can access the intranet with a password.
- Read and write users (production business users) can be accessed locally (Connection Pool).
- On the replica: read-only users (individuals) can access from the local (Connection Pool).
- On instances with
pg_role == 'offline'or withpg_offline_query == true, HBA rules that allow access todbrole_offlinegrouped users are added.
Default HBA rule information
Change HBA Rules
Users can modify and apply the new HBA rules through a playbook after the cluster/instance is created and running.
When the database cluster directory is destroyed and rebuilt, the new copy will have the same HBA rules as the cluster primary. You can use the above command to perform HBA repair for a specific instance.
Pgbouncer HBA
In Pigsty, Pgbouncer also uses HBA for access control. The usage is the same as Postgres HBA:
pgbouncer_hba_rules: HBA rules used by the connection poolpgbouncer_hba_rules_extra: Instance- or cluster-specific connection pooling HBA rules
The default Pgbouncer HBA rules allow password access from local and intranet.
Privilege
Pigsty’s default privilege model is related to the default role. When using the Pigsty access control, all newly created business users should belong to one of the four default roles, which have the privileges shown below:
- All users have access to all schemas.
- Read-only users can read all tables.
- Read-write users can perform DML operations (INSERT, UPDATE, DELETE).
- Admin users can perform DDL change operations (CREATE, USAGE, TRUNCATE, REFERENCES, TRIGGER).
- Offline and read-only users are only allowed to access instances of
pg_role == 'offline'orpg_offline_query = true.
| Owner | Schema | Type | Access privileges |
|---|---|---|---|
| username | schema | postgres=UC/postgres | |
| dbrole_readonly=U/postgres | |||
| dbrole_offline=U/postgres | |||
| dbrole_admin=C/postgres | |||
| username | sequence | postgres=rwU/postgres | |
| dbrole_readonly=r/postgres | |||
| dbrole_readwrite=wU/postgres | |||
| dbrole_offline=r/postgres | |||
| username | table | postgres=arwdDxt/postgres | |
| dbrole_readonly=r/postgres | |||
| dbrole_readwrite=awd/postgres | |||
| dbrole_offline=r/postgres | |||
| dbrole_admin=Dxt/postgres | |||
| username | function | =X/postgres | |
| postgres=X/postgres | |||
| dbrole_readonly=X/postgres | |||
| dbrole_offline=X/postgres |
Privilege Maintenance
PostgreSQL’s ALTER DEFAULT PRIVILEGES ensures default access to database objects.
All objects created by {{ dbsu }}, {{ pg_admin_username }}, {{ dbrole_admin }} will have the default privileges.
PostgreSQL’s ALTER DEFAULT PRIVILEGE only takes effect for “objects created by specific users” objects created by superuser postgres, and dbuser_dba have default privileges. Suppose you want to give business users privileges to execute DDL besides giving the dbrole_admin role to business users. You should also remember that you should first run the following command when executing DDL changes.
Database Privileges
The database has three privileges: CONNECT, CREATE, TEMP, and a special genus OWNERSHIP. The parameter pg_database controls the definition of the database. A complete database definition is shown below:
If the database is not configured with an owner, dbsu will be the default OWNER of the database. Otherwise, it will be the specified user.
All users have the CONNECT privilege to the newly created database; set revokeconn == true if you wish to reclaim this privilege. Only the default user (dbsu|admin|monitor|replicator) with the database’s owner is explicitly given the CONNECT privilege. Also, admin|owner will have GRANT OPTION for the CONNECT privilege and can transfer the CONNECT privilege to others.
If you implement access isolation between different databases, you can create a business user as the owner for each database and set the revokeconn option for all of them.
A sample database for privilege isolation
Create Privilege
Pigsty revokes the PUBLIC user’s privilege to CREATE a new schema under the database for security reasons.
It also revokes the PUBLIC user’s privilege to create new relationships in the PUBLIC schema.
The database superuser and admin user are not subject to this restriction.
Privileges to create objects in the database are independent of whether the user is the database owner or not. It only depends on whether the user was given admin privileges when it was created.
13 - PGSQL Authentication and Privilege
PostgreSQL provides a standard access control mechanism: Authentication and Privileges, both of which are based on the Role system.
Role
Pigsty’s default role system contains four default roles and four default users:
| name | attr | roles | desc |
|---|---|---|---|
| dbrole_readonly | Cannot login | role for global readonly access | |
| dbrole_readwrite | Cannot login | dbrole_readonly | role for global read-write access |
| dbrole_offline | Cannot login | role for restricted read-only access (offline instance) | |
| dbrole_admin | Cannot login Bypass RLS |
pg_monitor pg_signal_backend dbrole_readwrite |
role for object creation |
| postgres | Superuser Create role Create DB Replication Bypass RLS |
system superuser | |
| replicator | Replication Bypass RLS |
pg_monitor dbrole_readonly |
system replicator |
| dbuser_monitor | 16 connections | pg_monitor dbrole_readonly |
system monitor user |
| dbuser_dba | Bypass RLS Superuser |
dbrole_admin | system admin user |
Default Roles
Pigsty has four default roles:
- Read-only role (
dbrole_readonly): Has read-only access to all data tables. - Read-write role (
dbrole_readwrite): Has to write access to all data tables, inheritsdbrole_readonly. - Admin role (
dbrole_admin): Can execute DDL changes, inheritsdbrole_readwrite. - Offline role (
dbrole_offline): A special read-only role for executing slow queries/ETL/interactive queries, only allowed access to specific instances.
The definition is shown below.
Common users should not change the name of the default role.
Default Users
Pigsty has four default users.
- superuser (
postgres), the owner and creator of the database, the same as the OS user. - Replication user (
replicator), the system user used for primary-replica. - Monitor user (
dbuser_monitor), a user used to monitor database and connection pool metrics. - Admin user (
dbuser_dba), the admin user who performs daily operations and database changes.
The definitions are shown below:
In Pigsty, four important default usernames and passwords are controlled and managed by separate parameters.
It is not recommended to set a password or allow remote access for the default superuser postgres, so there is no dedicated dbsu_password option.
If there is such a need, you can set a password for the dbsu in pg_default_roles.
Be sure to change the passwords of all default users.
In addition, users can define cluster-specific business users in pg_users in the same way as pg_default_roles.
It is recommended to remove the dborle_readony role from dbuser_monitor if there is a higher data security requirement. Some of the monitoring system features will not be available.
Authentication
Pigsty uses md5 password authentication by default and provides access control based on the PostgreSQL HBA mechanism.
HBA(Host Based Authentication)can be treated as an IP blocklist and allowlist.
Config: HBA
In Pigsty, the HBA of all instances is generated from the config file, and HBA rules vary depending on the instance’s role (pg_role).
The following variables control pigsty’s HBAs.
pg_hba_rules: Environmentally uniform HBA rulespg_hba_rules_extra: HBA rules for a specific instance or clusterpgbouncer_hba_rules: HBA rules used for connection poolingpgbouncer_hba_rules_extra: HBA rules for a specific instance or cluster connection pooling
Each variable is an array consisting of the following rules.
Role-Based HBA
The HBA rule set with role = common is installed to all instances,(role: primary) are only installed to instances with pg_role = primary.
As a special case, the HBA rule for the role: offline will be installed to instances with pg_role == 'offline' as well as to instances with pg_offline_query == true.
The rendering priority rules for HBA are:
hard_coded_rulesGlobal hard-coded rulespg_hba_rules_extra.commonCluster common rulespg_hba_rules_extra.pg_roleCluster role rulespg_hba_rules.pg_roleGlobal role rulespg_hba_rules.offlineCluster offline rulespg_hba_rules_extra.offlineGlobal offline rulespg_hba_rules.commonGlobal common rules
Default HBA Rules
Under the default config, the primary and replica will use the following HBA rules:
- Superuser access with local OS auth.
- Other users can access it with a password from local.
- Replica users can access via password from the LAN segment.
- Monitor users can access it locally.
- Everyone can access it with a password on the meta node.
- Admin users can access via password from the LAN.
- Everyone can access the intranet with a password.
- Read and write users (production business users) can be accessed locally (Connection Pool).
- On the replica: read-only users (individuals) can access from the local (Connection Pool).
- On instances with
pg_role == 'offline'or withpg_offline_query == true, HBA rules that allow access todbrole_offlinegrouped users are added.
Default HBA rule information
Change HBA Rules
Users can modify and apply the new HBA rules through a playbook after the cluster/instance is created and running.
When the database cluster directory is destroyed and rebuilt, the new copy will have the same HBA rules as the cluster primary. You can use the above command to perform HBA repair for a specific instance.
Pgbouncer HBA
In Pigsty, Pgbouncer also uses HBA for access control. The usage is the same as Postgres HBA:
pgbouncer_hba_rules: HBA rules used by the connection poolpgbouncer_hba_rules_extra: Instance- or cluster-specific connection pooling HBA rules
The default Pgbouncer HBA rules allow password access from local and intranet.
Privilege
Pigsty’s default privilege model is related to the default role. When using the Pigsty access control, all newly created business users should belong to one of the four default roles, which have the privileges shown below:
- All users have access to all schemas.
- Read-only users can read all tables.
- Read-write users can perform DML operations (INSERT, UPDATE, DELETE).
- Admin users can perform DDL change operations (CREATE, USAGE, TRUNCATE, REFERENCES, TRIGGER).
- Offline and read-only users are only allowed to access instances of
pg_role == 'offline'orpg_offline_query = true.
| Owner | Schema | Type | Access privileges |
|---|---|---|---|
| username | schema | postgres=UC/postgres | |
| dbrole_readonly=U/postgres | |||
| dbrole_offline=U/postgres | |||
| dbrole_admin=C/postgres | |||
| username | sequence | postgres=rwU/postgres | |
| dbrole_readonly=r/postgres | |||
| dbrole_readwrite=wU/postgres | |||
| dbrole_offline=r/postgres | |||
| username | table | postgres=arwdDxt/postgres | |
| dbrole_readonly=r/postgres | |||
| dbrole_readwrite=awd/postgres | |||
| dbrole_offline=r/postgres | |||
| dbrole_admin=Dxt/postgres | |||
| username | function | =X/postgres | |
| postgres=X/postgres | |||
| dbrole_readonly=X/postgres | |||
| dbrole_offline=X/postgres |
Privilege Maintenance
PostgreSQL’s ALTER DEFAULT PRIVILEGES ensures default access to database objects.
All objects created by {{ dbsu }}, {{ pg_admin_username }}, {{ dbrole_admin }} will have the default privileges.
PostgreSQL’s ALTER DEFAULT PRIVILEGE only takes effect for “objects created by specific users” objects created by superuser postgres, and dbuser_dba have default privileges. Suppose you want to give business users privileges to execute DDL besides giving the dbrole_admin role to business users. You should also remember that you should first run the following command when executing DDL changes.
Database Privileges
The database has three privileges: CONNECT, CREATE, TEMP, and a special genus OWNERSHIP. The parameter pg_database controls the definition of the database. A complete database definition is shown below:
If the database is not configured with an owner, dbsu will be the default OWNER of the database. Otherwise, it will be the specified user.
All users have the CONNECT privilege to the newly created database; set revokeconn == true if you wish to reclaim this privilege. Only the default user (dbsu|admin|monitor|replicator) with the database’s owner is explicitly given the CONNECT privilege. Also, admin|owner will have GRANT OPTION for the CONNECT privilege and can transfer the CONNECT privilege to others.
If you implement access isolation between different databases, you can create a business user as the owner for each database and set the revokeconn option for all of them.
A sample database for privilege isolation
Create Privilege
Pigsty revokes the PUBLIC user’s privilege to CREATE a new schema under the database for security reasons.
It also revokes the PUBLIC user’s privilege to create new relationships in the PUBLIC schema.
The database superuser and admin user are not subject to this restriction.
Privileges to create objects in the database are independent of whether the user is the database owner or not. It only depends on whether the user was given admin privileges when it was created.
14 - Pigsty Deployment
It takes three steps to deploy Pigsty: Prepare, Configure, Playbook.
Preparation
Before installing Pigsty, you need to prepare the required resources: physical/VM nodes, admin users, and download Pigsty software.
Configuration
After preparation, you need to indicate to Pigsty what infra and database services you need via configure.
- Configure Infra
- Configure Nodes
- Configure PGSQL Cluster / Customize PGSQL Cluster /Deploy PGSQL Cluster
- Configure Redis Cluster / Deploy Redis Cluster
- Deploy MatrixDB Cluster
Playbook Execution
The next step can be to land the requirements by executing the playbook.
- Install Pigsty on Meta / Pigsty Uninstall
- Add Nodes / Remove Nodes
- Deploy PGSQL Cluster / Offline PGSQL Cluster
- Create PGSQL Business User / Create PGSQL Business Database
- Deploy Redis Cluster / Offline Redis Cluster
Deployment
- Standard Deployment: Prepare brand new nodes to complete the standard Pigsty deployment process.
- Sandbox Deployment: Pull up a local VM sandbox environment with one click using a pre-built
vagranttemplate. - Multi-Cloud Deployment: Use
terraformtemplate to pull up the required VM resources at the cloud service vendor and perform the deployment. - Monly Deployment: Use singleton Pigsty to monitor existing database clusters.
15 - Preparation
How to prepare the resources required for Pigsty deployment.
- Node Provisioning
- Meta Provisioning
- Admin Provisioning
- Software Provisioning
- Pigsty source code
- Pigsty offline package
- Vagrant (sandbox)
- Virtualbox (sandbox)
Node Provisioning
Before deploying Pigsty, the user needs to prepare machine node resources with arbitrary database nodes, including at least one meta node.
The nodes can use any nodes: bare metals, local VMs, cloud VMs, containers, etc… only if the following conditions are met:
- Processor architecture: x86_64
- Hardware specifications: 1C/1GB at least
- Operating System: CentOS 7.8.2003 (or RHEL7 equivalent)
- Admin User can
sshto the meta node and executesudocommands.
One node is sufficient if you are using Pigsty as a battery-included PostgreSQL database instance. If you also plan to use Pigsty as a control for more nodes/databases, you can prepare more nodes for backup.
Meta Node Provisioning
Pigsty requires meta nodes as the admin controller of the entire environment and provides infra services.
The minimum number of meta-nodes is 1. Pigsty’s infra is deployed as replicas on multiple meta nodes, except for DCS (Consul/Etcd), which exists as Quorum.
Pigsty clusters require the use of DCS for HA functionality. You can use DCS clusters that are automatically deployed on meta nodes or use external DCS clusters. Using three meta nodes is recommended in large-scale production environments if you do not have a dedicated external DCS cluster.
Users should ensure that they can log in to the meta node and log in to other nodes via ssh with sudo or root access from the meta node using the admin user. Users should ensure access to port 80 of the meta node to access the Pigsty user interface.
- Number of meta nodes: odd number, at least 1
- Ability to log in to the meta node using the admin user
- Ability to access port 80 of the meta node via browser
- Admin users can log in to the database node remotely
sshfrom the meta node and executesudo(including itself).
Admin Provisioning
Pigsty requires an admin user to SSH into other nodes from the meta node and execute
sudocommands.
- Can use this user on the meta node
- Can SSH to all managed nodes (including itself) with this user
- Can execute the sudo command after logging in to all managed nodes (including itself)
- Admin user is not
postgresor{{ dbsu }}(using DBSU as admin is a security risk) - ssh login password-free, sudo command password-free (or you know how to enter it manually via
-k,-K)
The admin user you are using must have ssh and sudo privileges for all nodes when performing deployments and changes. Password-free is not required. You can always pass in ssh and sudo passwords via the -k|-K when executing the playbook or use another user to run the playbook via -eansible_host=<another_user>. However, Pigsty strongly recommends configuring SSH password-free login with password-free sudo for the admin user.
Pigsty recommends that the creation of admin users, privilege config, and key distribution be done in the Provisioning phase of the VM. For a production environment, the machine should be delivered with such a user configured with password-free remote SSH login and performing password-free sudo.
The Pigsty playbook nodes can be used to create admin users on nodes. In the Bootstrap phase, as long as you have an SSH login with SUDO access, you can use it to execute the Ansible playbook even without a password. Please refer to Nodes: Create an admin user for more details.
Manual config of SSH and SUDO
Manual config of SSH password-free login can be achieved by ssh-keygen and ssh-copy-id. Please refer to the related doc.
Manually configuring password-free sudo for a user can be done by adding the following entry to the /etc/sudoers.d/<username> file. Note that replacing <username> with the name of the administrator.
Software Provisioning
To run Pigsty, you need to have the following software.
- Pigsty Source Code
- Pigsty Offline Package (OPTIONAL)
To run the Pigsty sandbox on your own laptop, you will also need to download and install it on the host.
- Vagrant: VM hosting orchestration software (cross-platform, free)
- Virtualbox: VM software (cross-platform, open-source, and free)
If you wish to run Pigsty sandbox on a cloud vendor server, you must. The. Use download and install Terraform locally.
Pigsty Source Code
Users should get the Pigsty project source on the meta node, usually unpacked to the admin user HOME dir.
You can also download the source tarball in other ways.
Also, the download script in the root of the pigsty project can be used to download the source.
Pigsty Offline Package
The offline package packs all software packages, is about 1GB, and is optional. If /tmp/pkg.tgz already exists during a complete installation of Pigsty on the meta node, Pigsty will build the local source directly with that package. Otherwise, Pigsty will download all packages from the network.
The official offline package is made based on CentOS 7.8.2003 OS. Please refer to the FAQ to see all the dependency packages and install them directly from the upstream. Or visit Github on a machine with the same OS, make an offline package, and copy it to a network isolated environment.
You can download the offline package in advance on the meta node where Pigsty is to be installed (just on a meta node to /tmp/pkg.tgz).
Also, the download script in the root of the pigsty project can be used to download offline packages.
Finally, Baidu Web-Disk also provides an offline package for download: https://pan.baidu.com/s/1DZIa9X2jAxx69Zj-aRHoaw?pwd=8su9
Vagrant
Local VM configuration is relatively cumbersome, and Vagrant can solve this problem.
Vagrant makes it fast and straightforward to pull several VMs on a laptop, PC, or Mac, depending on the user’s needs. Users need to express their requirements for VMs in a vagrant configuration file.
We have provided a sample Vagrant configuration file. Vagrantfile
In the Vagrant configuration file, four VMs, including a 2-core/4GB central control/meta node meta and three 1-core/1GB database nodes node-1, node-2, node3.
When using the sandbox via shortcuts like make up, make new, and make demo, only one meta node meta is used by default. And make up4, make new4, and make demo4 use all the VMs. The N value defines the number of additional database nodes. The user can also modify the number of CPU cores and memory resources per machine, etc.
Vagrantfile Example
The vagrant binary will invoke Virtualbox by default to complete the creation of the local VMs defined in the Vagrant configuration file. Go to vagrant in the Pigsty root directory and execute vagrant up to bring up the four VMs. The Makefile provides some wrappers for the original vagrant command.
The default VM image used by the sandbox is IMAGE_NAME = "centos/7".
Virtualbox
Virtualbox is an open-source and free cross-platform VM software. Installing Virtualbox on MacOS is very simple: brew install virtualbox, and is similar on other OS.
After installing Virtualbox, you may need to reboot your computer to load the VM kernel module. Pigsty requires an x86_64 runtime environment, and Macbooks with M1 chips installed may not be able to run Virtualbox properly.
16 - Sandbox
Pigsty supports both local sandbox and cloud sandbox for quickly preparing a standard 1/4 node demo environment locally or in the cloud.
Pigsty provides a sandbox environment. Ultimately creating and running through the sandbox installation and deployment process for deployment in production envs have Pigsty very helpful.
Introduction
The config specifications, object identities, and default database predetermined environment of the sandbox are consistent in both the local and cloud versions.
The sandbox meta node IP is fixed to: 10.10.10.10. 10.10.10.10 is also a placeholder for the IP of the meta node in all config templates, which is used as the actual IP of the meta node when executing config.
You can use a single-node sandbox with a meta, deployed with complete infrastructure, and a single instance Postgres database pg-meta.
meta 10.10.10.10 pg-meta.pg-meta-1
The single-node sandbox is suitable for personal development, experimentation, and learning; the four-node sandbox can demonstrate Pigsty’s capabilities, data analysis and visualization, design, demonstration, and distribution of interactive data applications. Please select as you need.
There are three additional nodes in the four-node sandbox, with a set of three-node PostgreSQL cluster pg-test.
node-1 10.10.10.11 pg-test.pg-test-1node-2 10.10.10.12 pg-test.pg-test-2node-3 10.10.10.13 pg-test.pg-test-3
Also, the sandbox will use the following two IPs with two static DNS records for accessing the database cluster.
10.10.10.2 pg-meta10.10.10.2 pg-test
Pigsty offers a local sandbox based on Vagrant (pulling up local VMs using Virtualbox), and a cloud sandbox based on Terraform (creating VMs using the cloud vendor API).
-
Local sandbox can be run on Mac/PC for free. If running a full 4-node sandbox, your Mac/PC should have at least 4C/8G.
-
Cloud sandbox can be easily shown and shared. You need to create a cloud account. VM resources are created and used on-demand and can be destroyed with one click after use, which is also very cheap.
Local Sandbox
The Pigsty local sandbox relies on Vagrant to host the local Virtualbox VM.
Before using Pigsty sandbox, you need to install Vagrant and Virtualbox in your operating system. You can also create VMs for standard installation and deployment by choosing other VM software (Parallel Desktop, VMWare).
Quick Start
Make sure that Vagrant and Virtualbox are installed and available. On macOS, you can use homebrew to install both with one click (requires reboot).
You can install software dependencies on macOS, configure local static DNS, and pull up VMs with the following four shortcutS. A few additional manual steps are required under Windows and Linux.
Next, you can ssh meta to log in to the default meta node. SSH sudo for the meta node access to all nodes is already configured, and you can execute the Pigsty installation.
Vagrant
Local VM configuration is relatively cumbersome, and Vagrant can solve this problem.
Vagrant makes it fast and straightforward to pull several VMs on a laptop, PC, or Mac, depending on the user’s needs. Users need to express their requirements for VMs in a vagrant configuration file.
We have provided a sample Vagrant configuration file. Vagrantfile
In the Vagrant configuration file, four VMs, including a 2-core/4GB central control/meta node meta and three 1-core/1GB database nodes node-1, node-2, node3.
When using the sandbox via shortcuts like make up, make new, and make demo, only one meta node meta is used by default. And make up4, make new4, and make demo4 use all the VMs. The N value defines the number of additional database nodes. The user can also modify the number of CPU cores and memory resources per machine, etc.
Vagrantfile Example
The vagrant binary will invoke Virtualbox by default to complete the creation of the local VMs defined in the Vagrant configuration file. Go to vagrant in the Pigsty root directory and execute vagrant up to bring up the four VMs. The Makefile provides some wrappers for the original vagrant command.
The default VM image used by the sandbox is IMAGE_NAME = "centos/7".
Virtualbox
Virtualbox is an open-source and free cross-platform VM software. Installing Virtualbox on MacOS is very simple: brew install virtualbox, similar to other OS.
After installing Virtualbox, you may need to reboot your computer to load the VM kernel module. Pigsty requires an x86_64 runtime environment, and Macbooks with M1 chips installed may not be able to run Virtualbox properly.
DNS Config
Pigsty accesses all web systems via domain name by default. If you do not have a DNS server or public domain name, you can use local static DNS records. The static DNS records used by the sandbox are shown below.
On macOS and Linux, running sudo make dns will write the above records to /etc/hosts (requires sudo access). On Windows, you will need to add them manually to C:\Windows\System32\drivers\etc\hosts.
Cloud Sandbox
You can also use cloud VMs that are ready to use and destroy.
Terraform
Terraform is an open-source and free infrastructure or code tool. Just declare the required cloud VMs, network, security group configurations, etc., and pull up the corresponding resources with one click.
To install Terraform under MacOS, execute brew install terraform. You will need a cloud account to obtain AccessKey and AccessSecret credentials.
Config file
The project root dir terraform/ provides Terraform files for several cloud vendors. You can use these templates to quickly request VM resources on the cloud for Pigsty deployment. Here is an example of Ali cloud.
AliCloud Sample Terraform
Execution Plan
First, use the terraform command to create the cloud resource defined above (Pay on demand).
After running apply and entering yes, terraform will call AliCloud API to create the corresponding VM resource.
Terraform Execution Results
SSH Config and Tweaking
The manager will assign a pay-per-use public IP, which you can also print out using the command terraform output.
Next, let’s configure the local SSH login to the cloud manager (default user root, password PigstyDemo4).
You can access the cloud manager via the SSH alias demo.
Now, it is possible to access the node from the local password-free. If only a single node installation is required, this will do. Next, complete the standard installation on that meta node.
DNS Config
Pigsty accesses all web systems via domain name by default and does not recommend using IP: Port to access the primary system’s web interface.
The static DNS records used by the cloud sandbox are shown below, and you need to fill in the public IP of the meta node.
In macOS and Linux, you need to write the above records to /etc/hosts (requires sudo access), and in Windows, you need to add them manually to C:\Windows\System32\drivers\etc\hosts.
Caveat
The AliCloud VM CentOS 7.8 mirror runs with nscd, which locks out the glibc version and causes RPM dependency errors during installation.
Run yum remove -y nscd on all machines to resolve this issue.
17 - Monitoring System
How to use Pigsty to monitor existing PostgreSQL instances?
For existing Pigsty instances that Pigsty does not create, some additional configuration is required if they are monitored using Pigsty’s monitoring system.
TL; DR
-
Create the monitoring object in the target instance: monitoring object configuration.
-
Declare the cluster in the inventory.
-
Execute the playbook against the cluster:
./pgsql-monly.yml -l pg-test. -
The playbook registers the target PostgreSQL data source in Grafana so that PGCAT functionality is fully available. The playbook deploys PG Exporter on the meta node to monitor remote PG instances, so pure database-related metrics in PGSQL are available. However, host node, connection pool, load balancing, and HA Patroni metrics are unavailable.
Overview
Suppose you want to use Pigsty for monitoring only. In that case, you can use monly mode. You can use Pigsty to manage and monitor other PostgreSQL instances (currently, 10+ versions are supported by default, the pg_exporter configuration file can manually modify older versions).
First, you need to complete the standard installation process of Pigsty on one meta node, and then you can connect more database instances to monitoring. According to the access rights of the target database node, there are two different cases.
Target nodes can be managed.
If the target DB node can be managed by Pigsty (ssh reachable, sudo available), you can use the pg-exporter task of the pgsql.yml playbook to deploy the monitoring component on the target node in the same way: PG Exporter. You can also use the other tasks of the playbook to deploy additional components and their monitoring on the existing instance node: connection pool Pgbouncer and load balancer HAProxy. In addition, the node-exporter and promtail tasks in nodes.yml can also be used to deploy the host node monitoring and log collection components on existing instance nodes. And log collection components.
Since the target database cluster already exists, you will need to manually create monitoring users, modes, and extensions on the target database cluster as described in this section. The rest of the process is no different from full deployment.
Database connection string only.
If you can only access the target database using a PGURL (database connection string), consider monitoring the target database’s Monly mode/Basic mode. All monitoring components are deployed on the meta node where Pigsty is installed in this mode. The monitoring system will not have metrics related to nodes, connection pools, load balancers, and HA components, but the database and real-time status information in the Data Catalog will still be available.
To perform a lean monitoring deployment, you will also need to manually create monitoring users, modes, and extensions on the target database cluster as described in this section and ensure that the target database can be accessed from the meta node using monitoring users. After that, execute the pgsql-monly.yml playbook against the target cluster to complete the deployment.
This article focuses on this monly deployment mode.
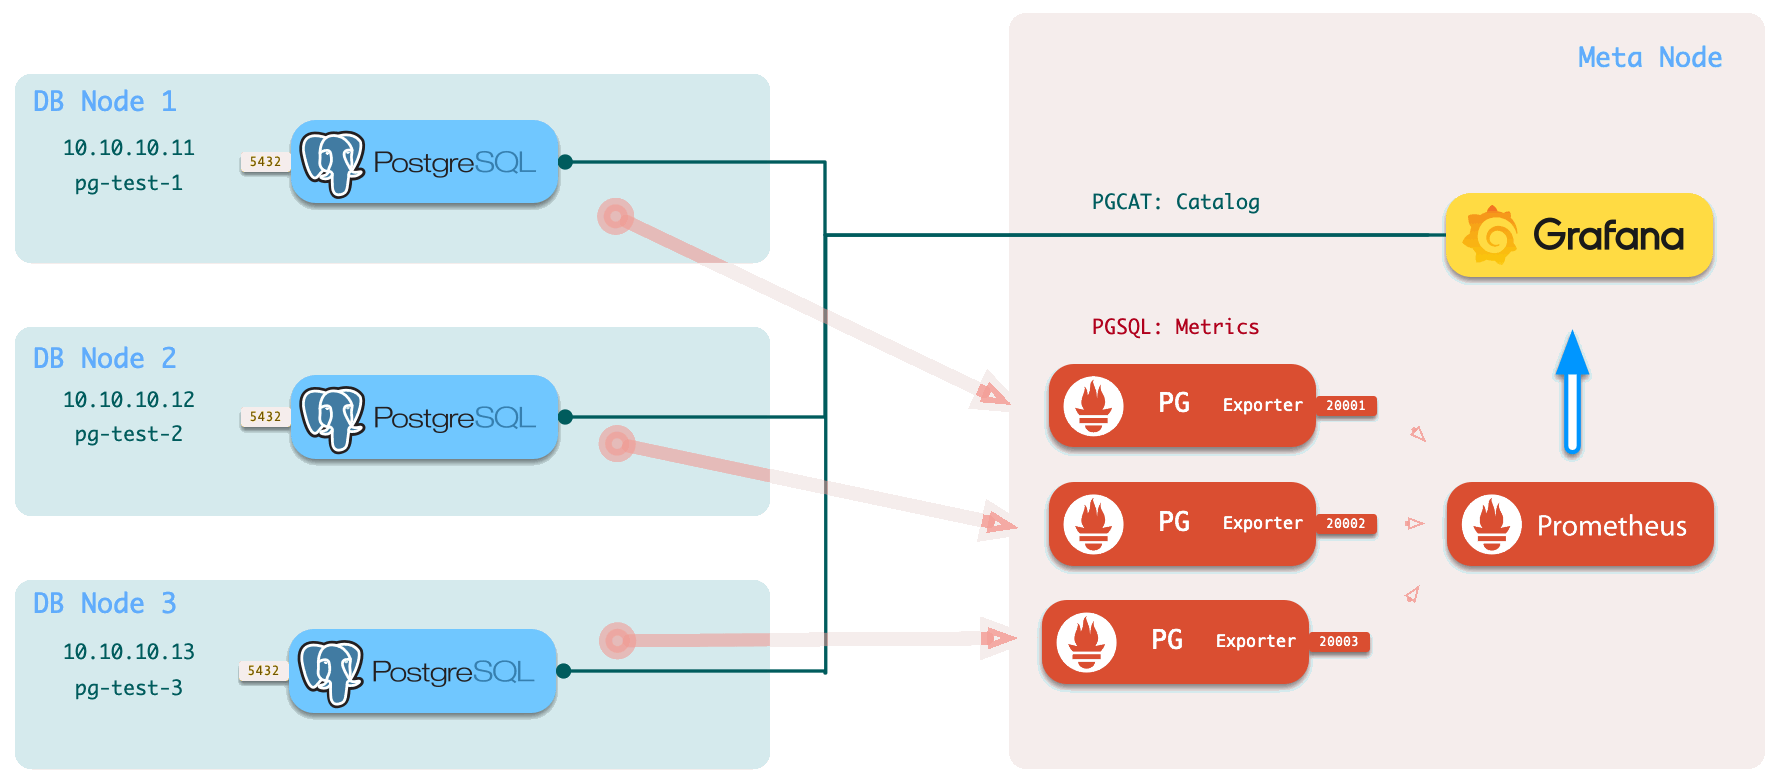
Figure: the monly mode architecture, with multiple PG Exporter, deployed locally on the management machine for monitoring multiple remote database instances.
Difference
The Pigsty monitoring system consists of three core modules:
| Matter \ Level | L1 | L2 | L3 |
|---|---|---|---|
| Name | Basic Deployment | Managed Deployment | Managed Deployment |
| English | basic | managed | full |
| Scenes | Only the connection string | DB already exists, nodes can be managed | Instances created by Pigsty |
| PGCAT Function | ✅ Full Availability | ✅ Full Availability | ✅ Full Availability |
| PGSQL Function | ✅ Limited PG metrics | ✅ Limited PG and node metrics | ✅ Full Function |
| Connection Pool Metrics | ❌ Not available | ⚠️ Optional | ✅ Pre-installed |
| Load Balancer Metrics | ❌ Not available | ⚠️ Optional | ✅ Pre-installed |
| PGLOG Function | ❌ Not available | ⚠️ Optional | ⚠️ Optional |
| PG Exporter | ⚠️ Deployed on meta nodes | ✅ Deployed on DB nodes | ✅ Deployed on DB nodes |
| Node Exporter | ❌ Non-deployment | ✅ Deployed on DB nodes | ✅ Deployed on DB nodes |
| Intrusion into DB nodes | ✅ Non-intrusive | ⚠️ Installing Exporter | ⚠️ Fully managed by Pigsty |
| Monitor existing instances | ✅ Can support | ✅ Can support | ❌ For Pigsty-hosted instances only |
| Monitoring users and views | Manually created | Manually created | Pigsty automatically creates |
| Deployment Usage Playbook | pgsql-monly.yml |
pgsql.yml -t pg-exporternodes.yml -t node-exporter |
pgsql.yml -t pg-exporternodes.yml -t node-exporter |
| Required Privileges | PGURLs reachable by meta nodes | DB node ssh and sudo privileges | DB node ssh and sudo privileges |
| Function Overview | Basic functions:PGCAT+PGSQL | Most functions | Full Functions |
Basic Deploy
Deploying a monitoring system for a database instance is divided into three steps: Prepare Targets, Modify Inventory, and Execute Playbook.
Prepare Targets
To include an external existing PostgreSQL instance in monitoring, a connection string that can be used to access the instance/cluster is required. It is recommended to use a dedicated monitoring user to avoid privilege leaks.
- Monitor User: The default user name used is
dbuser_monitor, which should belong to thepg_monitorrole group or ensure that it has access to the relevant view. - Monitor Auth: Default is password access. You need to ensure the HBA policy allows the monitor user to access the database locally from the management machine or DB node.
- Monitor Mode: Fixed using the name
monitorfor installing additional monitor views with extended plugins, optional but highly recommended. - Monitor Extensions: It is highly recommended to enable the monitor extension
pg_stat_statementswith PG.
For details on the preparation of monitoring objects, please refer to Monitoring Object Config.
Modify Inventory
This target cluster must be declared in the inventory (config file or CMDB). For example, specify the identity for the cluster with the instance. It is also necessary to manually assign a unique local port ( pg_exporter_port) to each instance at the instance level.
The following is a sample database cluster declaration.
Even if you access the database through a domain name, you still need to declare the database cluster by filling in the actual IP.
To enable the PGCAT feature, you need to explicitly list in pg_databases the list of database names of the target cluster registered as Grafana’s data source and can access the Catalog data of that instance through Grafana. If you do not use the PGCAT function, do not set this variable or set it to an empty array.
Connect Info
Note: Pigsty will default generate the monitor connection string using the following rules. However, the pg_exporter_url will directly override the spliced connection string if it exists.
You can constantly monitor user/password globally or configure the following connection parameters on-demand at the cluster or instance level.
Example: Specifying connect information at the instance-level
Execute Playbook
Once the cluster declaration is complete, use the playbook pgsql-monly.yml on the meta node against the target cluster.
Monitor Preparation
In monitor mode, the target DB nodes can be managed by Pigsty (ssh reachable, sudo available), and the user will install the following monitoring components on the existing nodes: promtail, node_exporter, pg_exporter.
You can use the node-exporter task in nodes.yml and the pg-exporter task in the pgsql.yml playbook to deploy the monitoring component on the target node: node_exporter with pg_exporter.
Because the target database cluster already exists, you need to create monitor users, modes & extensions on the target database cluster.
When the value of exporter_install is yum, Pigsty will download from the URL specified by the exporter_repo_url Repo file to the node’s local /etc/yum.repos.d. You should fill in the Pigsty local source address on the meta node, for example, http://10.10.10.10/pigsty.repo.
Targets Config
How to configure users, modes, extensions, views, and functions required for monitoring existing instances.
Monitor user
Take the monitoring user dbuser_monitor used by Pigsty by default as an example, and create the following user in the target cluster.
Please note that the monitor user and password created need to be the same as pg_monitor_username and pg_monitor_password stay consistent.
Configure the database file pg_hba.conf by adding the following rules to allow monitoring users to access the database from local, and management machines using passwords.
Monitor mode
It is recommended to create a monitor mode and enable at least the pg_stat_statements that come with PG, which provides essential data on query performance. Note: This extension must be included in the database parameter shared_preload_libraries. Modifying this parameter requires a database restart.
Creating an extension mode.
Monitor extensions
Create extension plugins.
Monitor Views
The monitoring view shows common preprocessing results and wraps privileges for specific monitoring metrics (e.g., shared memory allocation). It is highly recommended to create it in all databases that need to be monitored.
Monitor Views
Functions to view shared memory allocations (available for PG13 and above)
18 - PostgreSQL Deployment
This article describes several ways to deploy a PostgreSQL cluster using Pigsty: PGSQL-related playbook and config. Please refer to the related doc.
- Identity Parameters: Introduces the identity parameters required to define a standard PostgreSQL HA cluster.
- Singleton Deployment: Defines a single instance PostgreSQL cluster.
- Primary-Replica Cluster: Defines a standard availability cluster with one primary & one replica.
- Sync-Standby: Define a highly consistent cluster with sync standby and RPO = 0.
- Quorum Commit: Defines a cluster with higher data consistency: most replicas return commits on the successful side.
- Offline Replica: Dedicated instances for hosting OLAP analysis, ETL, and interactive personal queries individually.
- Standby Cluster: Produces real-time online clones of existing clusters for offsite disaster recovery or delayed.
- Delayed Cluster: For responding to software/human failures such as mistaken table and database deletion, faster than PITR.
- Cascade Instance: Used to build cascade within a cluster for many replica scenarios (20+) to reduce primary pressure.
- Citus Deployment: Deploy Citus distributed database cluster.
- MatrixDB Deployment: Deploy Greenplum7/PostgreSQL12 compatible chronological data warehouse.
Identity
The Core Identity Parameters are information that must be provided when defining a PostgreSQL cluster.
| Name | Attribute | Description | Example |
|---|---|---|---|
pg_cluster |
MUST, cluster level | Cluster name | pg-test |
pg_role |
MUST, instance level | Instance Role | primary, replica |
pg_seq |
MUST, instance level | Instance number | 1, 2, 3,... |
The content of the identity parameter follows the entity naming pattern. Where pg_cluster, pg_role, and pg_seq belong to the core identity parameters, the minimum set of mandatory parameters required to define the database cluster and core identity parameters must be explicitly specified.
-
pg_clusteridentities the name of the cluster configured at the cluster level and serves as the top-level namespace for cluster resources. -
pg_roleidentities the role of the instance in the cluster, configured at the instance level, with optional values including:primary: the only primary in the cluster, that provides writing services.replica: the ordinary replica in the cluster, takes regular production read-only traffic.offline: an offline replica in the cluster, takes ETL/SAGA/personal user/interactive/analytical queries.standby: a standby replica in the cluster, with synchronous replication and no replication latency (reserved).delayed: a delayed replica in the cluster, explicitly specifying replication delay, used to perform backtracking queries and data salvage (reserved).
-
pg_seqis used to identify the instance within the cluster. Usually, an integer incrementing from 0 or 1 will not be changed once assigned. -
pg_shardis used to identify the upper-level shard cluster to which the cluster belongs, and only needs to be set if the cluster belongs to a horizontal sharding cluster. -
pg_sindexis used to identify the cluster’s slice cluster number and only needs to be set if the cluster belongs to a horizontal sharding cluster. -
pg_instanceis the derived identity parameter that uniquely identifies a database instance, with the following composition rules{{ pg_cluster }}-{{ pg_seq }}. Sincepg_seqis unique within the cluster, this identity is globally unique.
Sharding Cluster
pg_shard and pg_sindex define particular sharded clusters and are optional, currently reserved for Citus and Greenplum.
Suppose a user has a horizontal sharding sharded database cluster with the name test. This cluster consists of four separate clusters: pg-test1, pg-test2, pg-test3, and pg-test-4. The user can bind the identity of pg_shard: test to each database cluster and pg_sindex: 1|2|3|4 to each database cluster separately.
With this definition, you can easily observe the cross-sectional metrics comparison of four horizontal sharding clusters from the PGSQL Shard monitoring dashboard. The same functionality works for Citus and MatrixDB clusters as well.
Singleton
Let’s start with the simplest case.
Use the following command to create a primary database instance on the 10.10.10.11 node.
M-S Replication
Pigsty natively supports M-S replication, e.g., to declare a typical one primary & one replica HA database cluster.
Use bin/createpg pg-test to create the cluster. If you have already finished deploying 10.10.10.11 in step 1 singleton deployment, you can also use bin/createpg 10.10.10.12 to expand the cluster.
Sync Standby
Under normal circumstances, PostgreSQL’s replication latency is a few tens of KB/10ms, which is negligible for regular business.
When the primary fails, data that has not yet completed replication will be lost! Replication latency can be a problem when dealing with critical and sophisticated business queries. Or, in a replica, immediately read-your-write after the primary writes, which can also be very sensitive to replication latency.
Sync standbys can solve such problems. A simple way to configure a sync standby is to use the pg_conf = crit template, which automatically enables synchronous replication.
After the cluster is created, you can also execute pg edit-config <cluster.name> on the meta node, edit the cluster configuration file, change the value of the synchronous_mode to true and apply it.
Quorum Commit
By default, synchronous replication picks an instance from all candidate replicas as a sync standby. Any primary transaction is only considered successfully committed and returned when replicated to the replica and flushed to the disk. A quorum commit can be used if more persistent data is expected. For example, in a 1primary & 3 replicas cluster, at least two replicas successfully flush to disk before a commit is confirmed.
When using quorum commit, you need to modify the synchronous_standby_names in PostgreSQL and the value of synchronous_node_count in Patroni. Assuming that the three replicas are pg-test-2, pg-test-3, and pg-test-4, the following should be configured.
synchronous_standby_names = ANY 2 (pg-test-2, pg-test-3, pg-test-4)synchronous_node_count : 2
Execute pg edit-config pg-test and modify the config as follows.
After the application, the configuration takes effect, and two Sync Standby appear. When the cluster has Failover or expansion and contraction, please adjust these parameters to avoid service unavailability.
Offline Replica
Data analysis/ETL/personal interactive queries should be placed on the offline replica when the high online business request load.
Use bin/createpg pg-test to create the cluster. If you have already completed singleton deployment and primary-replica-cluster, you can use bin/createpg 10.10.10.13 to expand the cluster and add an offline replica to the cluster.
Offline replicas do not host the replica service by default, and the offline instance will only host read-only traffic if all instances in the replica service are unavailable. If you have only one primary & one replica, or only one primary, you can set the pg_offline_query flag for an offline instance that also hosts the offline service to be used as a quasi-offline instance.
Standby Cluster
You can make a clone of an existing cluster using the Standby Cluster method, which allows for a smooth migration from a current database to a Pigsty cluster.
Just make sure that the pg_upstream parameter is configured on the primary of the backup cluster to pull backups from the original upstream automatically.
Promote Standby Cluster
When you want to promote the standby cluster to a standalone cluster, edit the Patroni configuration file of the new cluster to remove all standby_cluster configurations, and the Standby Leader in the standby cluster will be elevated to a standalone primary.
Remove the following config: the entire standby_cluster definition section.
Change Replication Upstream
When a Failover primary change occurs in the source cluster, you need to adjust the replication source of the standby cluster. Execute pg edit-config <cluster> and change the source address in standby_cluster to the new primary, and the application will take effect. Note that replica replication from the source cluster is feasible, and a Failover in the source cluster will not affect the replication of the standby cluster. However, the new cluster cannot create replication slots on the read-only replica, and there may be related error reports and a risk of replication interruption. It is recommended to adjust the upstream replication source of the standby cluster in time.
Modify the IP of the replication upstream in standby,_cluster.host, and the application will take effect (no need to reboot, Reload).
Delayed Cluster
HA and M-S replication can solve the problems caused by machine hardware failure, but cannot solve the failure caused by software bugs and human operations. A cold standby is usually required for accidental data deletion, but another way is to prepare a delayed cluster.
You can use the function standby cluster to create a delayed. For example, now you want to specify a delayed for the pg-test cluster: pg-testdelay, which is the state of pg-test 1 hour ago.
After creation, edit the Patroni config file for the delayed cluster using pg edit-config pg-testdelay in the meta node and change standby_cluster.recovery_min_apply_delay to the delay value you expect.
Cascade Instance
When creating a cluster, if the pg_upstream parameter is specified for one of the replicas in the cluster (defined as another replica in the cluster), the instance will attempt to build logical replication from that specified replica.
Citus Deployment
Citus is a distributed extension plugin for PostgreSQL. By default, Pigsty installs Citus but does not enable it. pigsty-citus.yml provides a config file case for deploying a Citus cluster. To allow Citus to, you need to modify the following parameters.
max_prepared_transaction: Modify to a value greater thanmax_connections, e.g. 800.pg_libs: Must containcitusand be placed in the top position.- You need to include the
citusextension plugin in the business database (but you can also manually install it viaCREATE EXTENSION).
Citus cluster sample config
Next, you need to refer to the Citus Multi-Node Deployment Guide, and on the Coordinator node, execute the following command to add a data node.
After successfully adding data nodes, you can use the following command to create sample data tables on the coordinator and distribute them to each data node.
For more information about Citus, please refer to the Citus official doc.
MatrixDB Deployment
Greenplum is a distributed data warehouse based on the PostgreSQL ecosystem, and MatrixDB is a branch of Greenplum based on Greenplum 7, using the PostgreSQL 12 kernel. Greenplum 7 has not yet been officially released, so Pigsty is currently using MatrixDB as a replacement for Greenplum.
MatrixDB is based on the PostgreSQL ecosystem, so most PostgreSQL playbooks and tasks can be reused on MatrixDB. There are only two additional parameters specific to MatrixDB.
gp_role: Define the identity of the Greenplum cluster,master,orsegment.pg_instances: Define the Segment instance, which is used to deploy the Segment monitoring instance.
For details, please refer to MatrixDB Deployment.
MatrixDB cluster sample config--4 nodes
19 - Redis Deployment
Pigsty is a PostgreSQL distribution and a general-purpose application runtime. It can manage, deploy, and monitor other applications and databases, such as Redis.
Similar to PostgreSQL, deploying Redis requires the same two steps.
- Declare/Define the Redis cluster
- Execute Playbook to create the Redis cluster
Define Redis Cluster
ER Model
The Redis entity concept model is almost identical to PostgreSQL and includes the Cluster and Instance. Note that Cluster here does not refer to the clusters in Redis’ native clusters.
The core difference is that Redis typically uses multiple singleton instances, with various Redis instances typically deployed on a single physical/VM to take advantage of multi-core CPUs.
In Pigsty-managed Redis, it is not yet possible to deploy two Redis instances from different clusters on a node, but this does not affect the deployment of multiple independent Redis instances on a node.
Identity Parameters
The identity parameters are the information that must be provided when defining a Redis cluster and include.
| Name | Attribute | Description | Example |
|---|---|---|---|
redis_cluster |
MUST, cluster level | Cluster name | redis-test |
redis_node |
MUST, node level | Node Number | 1,2 |
redis_instances |
MUST, node level | Instance Definition | { 6001 : {} ,6002 : {}} |
-
redis_cluster: Identifies the Redis cluster name, configured at the cluster level, as the top-level namespace for cluster resources. -
redis_node: Identifies the number of the node in the cluster. -
redis_instances: A JSON object with the Key as the instance port and the Value as a JSON object containing the instance-specific configuration.
Cluster Definition
A condensed definition of three Redis clusters is given below, including.
- A 1-node, 3-instance Redis Sentinel cluster
redis-sentinel. - A 2-node, 12-instance Redis Cluster
redis-cluster. - A 1-node, one primary & two replicas Redis Standalone cluster
redis-standalone.
It would help to assign a unique port to the Redis instance on the node.
Redis Sentinel Cluster Example
Redis Native Cluster Example
Redis Standalone Example
Create Redis Cluster
Playbook
Create a Redis instance/cluster using the playbook redis.yml.
Caveat
Although not recommended, it is still possible to deploy a mix of PostgreSQL and Redis to make the most of machine resources.
The redis.yml playbook will deploy the Redis Monitor Exporter on the machine, including redis_exporter and node_exporter (optional).
If the machine’s node_exporter exists during this process, it will be redeployed.
By default, Prometheus will use the “multi-target crawl” mode, using the Redis Exporter on port 9121 on the node to crawl all Redis instances on that node.
Checking Redis Monitor
Pigsty currently provides three Redis monitor dashboards as part of a standalone monitoring application REDIS.
- Redis Overview: Provide a global overview of Redis in the entire environment.
- Redis Cluster: Focus on monitoring information for a single Redis business cluster.
- Redis Instance: Focus on detailed monitoring information for a single Redis instance.
You can use the included Redis-benchmark test.
Other Functions
Pigsty v1.5.1 supports whole-cluster Redis deployment and monitoring, and the tagged redis.yml/redis-remove.yml playbooks also target one instance with -e redis_port=<port>.
20 - MatrixDB Deployment
Pigsty can be used to deploy and monitor MatrixDB (equal to Greenplum 7+ Time-Series database).
Currently, MatrixDB uses PostgreSQL 12 kernel, while native Greenplum uses 9.6 kernels, so MatrixDB is used instead of Greenplum implementation, and Greenplum support will be added later.
E-R Model
MatrixDB is logically divided into two parts, Master and Segments, composed of PostgreSQL instances, divided into four categories: Master/Standby/Primary/Mirror.
- Master is the port directly accessed by the user to take over queries. There is only one MatrixDB deployment, usually deployed using a standalone node.
- Standby is a physical replica of the Master instance, which takes over when the Master fails and is usually deployed using a standalone node, which is optional.
- A MatrixDB deployment typically has multiple Segments, each of which consists of a mandatory primary instance and an optional mirror instance.
- The segment’s primary is responsible for the actual storage and computation, and the mirror does not carry the read and write traffic. It takes over for the primary when the primary is down, usually distributed on different nodes from the primary.
- MatrixDB installation wizard determines the distribution of primary and mirror of Segment, and there may be different Segment instances on Segments nodes of the cluster.
Deployment conventions
- Master cluster (master/standby) (
gp_role=master) constitutes a PostgreSQL cluster, usually named to containmdw, e.g.,mx-mdw. - Each Segment (primary/mirror) (
gp_role=segment) constitutes a PostgreSQL cluster, usually named withseg, e.g.,mx-seg1,mx-seg2. - The user should explicitly name the cluster nodes, e.g.,
mx-sdw-1,mx-sdw-2, …
Download
The RPM pkgs for MatrixDB & Greenplum are not part of the standard Pigsty deployment and will not be placed in the default pkg.tgz.
The RPM pkgs for MatrixDB & Greenplum and their complete dependencies will be packaged as a separate offline pkg matrix.tgz.
You can add new matrix sources to the Pigsty meta node.
This command creates a /www/matrix.repo file, which by default you can access at http://pigsty/matrix.repo to get the repo, which points to the http://pigsty/matrix.
Configure
The MatrixDB / Greenplum installation will reuse the PGSQL tasks and config with the exclusive config parameters gp_role and pg_instances.
The config file pigsty-mxdb.yml gives a sample deployment of MatrixDB in a four-node sandbox.
This config file node_repo_local_urls adds the new Yum repo, and http://pigsty/matrix.repo ensures that all nodes access Matrix Repo.
Execute
Deploy MatrixDB in a four-node sandbox. Note. Otherwise, the default will be to use DBSU mxadmin:mxadmin as the monitoring username and password.
Once the installation is complete, you need to complete the next installation through the WEB UI provided by MatrixDB. Open http://mx.pigsty or visit http://10.10.10.10:8240 and fill in pgsql-matrixdb.yml with the initial user password output at the end to enter the installation wizard.
Follow the prompts to add the MatrixDB nodes: 10.10.10.11, 10.10.10.12, 10.10.10.13, click Confirm Installation and proceed to the next step.
Monitoring uses mxadmin:mxadmin as the monitoring username password by default. Please fill in mxadmin or your password.
If a different password was specified in the installation wizard, change the pg_monitor_username and pg_monitor_password variables (using another user than dbsu, additional HBAs will usually need to be configured on all instances as well).
Note that the logic for MatrixDB / Greenplum to assign Segments on nodes is currently uncertain. Once initialization is complete, you can modify the definition of Segment instances in pg_instances and redeploy monitoring to reflect the true topology.
Post-Run
Finally, manually execute the following command on the Greenplum/MatrixDB Master node to allow the monitoring component to access the replica and restart it to take effect.
All MatrixDB clusters can then be observed from the monitoring system. The MatrixDB Dashboard provides an overview of the overall monitoring of the data warehouse.
Optional
You can treat MatrixDB’s Master cluster as a standard PostgreSQL cluster and use pgsql-createdb with pgsql-createuser to create a business database with users.
21 - Playbooks
Learn about the pre-built playbooks provided by Pigsty, the features, how to use them, and the considerations.
Pigsty implements core control functions at the bottom through the Ansible Playbook, and Pigsty provides pre-built playbooks in four main categories:
infra: Use theinfraseries of playbooks to install Pigsty singleton on the meta node with optional features.nodes: Use thenodesseries of playbooks to include more nodes in Pigsty monitoring and management and for subsequent use.pgsql: Use thepgsqlseries of playbooks to deploy and manage PostgreSQL database clusters on existing nodes.redis: Use theredisseries of playbooks to deploy and manage various modes of Redis clusters on existing nodes.
Overview
| Playbook | Function | Link |
|---|---|---|
| infra | Full installation of Pigsty on the meta node | src |
infra-demo |
Special playbook for complete initialization of a four-node demo sandbox in one go | src |
infra-jupyter |
Adding the optional data analysis service component Jupyter Lab to the meta node | src |
| nodes | Node provisioning to include nodes in Pigsty for subsequent database deployment | src |
nodes-remove |
Node remove, unloading node DCS and monitoring, no longer included in Pigsty | src |
| pgsql | PostgreSQL cluster deploy, or expand | src |
pgsql-remove |
PostgreSQL cluster destruction, or downsize | src |
pgsql-createuser |
Creating PostgreSQL business users | src |
pgsql-createdb |
Creating a PostgreSQL Business Database | src |
pgsql-monly |
Monly mode, with access to existing PostgreSQL instances or RDS | src |
pgsql-migration |
Generate PostgreSQL semi-automatic database migration solution (Beta) | src |
pgsql-matrixdb |
Reuse the PG role to deploy a MatrixDB data warehouse clusters (Beta) | src |
| redis | Deploy a Redis database in cluster/standalone/Sentinel mode | src |
redis-remove |
Redis cluster/node destruction | src |
The typical use process is as follows:
-
Use the
infraseries of playbooks to install Pigsty on the meta node/local machine and deploy the infra.All playbooks initiate execution on the meta node, and the
infraseries of playbooks only works on the meta node. -
Use the
nodesseries of playbooks to include or remove other nodes from Pigsty.After a node is managed, node monitoring and logging can be accessed from the meta node Grafana, and the node joins the Consul cluster.
-
Use the
pgsqlseries of playbooks to deploy a PostgreSQL cluster on managed nodes.After deployment on the managed node, you can access PostgreSQL monitoring and logs from the meta node.
-
Use the
redisseries of playbooks to deploy a Redis cluster on managed nodes.After deployment on the managed node, Redis monitoring and logs can be accessed from the meta node.
Most playbooks are idempotent, meaning that some deployment playbooks may erase existing databases and create new ones without the protection option turned on.
Please read the documentation carefully, proofread the commands several times, and operate with caution. The author is not responsible for any loss of databases due to misuse.
Ansible Quick Start
The Pigsty playbooks are written in Ansible.
- Ansible Installation: How to install Ansible? (Pigsty users usually don’t have to worry about)
- Limit Host: How to execute a playbook for a limit host?
- Task Subset: How to perform certain specific tasks in the playbook?
- Extra Params: How to pass in extra command-line params to control playbook behavior?
Installation
The Ansible playbook requires the ansible-playbook executable command, and Ansible can be installed on EL7-compatible systems with the following command.
Pigsty will attempt to install ansible from the offline package when using offline packages during the Configure phase.
There are three core params to focus on when executing the playbook:-l|-t|-e, which are used to restrict the host for execution, with the task to be performed and to pass in extra params, respectively.
Limit Host
The target of execution can be selected with the -l|-limit <selector> param. When this param is not specified, most playbooks default to all hosts defined in the configuration file as the target of execution.
It is highly recommended to specify the execution object when executing the playbook.
There are two types of objects commonly used, clusters and hosts.
Task Subset
You can select the task subset to be executed with -t|--tags <tags>. When this param is not specified, the full playbook will be executed, and the selected task subset will be executed when set.
Users can separate each task by , and perform multiple tasks at once. For example, you can adjust the cluster LB configuration using the following command when the cluster role members change.
Extra Params
Extra command-line params can be passed in via -e|-extra-vars KEY=VALUE to override existing params or control some special behavior.
For example, some of the behavior of the following playbooks can be controlled via command-line params.
22 - Playbook: INFRA
Install pigsty & Add new optional to meta node with
INFRAseries playbooks.
| Playbook | Function | Link |
|---|---|---|
infra |
Install pigsty on meta nodes | src |
infra-demo |
Special version of infra, pull up the 4-node sandbox in one-pass |
src |
infra-remove |
Uninstall pigsty from the meta node. | src |
infra-jupyter |
Install optional JupyterLab on meta node | src |
infra
The infra.yml playbook will install Pigsty on the meta nodes.
When using Pigsty as a battery-included Postgres, infra.yml is sufficient for the installation.
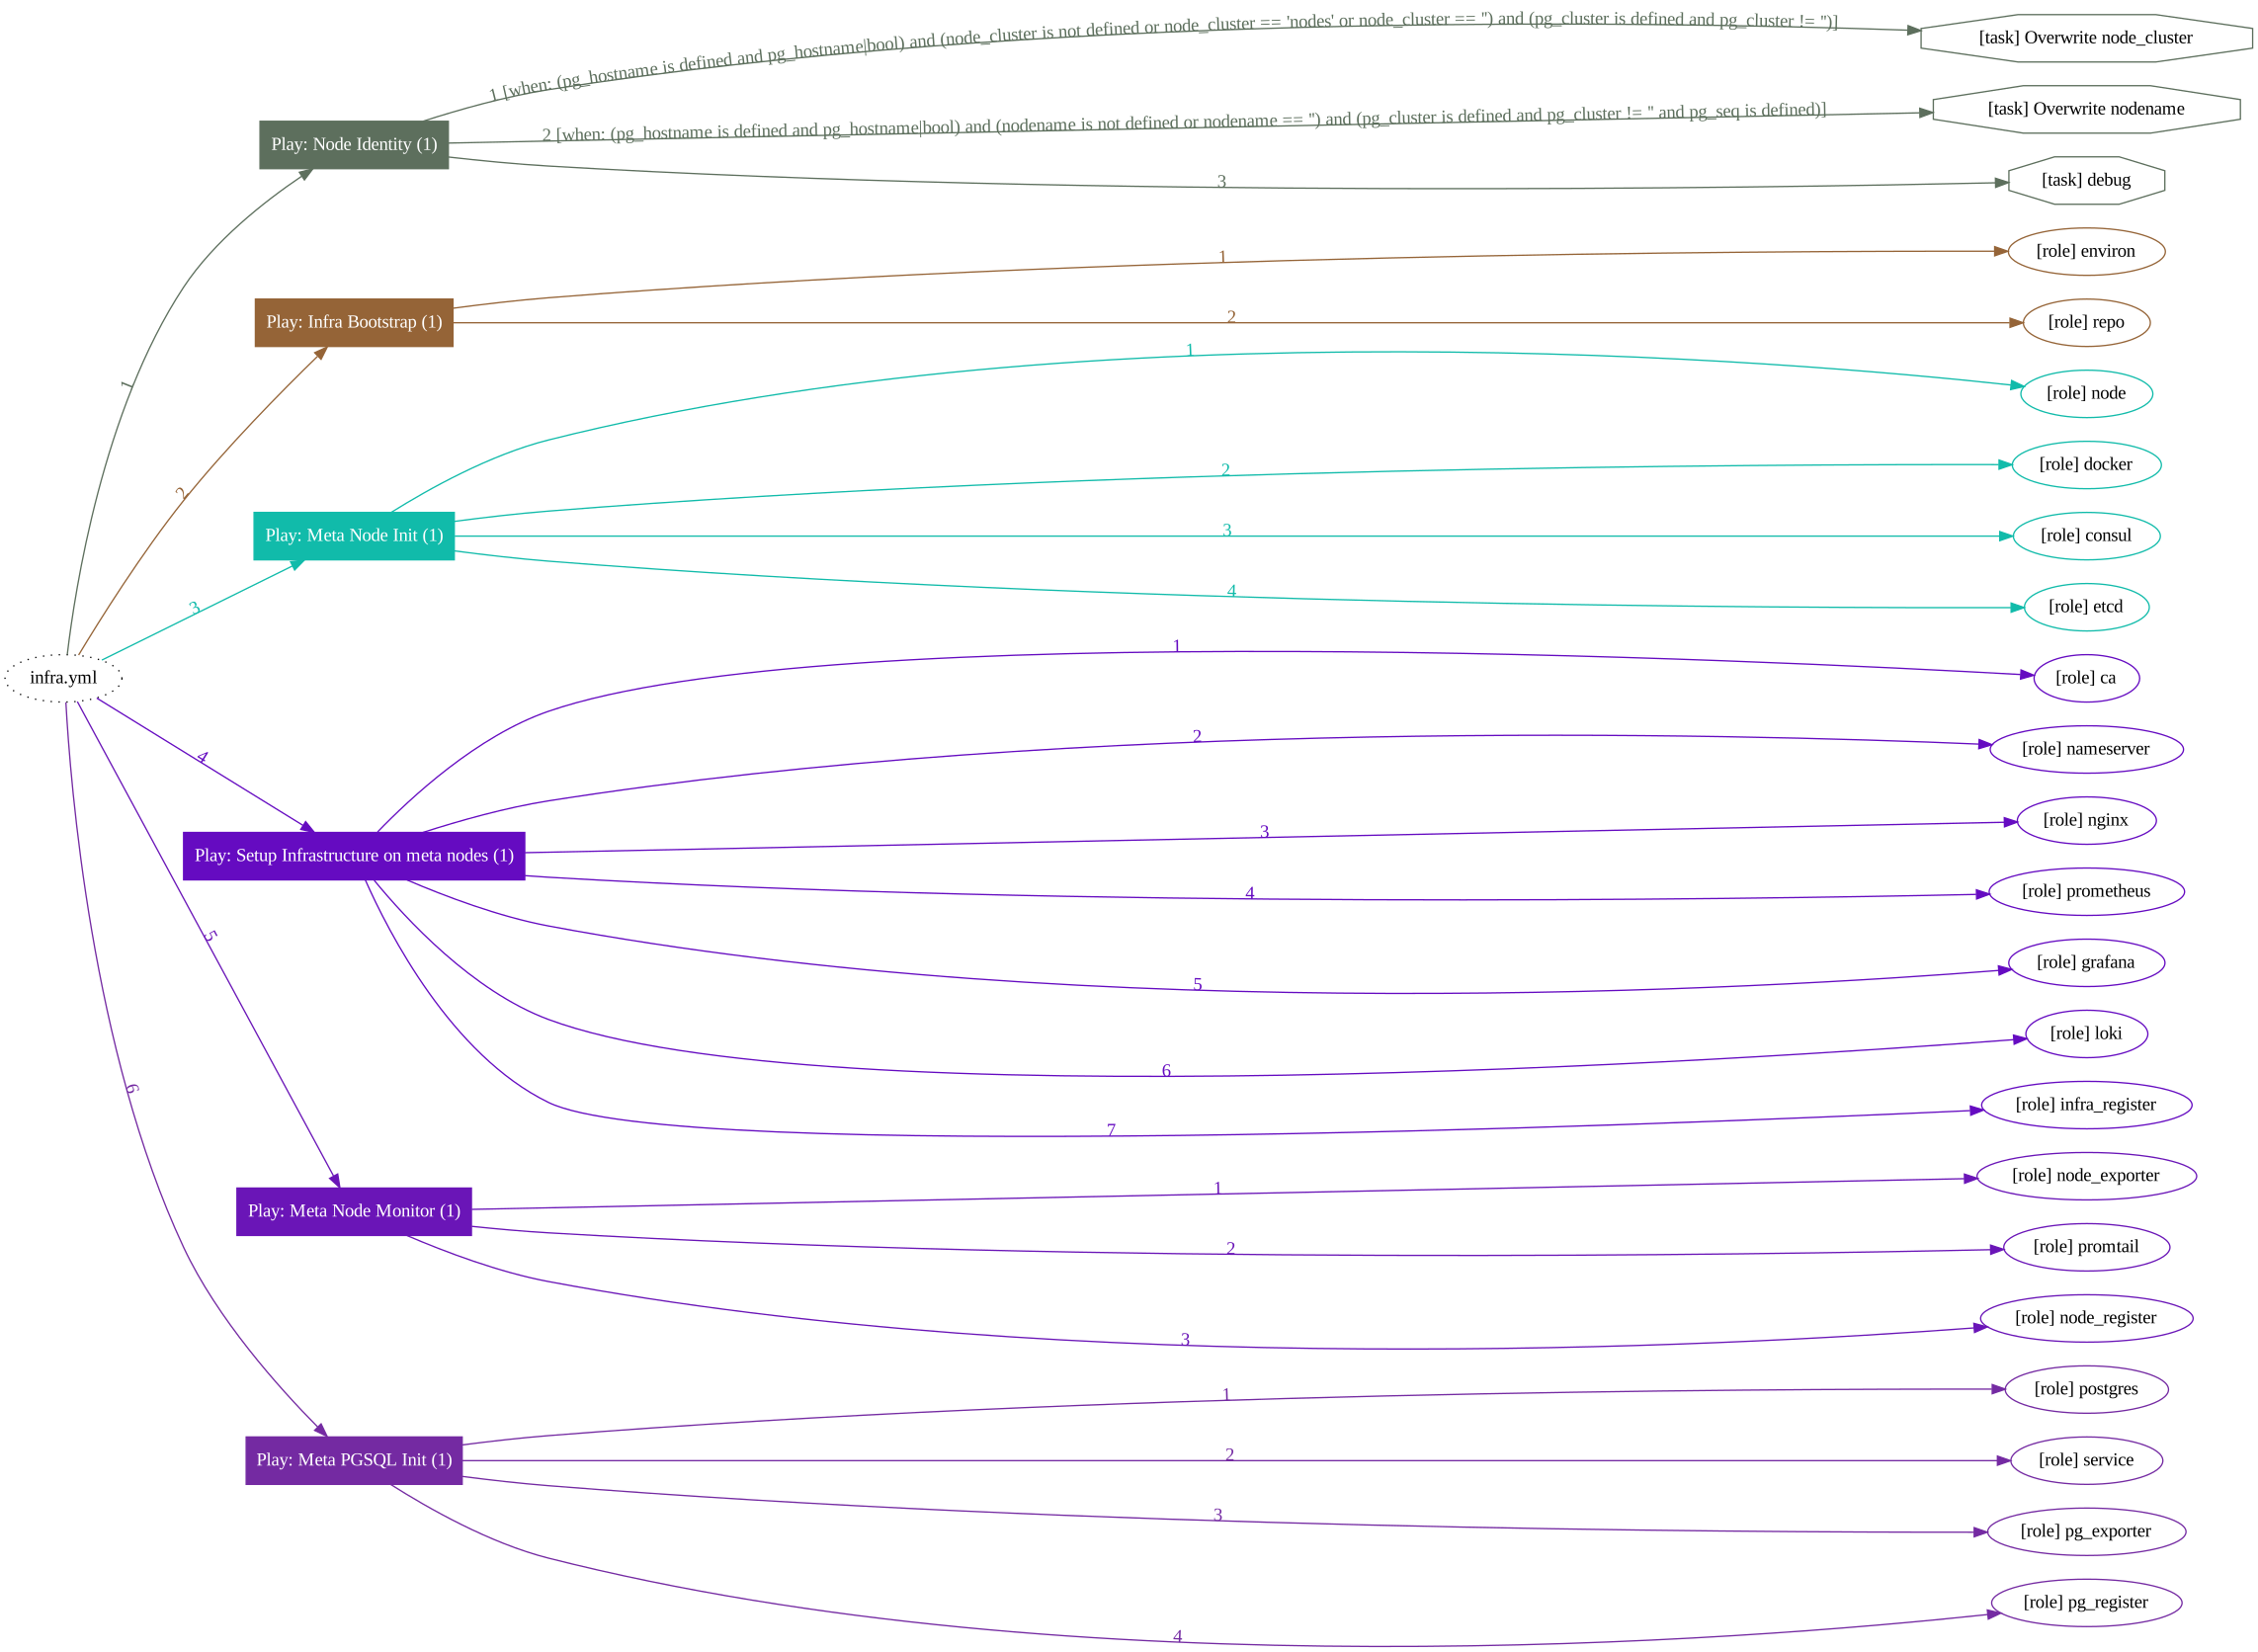
What
The following tasks will be executed:
- Configure dir and environment variables of meta nodes.
- Download and create a LocalYum repo. (If offline packages
/tmp/pkg.tgzexists, skip the download phase) - Init the current meta node as a common node in Pigsty management.
- Deploy infra, including Prometheus, Grafana, Loki, Alertmanager, Consul Server, etc…
- Init a common PostgreSQL singleton on the current node as CMDB.
Where
This playbook works on meta nodes.
- Pigsty will use the node currently executing this playbook as Pigsty’s meta node by default.
- Pigsty will mark the current node as the meta node by default during
configureand replace the placeholder IP10.10.10.10in the config template with the current node’s primary IP. - Meta node can initiate management and deploy infra. It is not different from a regularly managed pgsql node.
- Pigsty uses meta nodes by default to deploy DCS Servers for PostgreSQL HA. But you can use external DCS Servers, too.
- Using multiple meta nodes is possible. Refer to the
pigsty-dcs3template: 3 meta x 3 nodes, allowing one failure.
How
Some special notes:
- This playbook is idempotent. Play again will erase Consul Server and CMDB (when protection is disabled)
- The complete execution of this playbook takes about 5-8 minutes with offline pkgs, depending on your machine spec.
- Depending on your network conditions, downloading packages directly from the Internet may take 10-20 minutes.
- This playbook treats the meta node as a common node to manage and deploy the PGSQL database. If it can be executed successfully, you could be confident that
nodes.ymlandpgsql.ymlwill work on nodes with the same state. - The default
pg-metaon the meta node will be used as the Pigsty CMDB and supporting advanced features.
Tasks
The playbook.
Nodes within the meta group will be marked with the meta_node flag in Pigsty inventory.
infra-demo
The infra-demo.yml is a special playbook for the demo env, which can be used to initialize a 4-node sandbox in one go by interweaving meta node & other nodes initialization. It’s useful when trying to deploy multiple meta nodes.
It’s equivalent to following commands in the standard 4-node demo.
USE THIS WITH CAUTION! You could just destroy the entire env with a fat finger & wrong config.
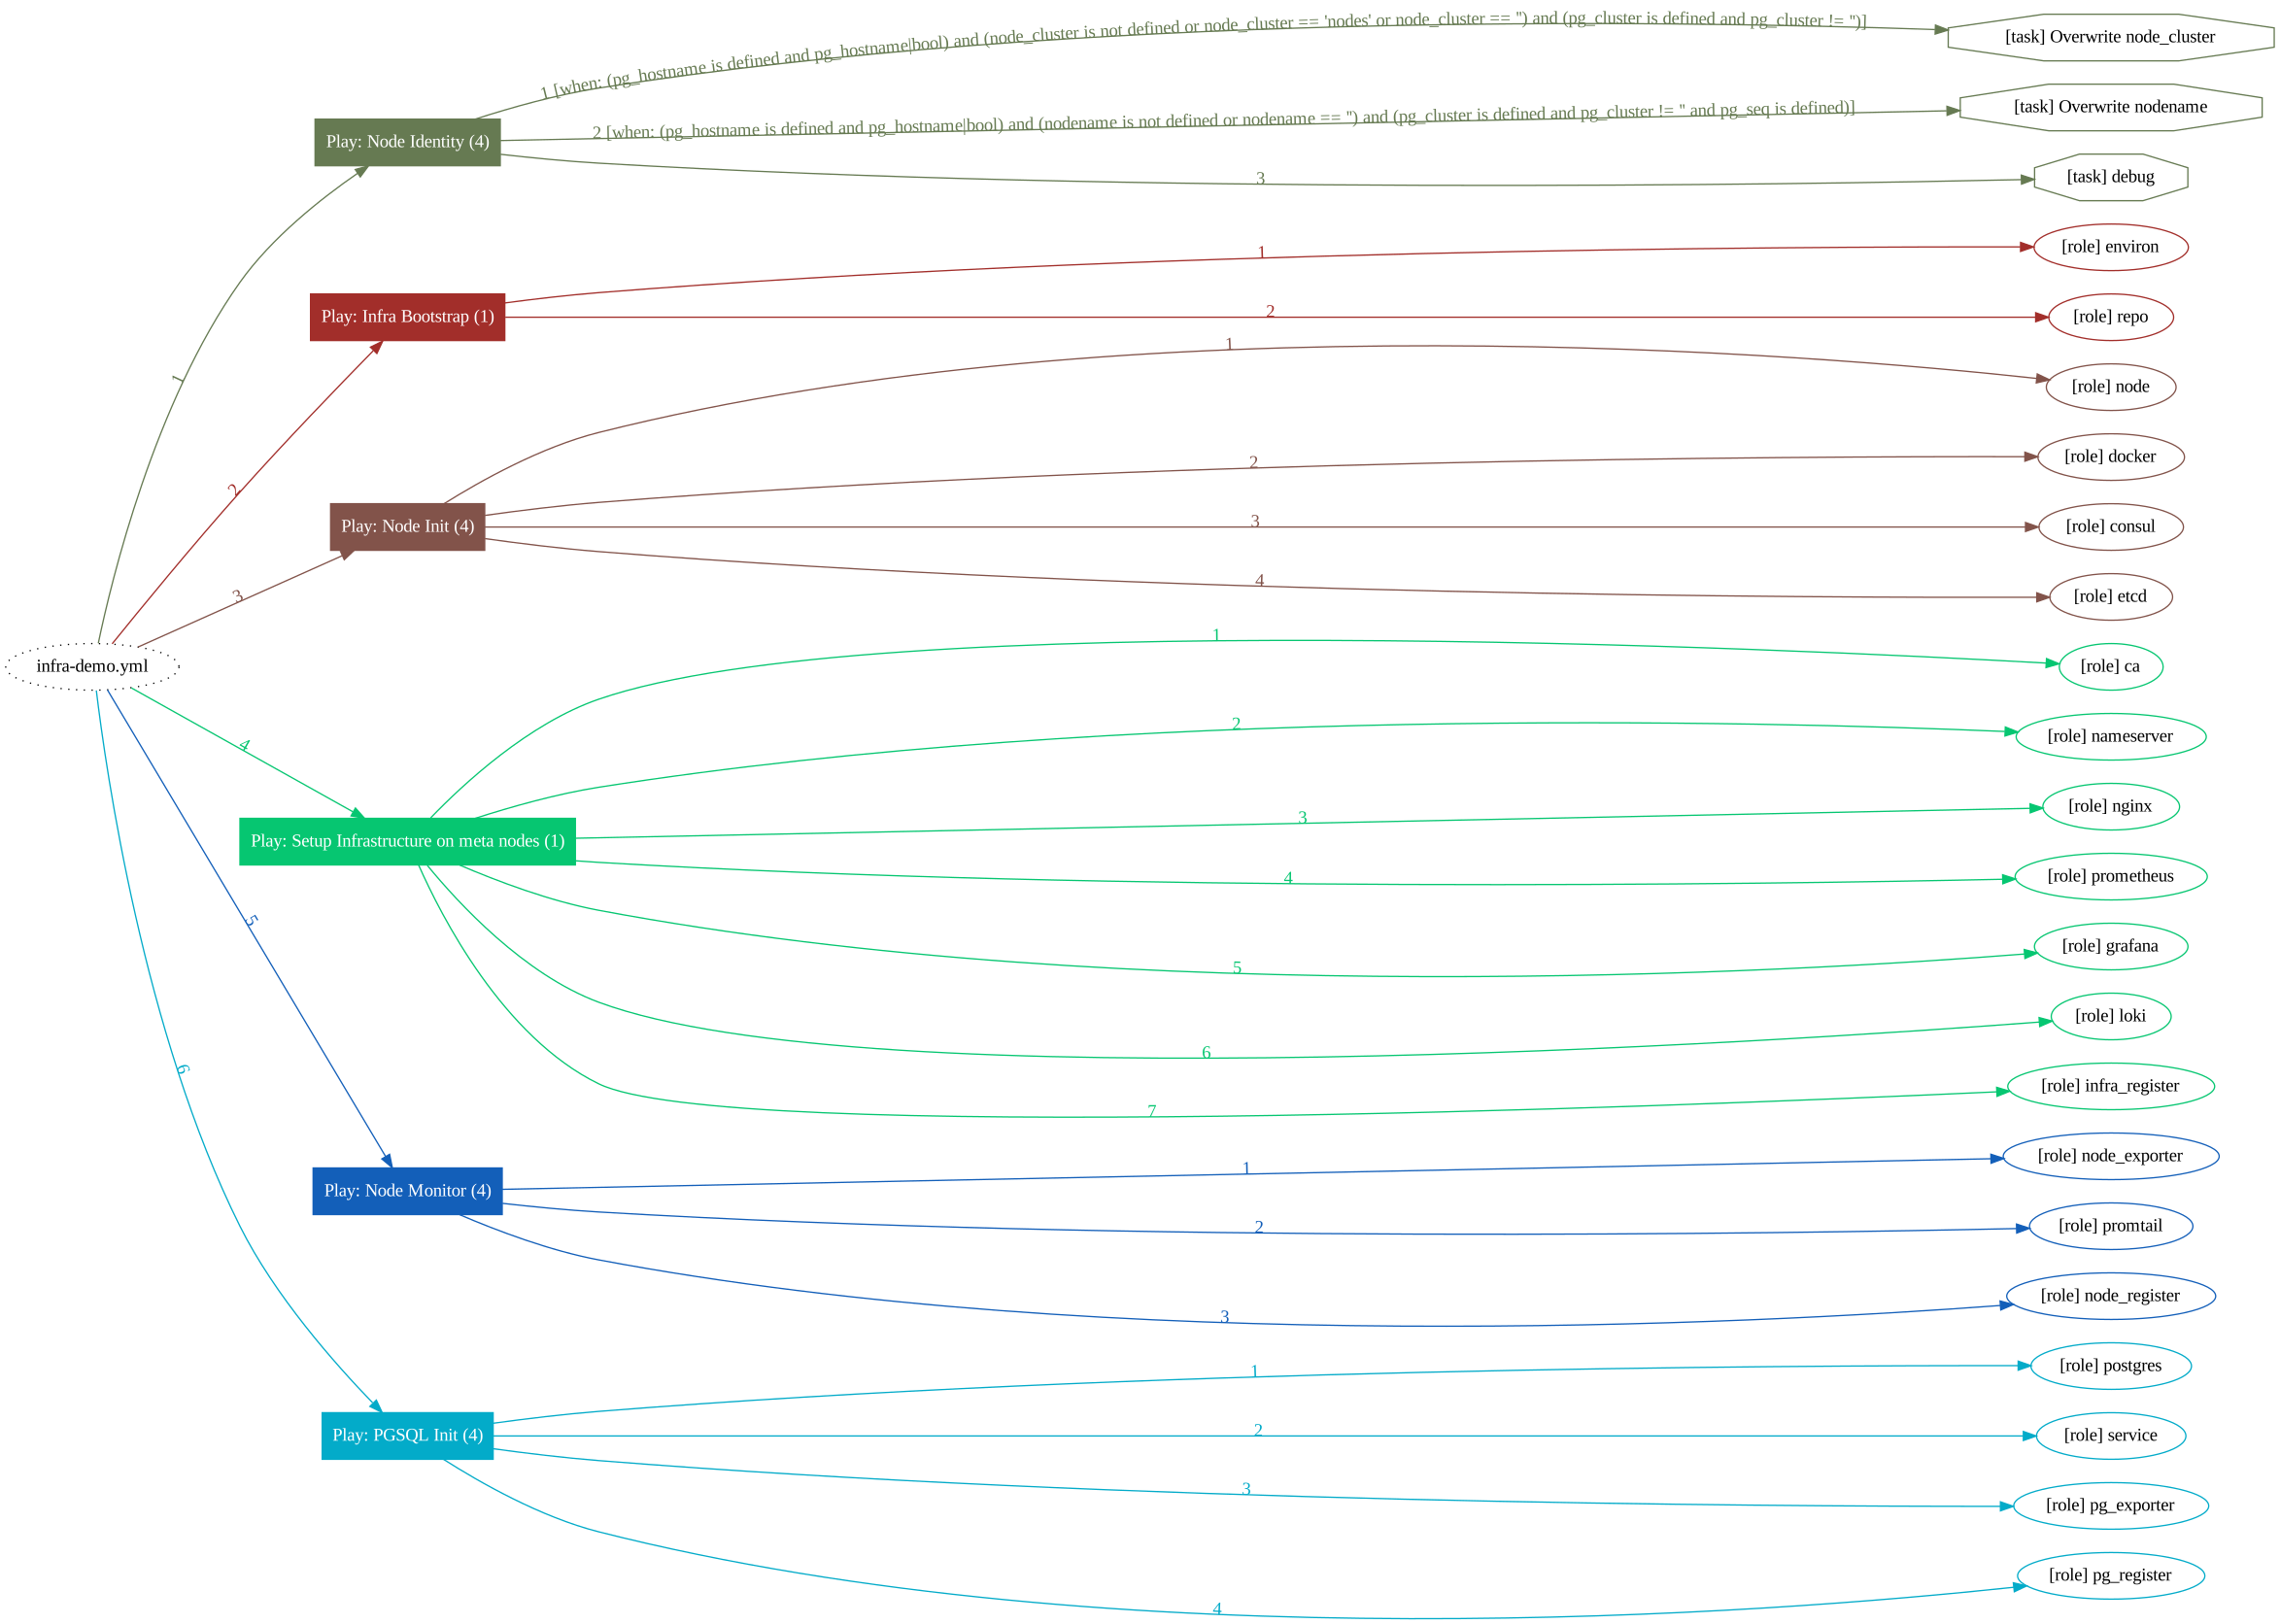
infra-remove
The infra-remove.yml playbook will uninstall pigsty from the meta node.
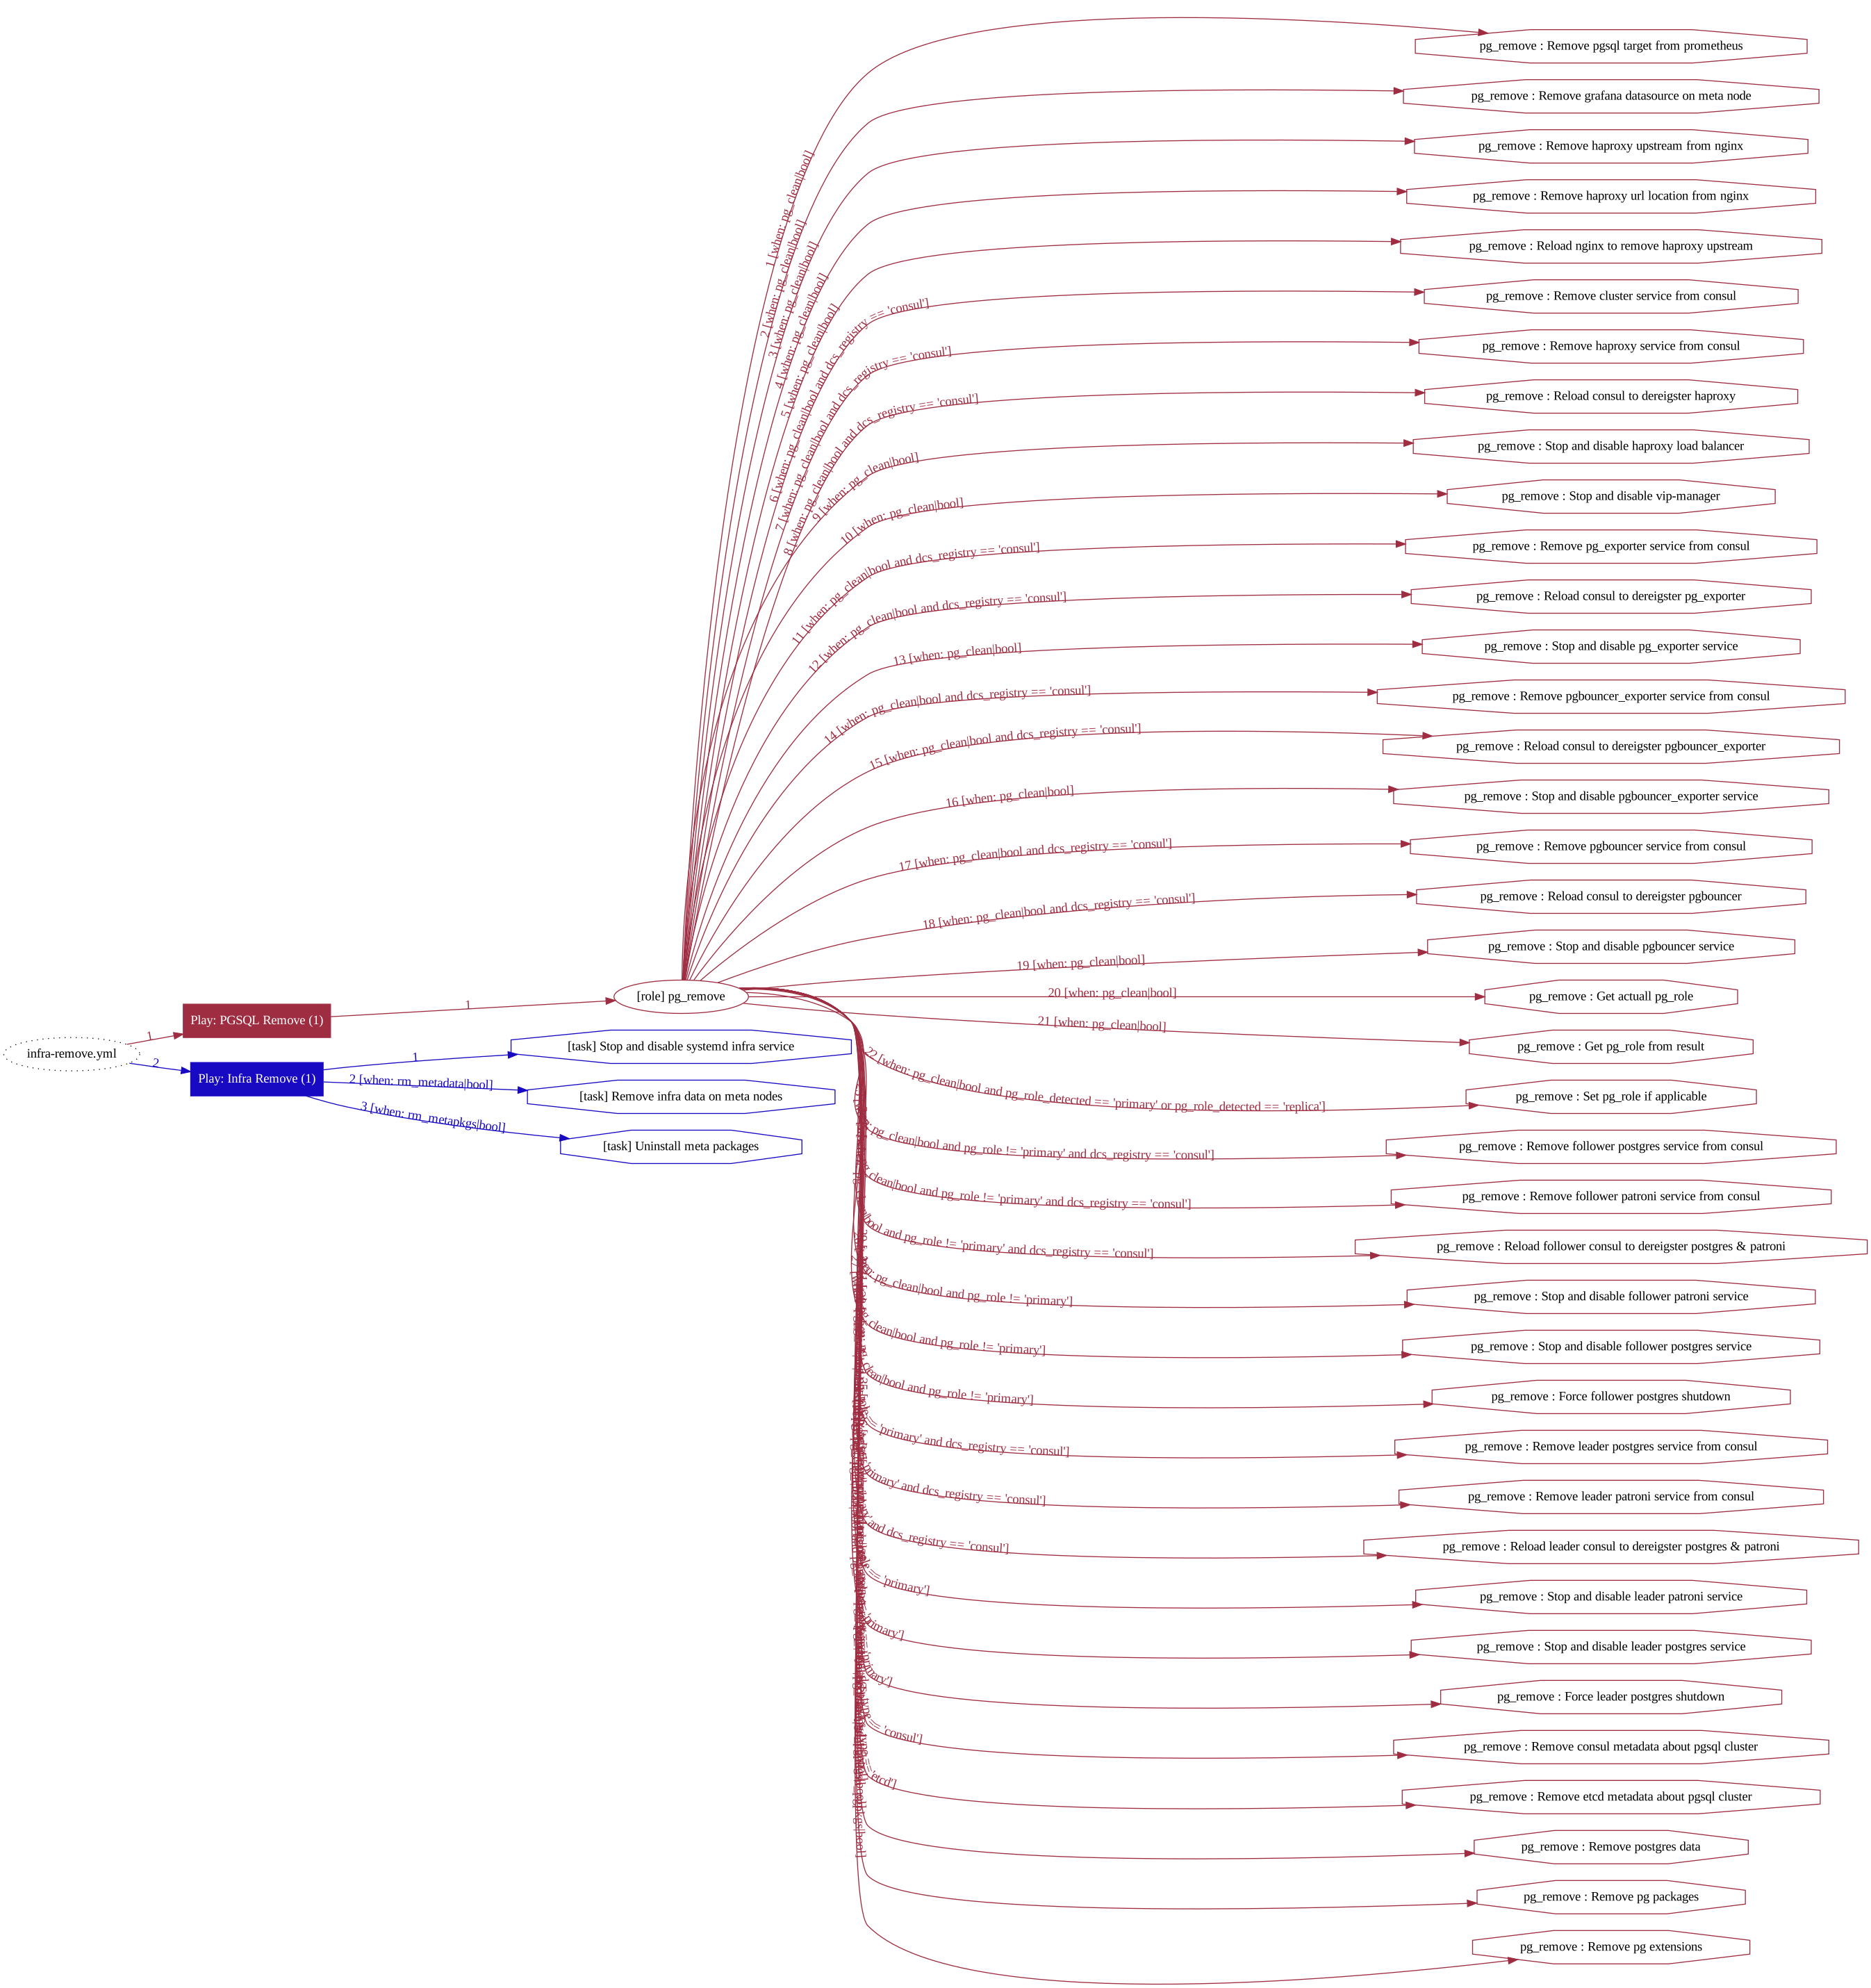
Following services will be stopped & removed from meta nodes.
- grafana-server
- prometheus
- alertmanager
- node_exporter
- consul
- loki
- promtail
infra-jupyter
Playbook infra-jupyter.yml will install JupyterLab on the meta node.
Check Tutorial: Jupyter Lab for more details.
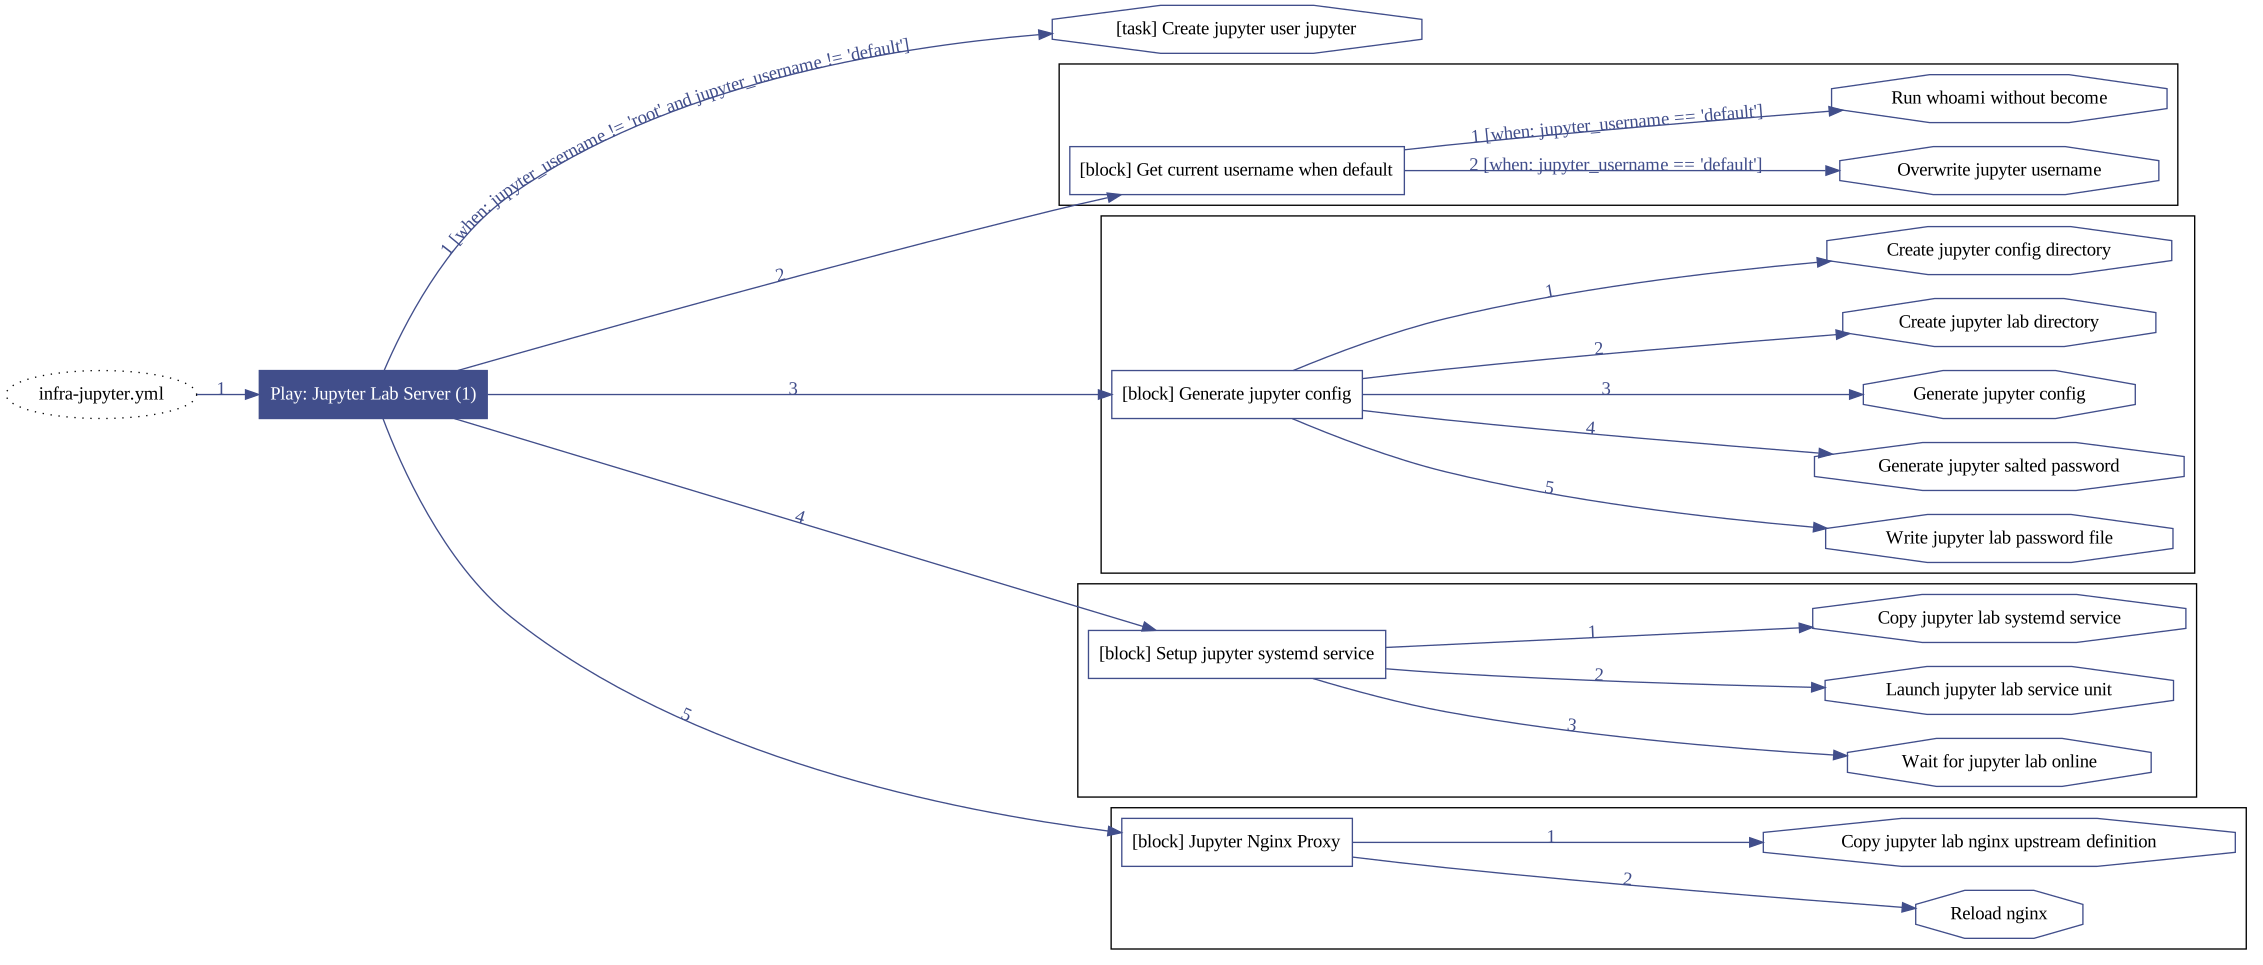
23 - Playbook: NODES
Use the
NODESplaybook to bring more nodes to Pigsty, adjusting nodes to the state described in the config.
Once pigsty is installed on the meta node with infra.yml, You can add more nodes to Pigsty with nodes.yml or remove them from Pigsty with nodes-remove.yml.
| Playbook | Function | Link |
|---|---|---|
nodes |
Node Provisioning. Register node into Pigsty and prepare for database deployment | src |
nodes-remove |
Node Removal, uninstall DCS & Monitoring & Logging, de-register from Pigsty | src |
nodes
The nodes.yml playbook will register nodes to Pigsty.
This playbook adjusts the target nodes to the state described in the inventory, installs the Consul service, and incorporates it into the Pigsty monitoring system. Nodes can be used for database deployment once provisioning is complete.
The behavior of this playbook is determined by the Config: NODES. The complete execution of this playbook may take 1 to 3 minutes when using the local yum repo, depending on the machine spec.
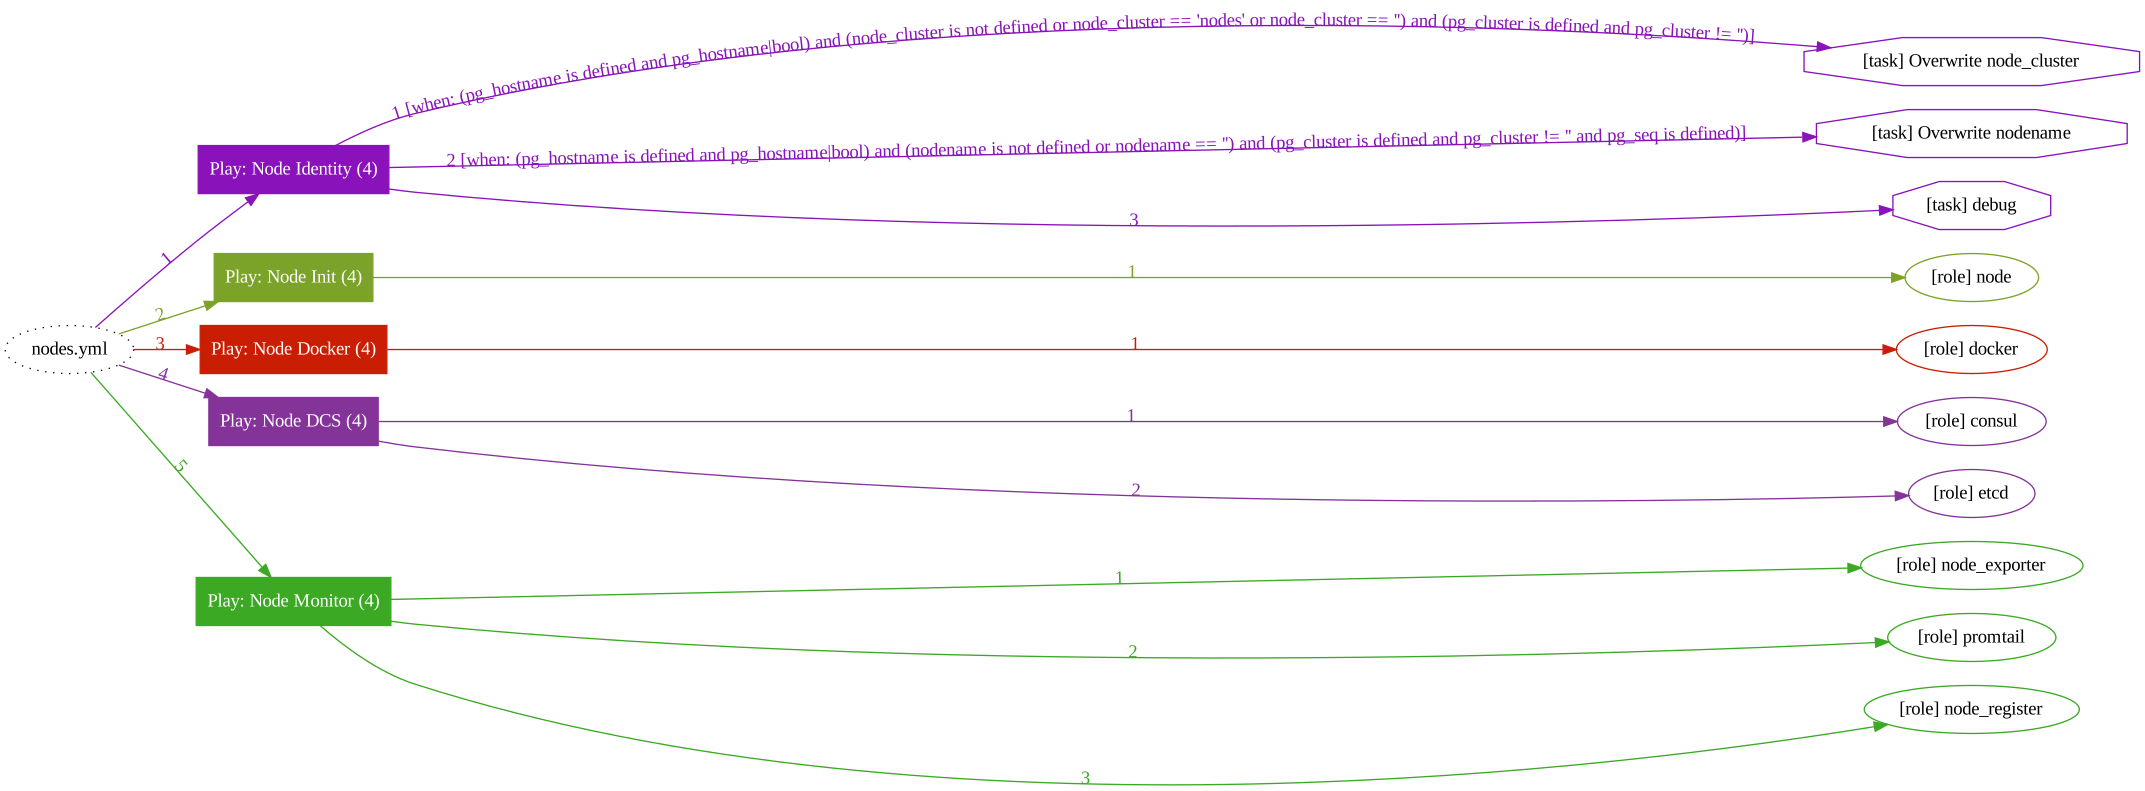
This playbook will run the following tasks:
- Generate node identity parameters
- Provisioning Node
- Configure the node’s hostname
- Configure static DNS records
- Configure dynamic DNS resolver
- Configure yum repo
- Install specified RPM packages
- Configure features such as NUMA/SWAP/firewall
- Configure node tuned tuning templates
- Configure shortcuts and environment variables for the node
- Create node admin user and configure its SSH access
- Configure timezone
- Configure NTP service
- Initialize the DCS service on the node: Consul
- Erase existing Consul if it exists (with protection disabled)
- Initialize the Consul Agent or Server service for the current node
- Initialize the node monitoring component and incorporate Pigsty
- Install Node Exporter
- Register Node Exporter to Prometheus on meta nodes.
Be careful when running this playbook on provisioned nodes. It may lead to the database being temporarily unavailable because of the removal of the consul service.
The dcs_clean provides a SafeGuard to avoid accidental purge. When existing Consul Instance is detected during playbook execution. It will take action about it.
When using the complete nodes.yml playbook or just the section on dcs|consul, please double-check that the -tags|-t and -limit|-l is correct. Make sure you are running the right tasks on the correct targets.
SafeGuard
Pigsty provides a SafeGuard to avoid purging running consul instances with fat fingers. There are two parameters.
dcs_safeguard: Disabled by default, if enabled, running consul will not be purged by any circumstance.dcs_clean: the Consul role fallback and bundled v1.5.1 sandbox inventory set this totrue; set it tofalseand enable the safeguard in protected environments.
When running consul exists, nodes.yml will act as:
dcs_safeguard / dcs_clean |
dcs_clean=true |
dcs_clean=false |
|---|---|---|
dcs_safeguard=true |
ABORT | ABORT |
dcs_safeguard=false |
PURGE | ABORT |
When running consul exists, nodes-remove.yml will act as:
dcs_safeguard / dcs_clean |
dcs_clean=true |
dcs_clean=false |
|---|---|---|
dcs_safeguard=true |
ABORT | ABORT |
dcs_safeguard=false |
PURGE | PURGE |
Selective Execution
You can selectively execute a subset of this playbook through tags.
For example, if you want to re-deploy node monitor components only:
Common tasks are listed below:
Admin User Provision
Admin user provisioning is a chicken-and-egg problem. To execute playbooks, you need to have an admin user. To create a dedicated admin user, you need to run this playbook.
Pigsty recommends leaving admin user provisioning to your vendor. It’s common to deliver the node with an admin user with ssh & sudo access.
It may require a password to execute ssh & sudo. You can pass them via extra params --ask-pass|-k and --ask-become-pass|-K, entering SSH and sudo password when prompted. You can create a dedicated admin user (with no pass sudo & ssh) with another admin user (with password sudo & ssh).
The following parameters are used to describe the dedicated admin user.
The default admin user is dba (uid=88). Please do not use postgres or {{ dbsu }} as the admin user. Please try to avoid using root as the admin user directly.
The default user vagrant in the local sandbox has been provisioned with nopass ssh & sudo. You can use vagrant to ssh to all other nodes from the sandbox meta node.
Refer to: Prepare: Admin User for more details.
nodes-remove
The nodes-remove.yml playbook is used to remove nodes from Pigsty.
The playbook needs to be executed on meta nodes, and targeting nodes need to be removed.
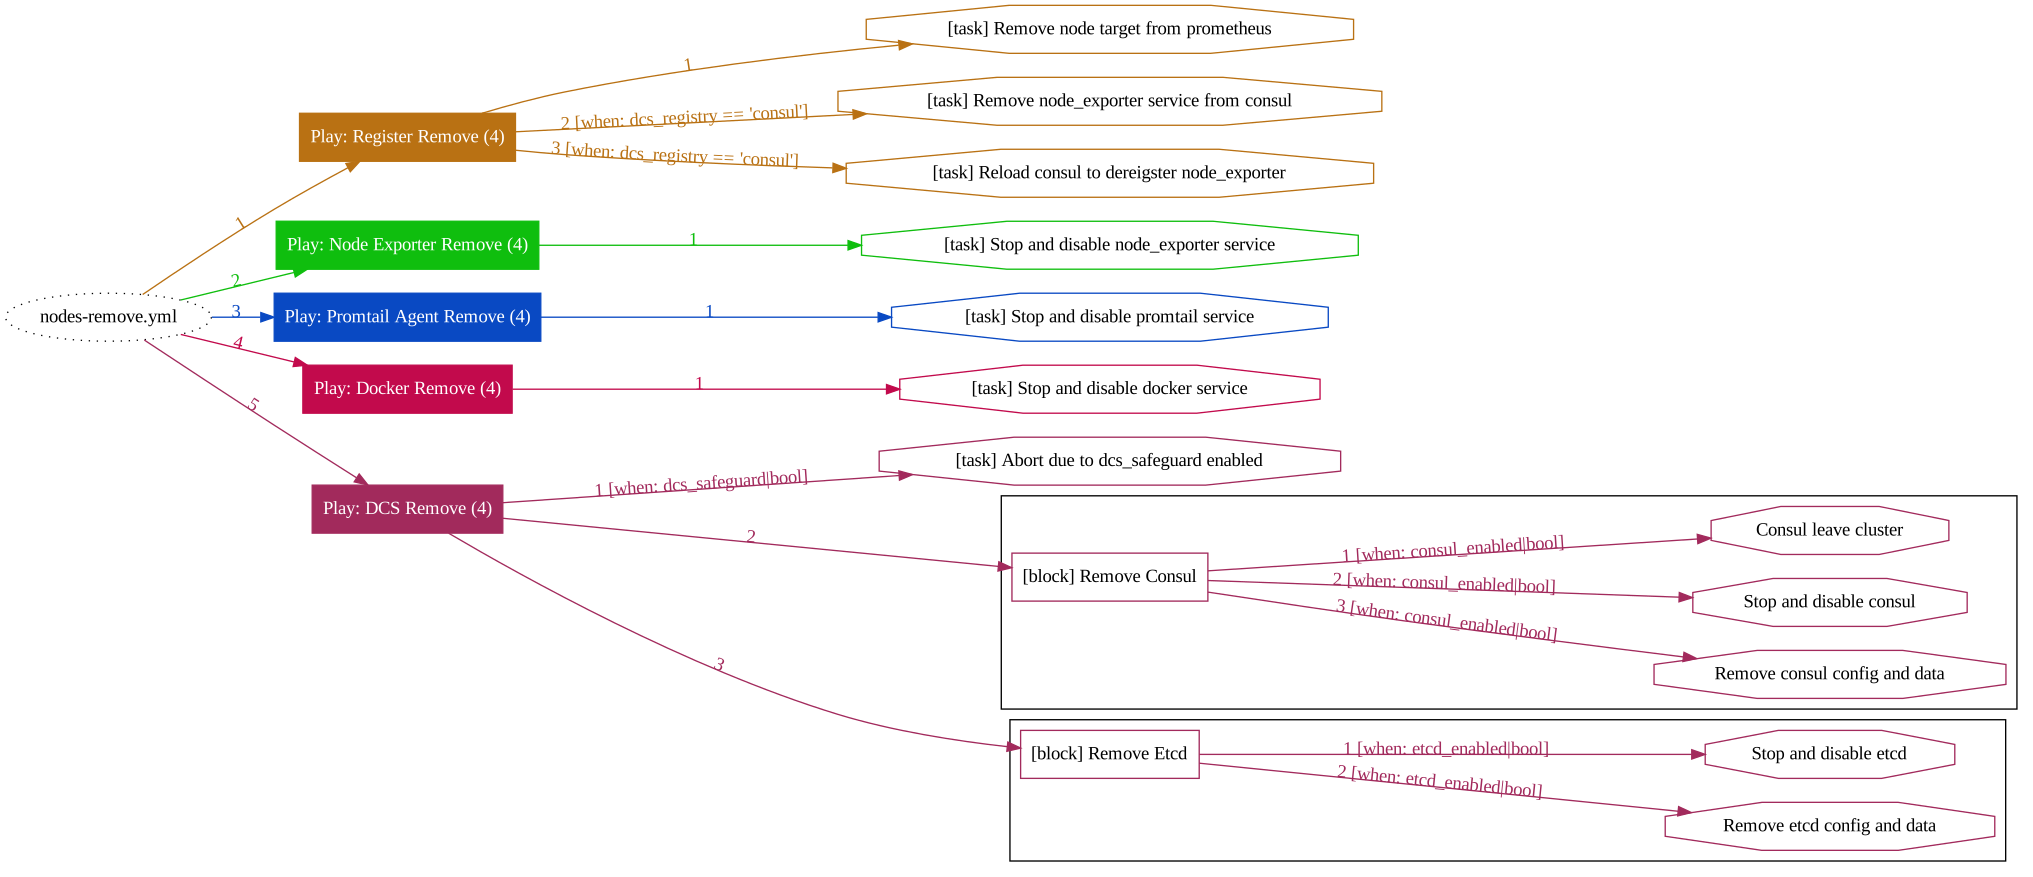
Task Subsets
24 - Playbook: PGSQL
Pull up a defined cluster of HA PostgreSQL cluster using the PGSQL series playbook.
Overview
| Playbook | Function | Link |
|---|---|---|
pgsql |
Deploy a PostgreSQL cluster, or cluster expand | src |
pgsql-remove |
Destroy PostgreSQL cluster, or cluster downsize | src |
pgsql-createuser |
Create PostgreSQL business users | src |
pgsql-createdb |
Create a PostgreSQL Business Database | src |
pgsql-monly |
Monly mode, with access to existing PostgreSQL instances or RDS | src |
pgsql-migration |
Generate PostgreSQL semi-automatic database migration solution (Beta) | src |
pgsql-matrixdb |
Reuse the PG to deploy a set of MatrixDB clusters (Beta) | src |
pgsql
After completing the infra initialization, users can use pgsql.yml to complete the initialization of the database cluster.
Complete the cluster definition in the Pigsty configuration file and then apply the changes to the environment by executing pgsql.yml.
This playbook accomplishes the following.
- Install, deploy, and initialize PostgreSQL, Pgbouncer, Patroni (
postgres). - Install the PostgreSQL monitor (
monitor). - Install and deploy Haproxy and VIP, expose services (
service). - Register the database instance to the infra to be monitored (
register).
This playbook can be misused to accidentally delete the database, as initializing the database will erase the existing database.
The insurance param prevents accidental deletion by allowing automatic aborting or skipping of high-risk operations during initialization when an existing running instance is detected.
Nevertheless, when using pgsql.yml, double-check that -tags|-t and -limit|-l is correct.
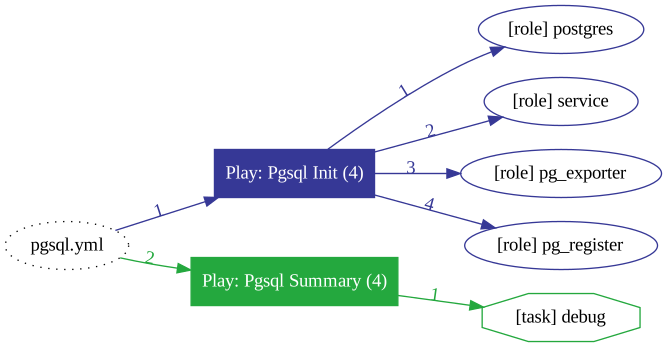
Cautions
- It is strongly recommended to add the
-lparameter to the execution to limit the scope of the command execution. - When performing initialization for a replica, the user must ensure that the primary has completed initialization.
- If
Patronitakes too long to pull up a replica when a cluster is expanded, the Ansible playbook may abort due to a timeout. (However, making the replica will continue, for example, in scenarios where making the replica takes more than one day). - It is possible to perform subsequent steps from the
-Wait for patroni replica onlinetask via Ansible’s-start-at-taskafter the replica has been automatically crafted. Please refer to SOP for details.
SafeGuard
Pigsty provides a SafeGuard to avoid purging running PostgreSQL instances with fat fingers. There are two parameters.
pg_safeguard: Disabled by default, if enabled, running PostgreSQL will not be purged by any circumstance.pg_clean: the role fallback isfalse, while the bundled disposable v1.5.1 sandbox inventory sets it totrue; protected environments should disable it and enable the safeguard.
When running pg exists, pgsql.yml will act as:
pg_safeguard / pg_clean |
pg_clean=true |
pg_clean=false |
|---|---|---|
pg_safeguard=true |
ABORT | ABORT |
pg_safeguard=false |
PURGE | ABORT |
When running pg exists, pgsql-remove.yml will act as:
pg_safeguard / pg_clean |
pg_clean=true |
pg_clean=false |
|---|---|---|
pg_safeguard=true |
ABORT | ABORT |
pg_safeguard=false |
PURGE | PURGE |
Selective execution
An ansible’s tagging mechanism can select a subset of the execution playbook.
For example, if you want to perform only service initialization, you can use the following command.
The common subsets of commands are as follows.
Daily management tasks
Daily management can also be used ./pgsql.yml to modify the state of the cluster. The common command subsets are as follows.
pgsql-remove
Database Destruction: Remove existing database cluster or instance, reclaim node: pgsql-remove.yml.
The pgsql-remove.yml is the reverse of pgsql.yml and will do the following :
- Unregister the database instance from the infra(
register) - Stop the LB, service component(
service) - Removal of monitoring system components(
monitor) - Remove Pgbouncer, Patroni, Postgres(
postgres) - Remove database dir(
rm_pgdata: true) - Remove packages (
rm_pgpkgs: true)
The playbook has two command-line options to remove the database dir and packages (the default destruction does not remove data and packages).
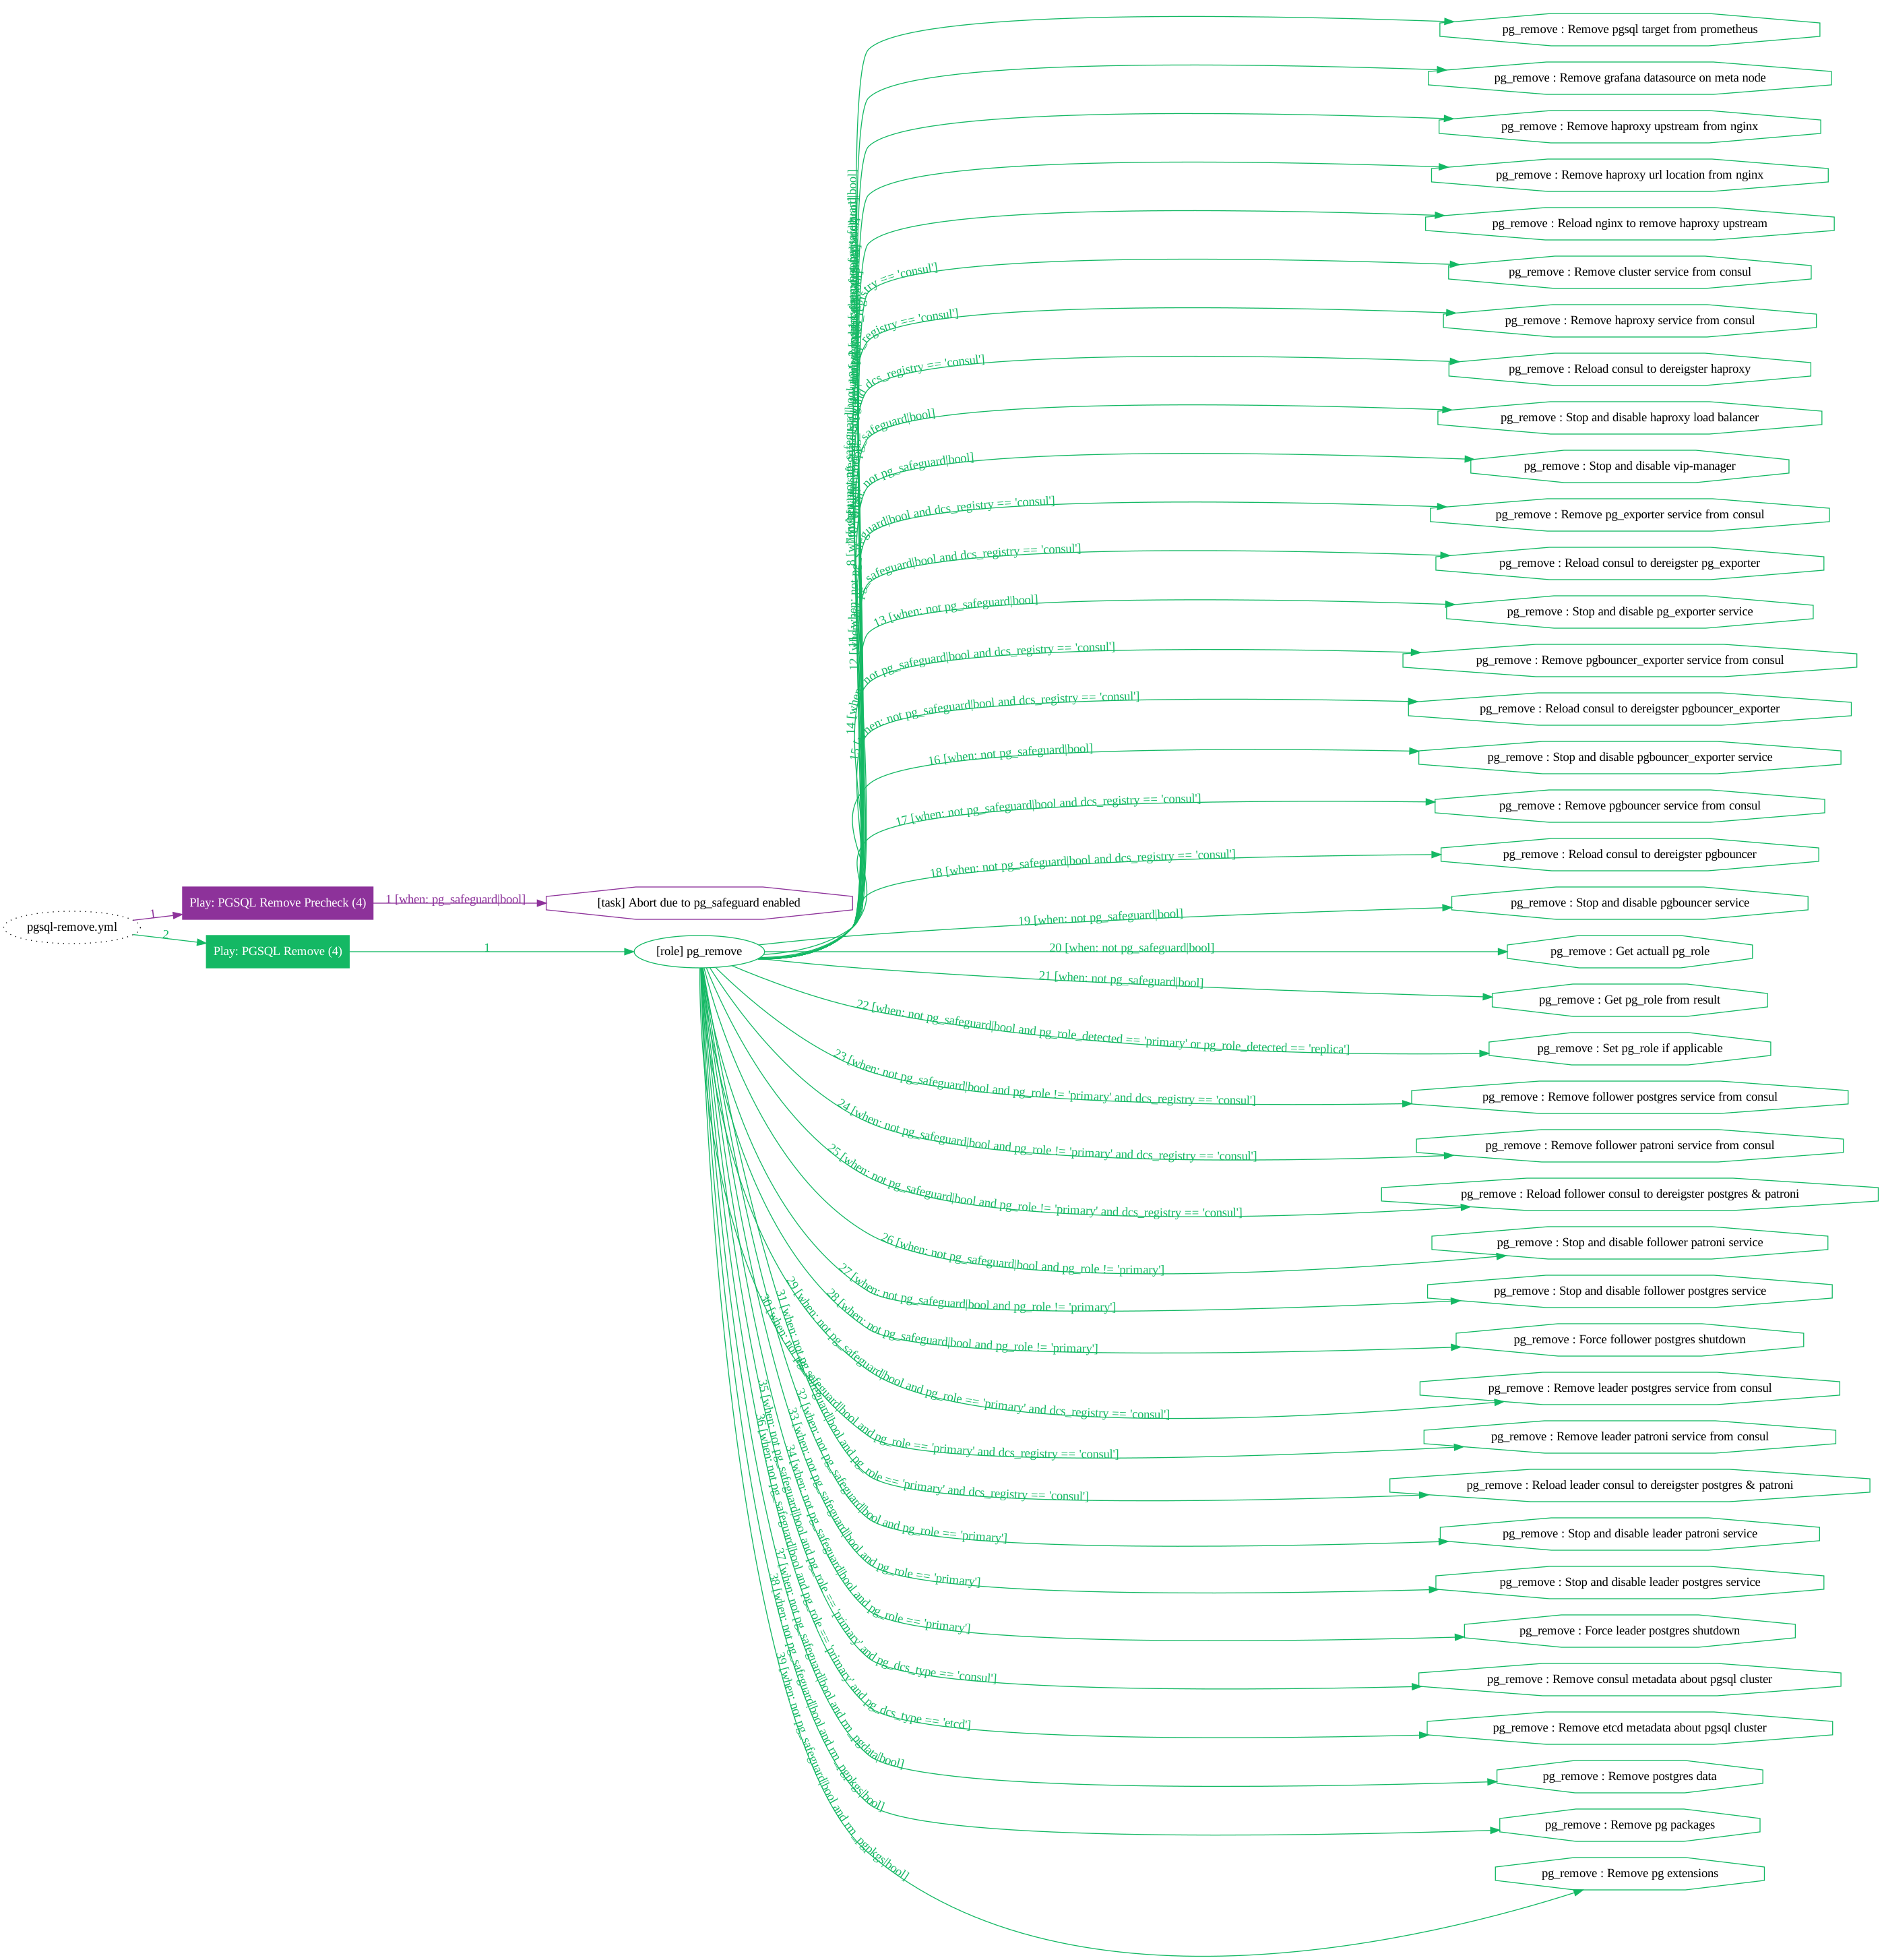
Daily management
pgsql-createdb
Created business database: Create a new database in an existing cluster or modify a current database: pgsql-createdb.yml.
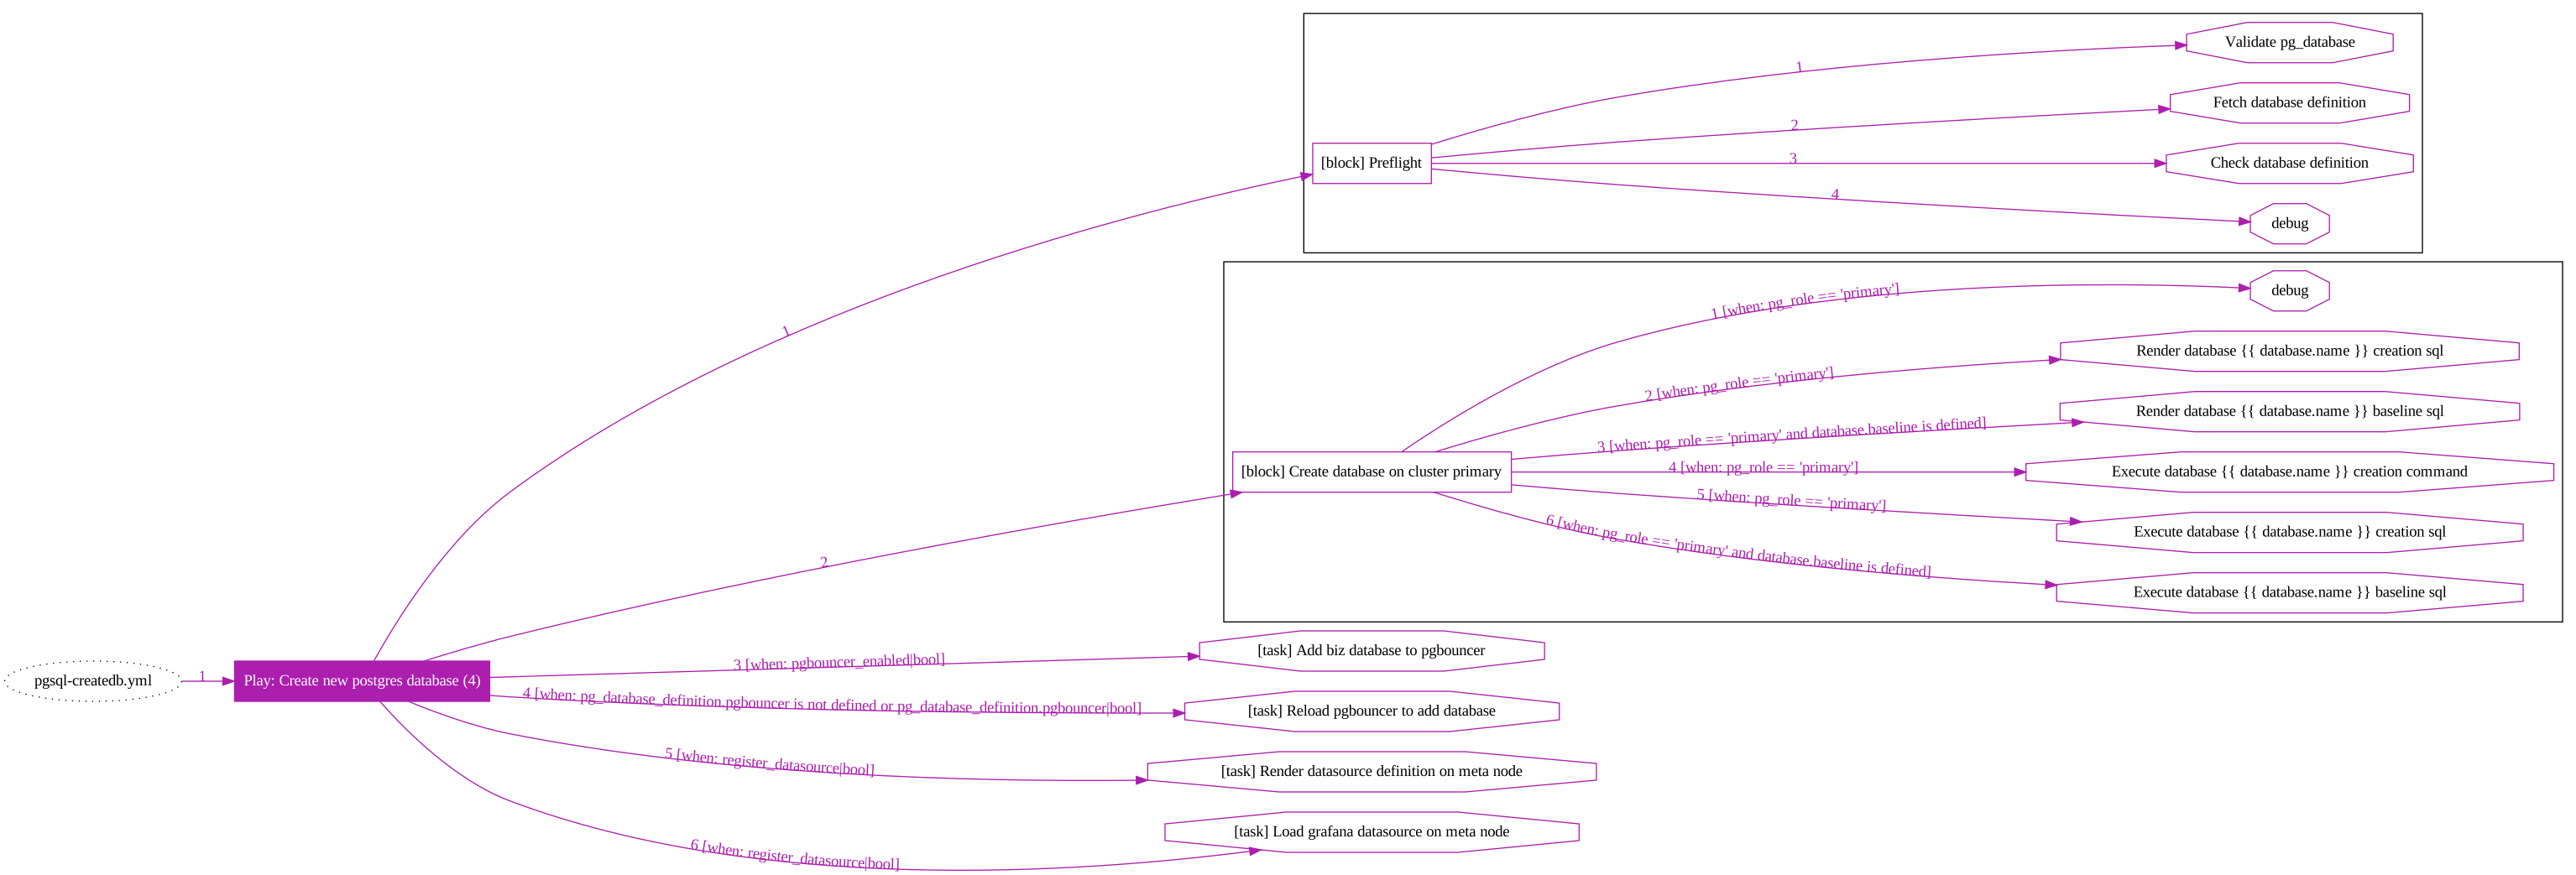
To ensure that, the author recommends creating a new database in an existing cluster via a playbook or scripting tool.
- The inventory is consistent with the actual situation.
- Pgbouncer connection pools are consistent with the database.
- The data sources registered in Grafana are consistent with the actual situation.
Daily management
Please refer to the section Database for the creation of the database.
Simplify commands using wrapper scripts:
pgsql-createuser
Create business users: Create a new user or modify an existing user in an existing cluster:pgsql-createuser.yml.
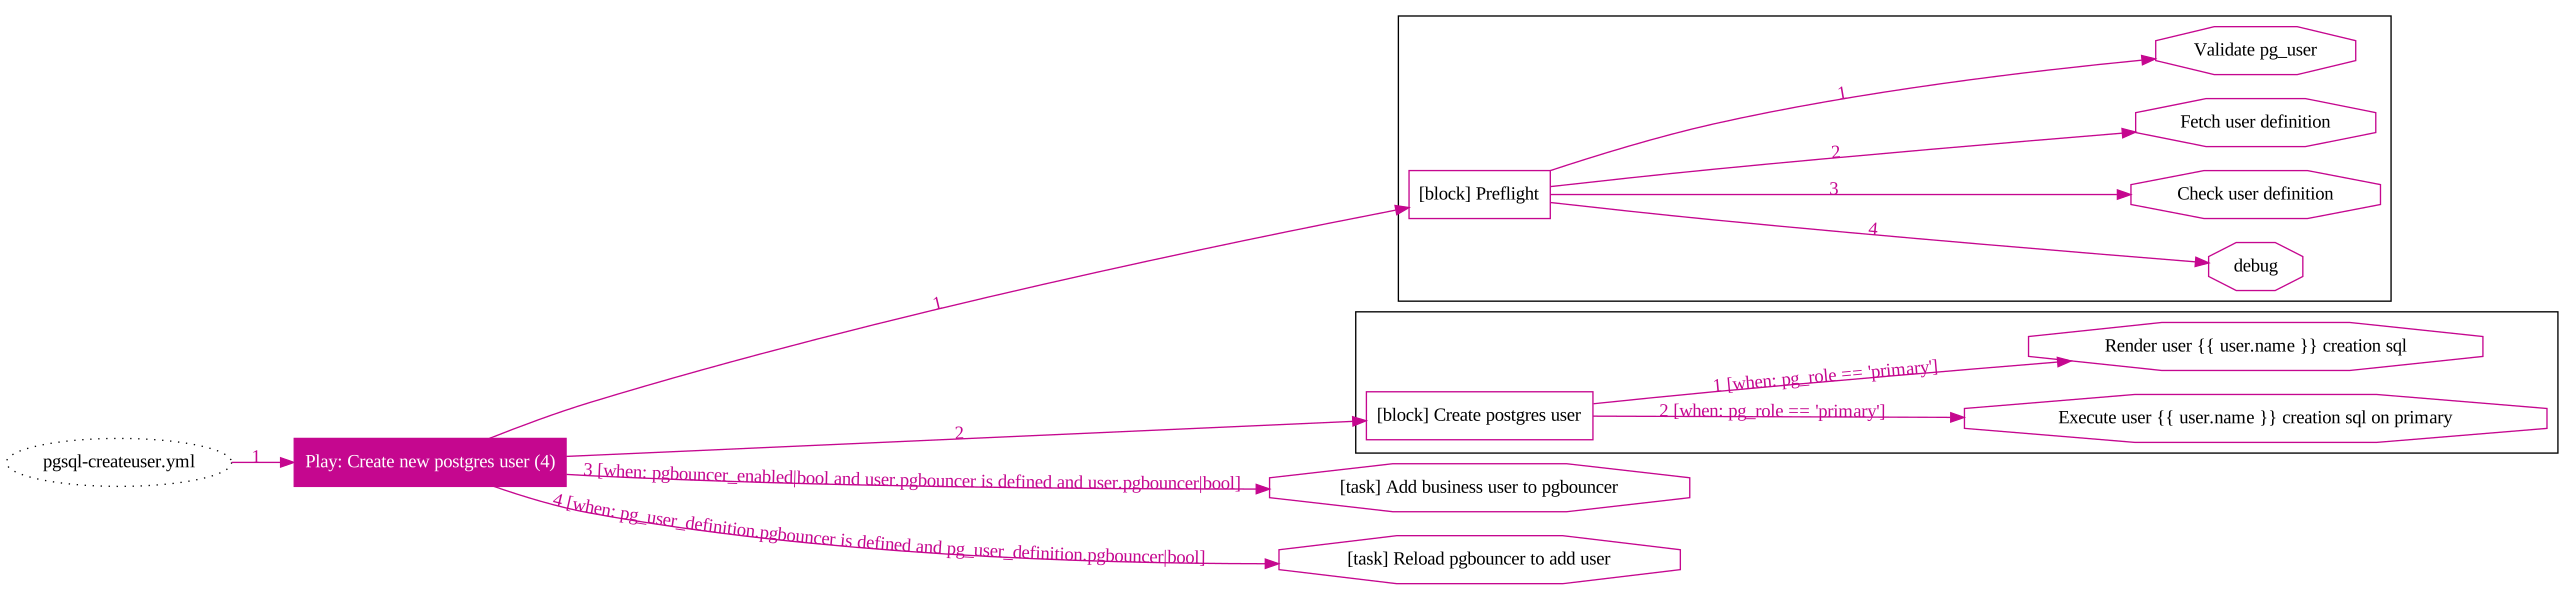
Daily management
Please refer to the section User for the creation of business users.
Simplify commands using wrapper scripts.
Note that the user-specified by pg_user must already be in the definition of the cluster pg_users. Otherwise, an error will be reported.
pgsql-monly
Dedicated playbook for performing monitoring deployments. See monly deployments for details.
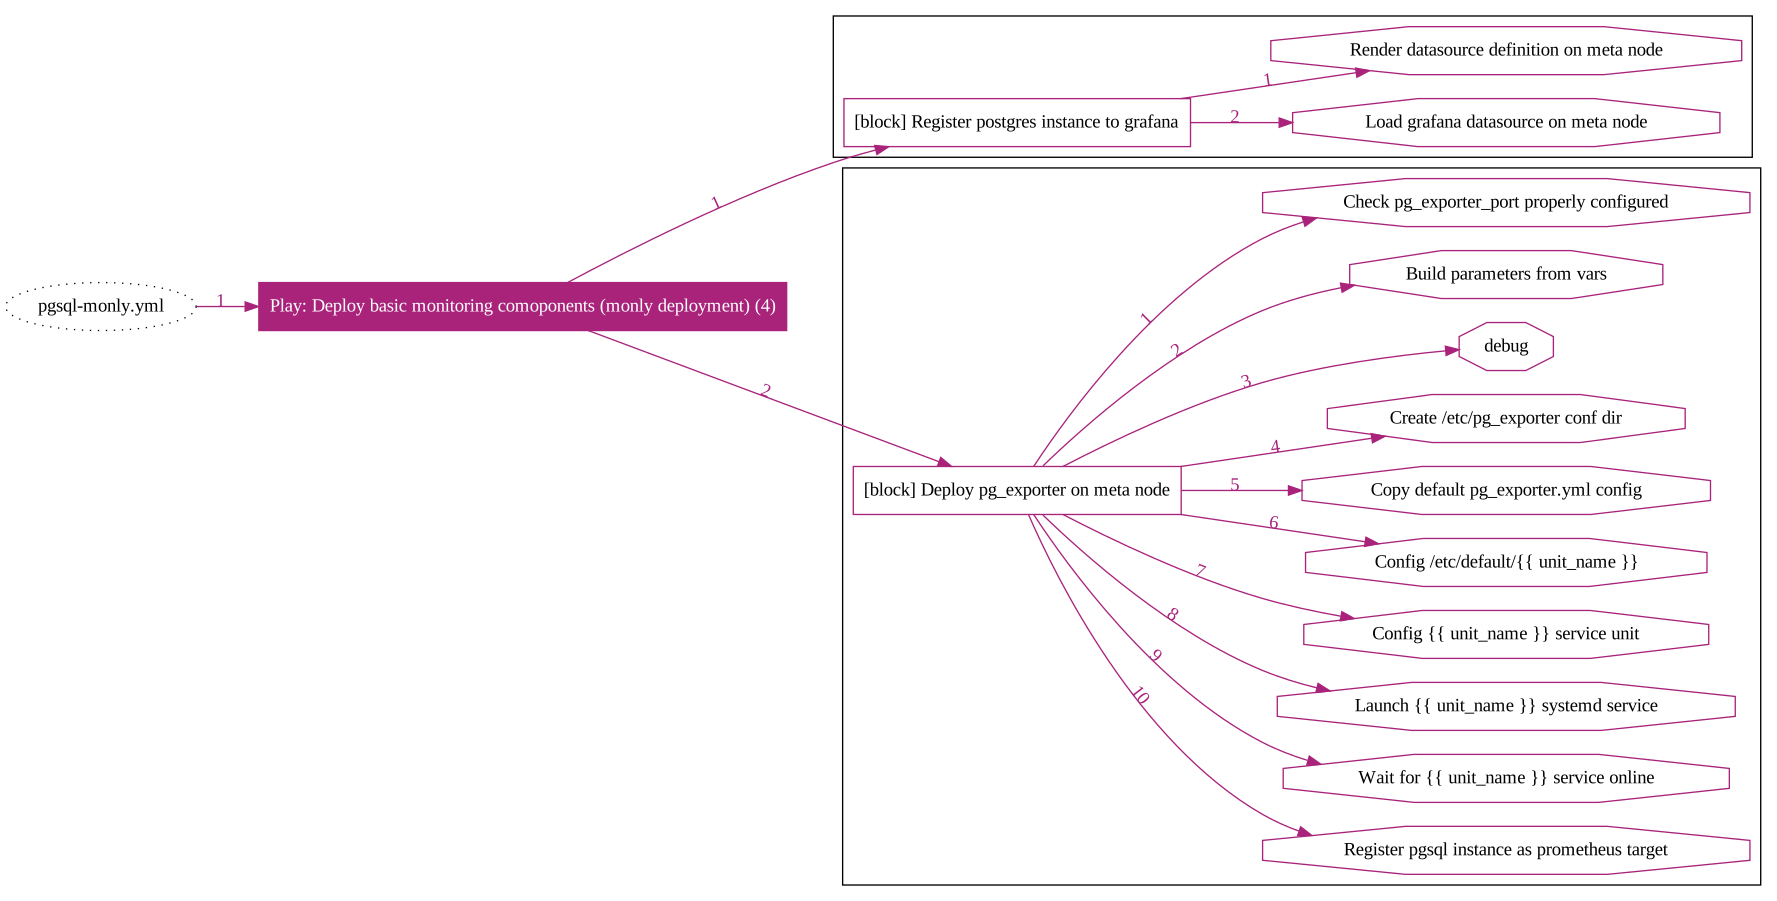
pgsql-matrixdb
Dedicated playbook for deploying MatrixDB. See Deploying MatrixDB Cluster for details.
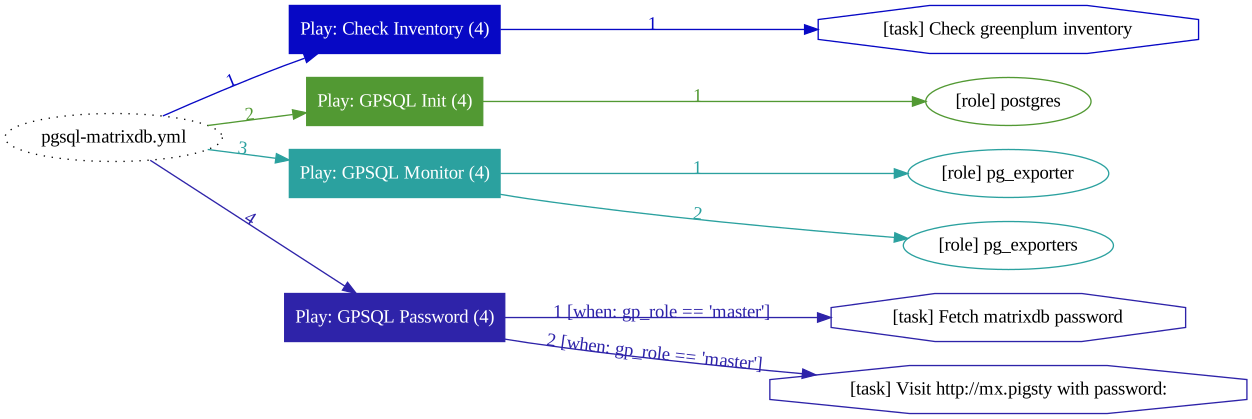
pgsql-migration
Playbook for automated database migration, still in Beta status. See database cluster migration for details.
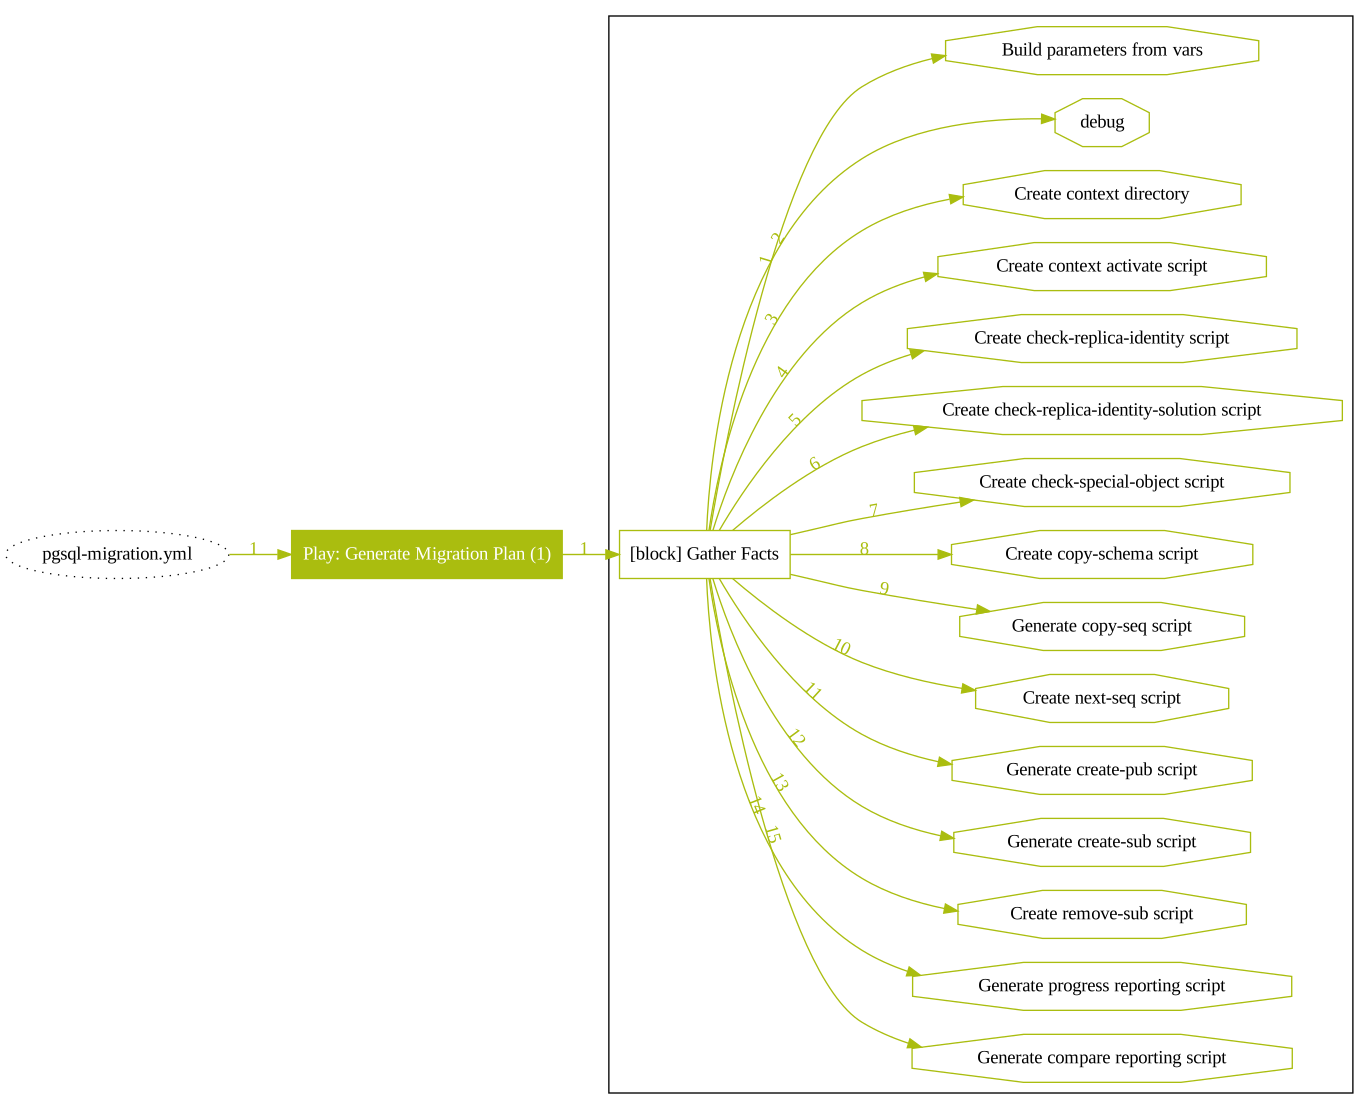
25 - Playbook: REDIS
REDIS series Playbook: Define and pull Redis databases in traditional standalone, native, and sentinel clusters.
| Playbook | Function | Link |
|---|---|---|
redis |
Deploying a Redis database in Native/Standalone/Sentinel cluster | src |
redis-remove |
Redis cluster/node destruction | src |
redis
Deploy redis instances on nodes.
Alias script bin/createredis wrap above playbook with:
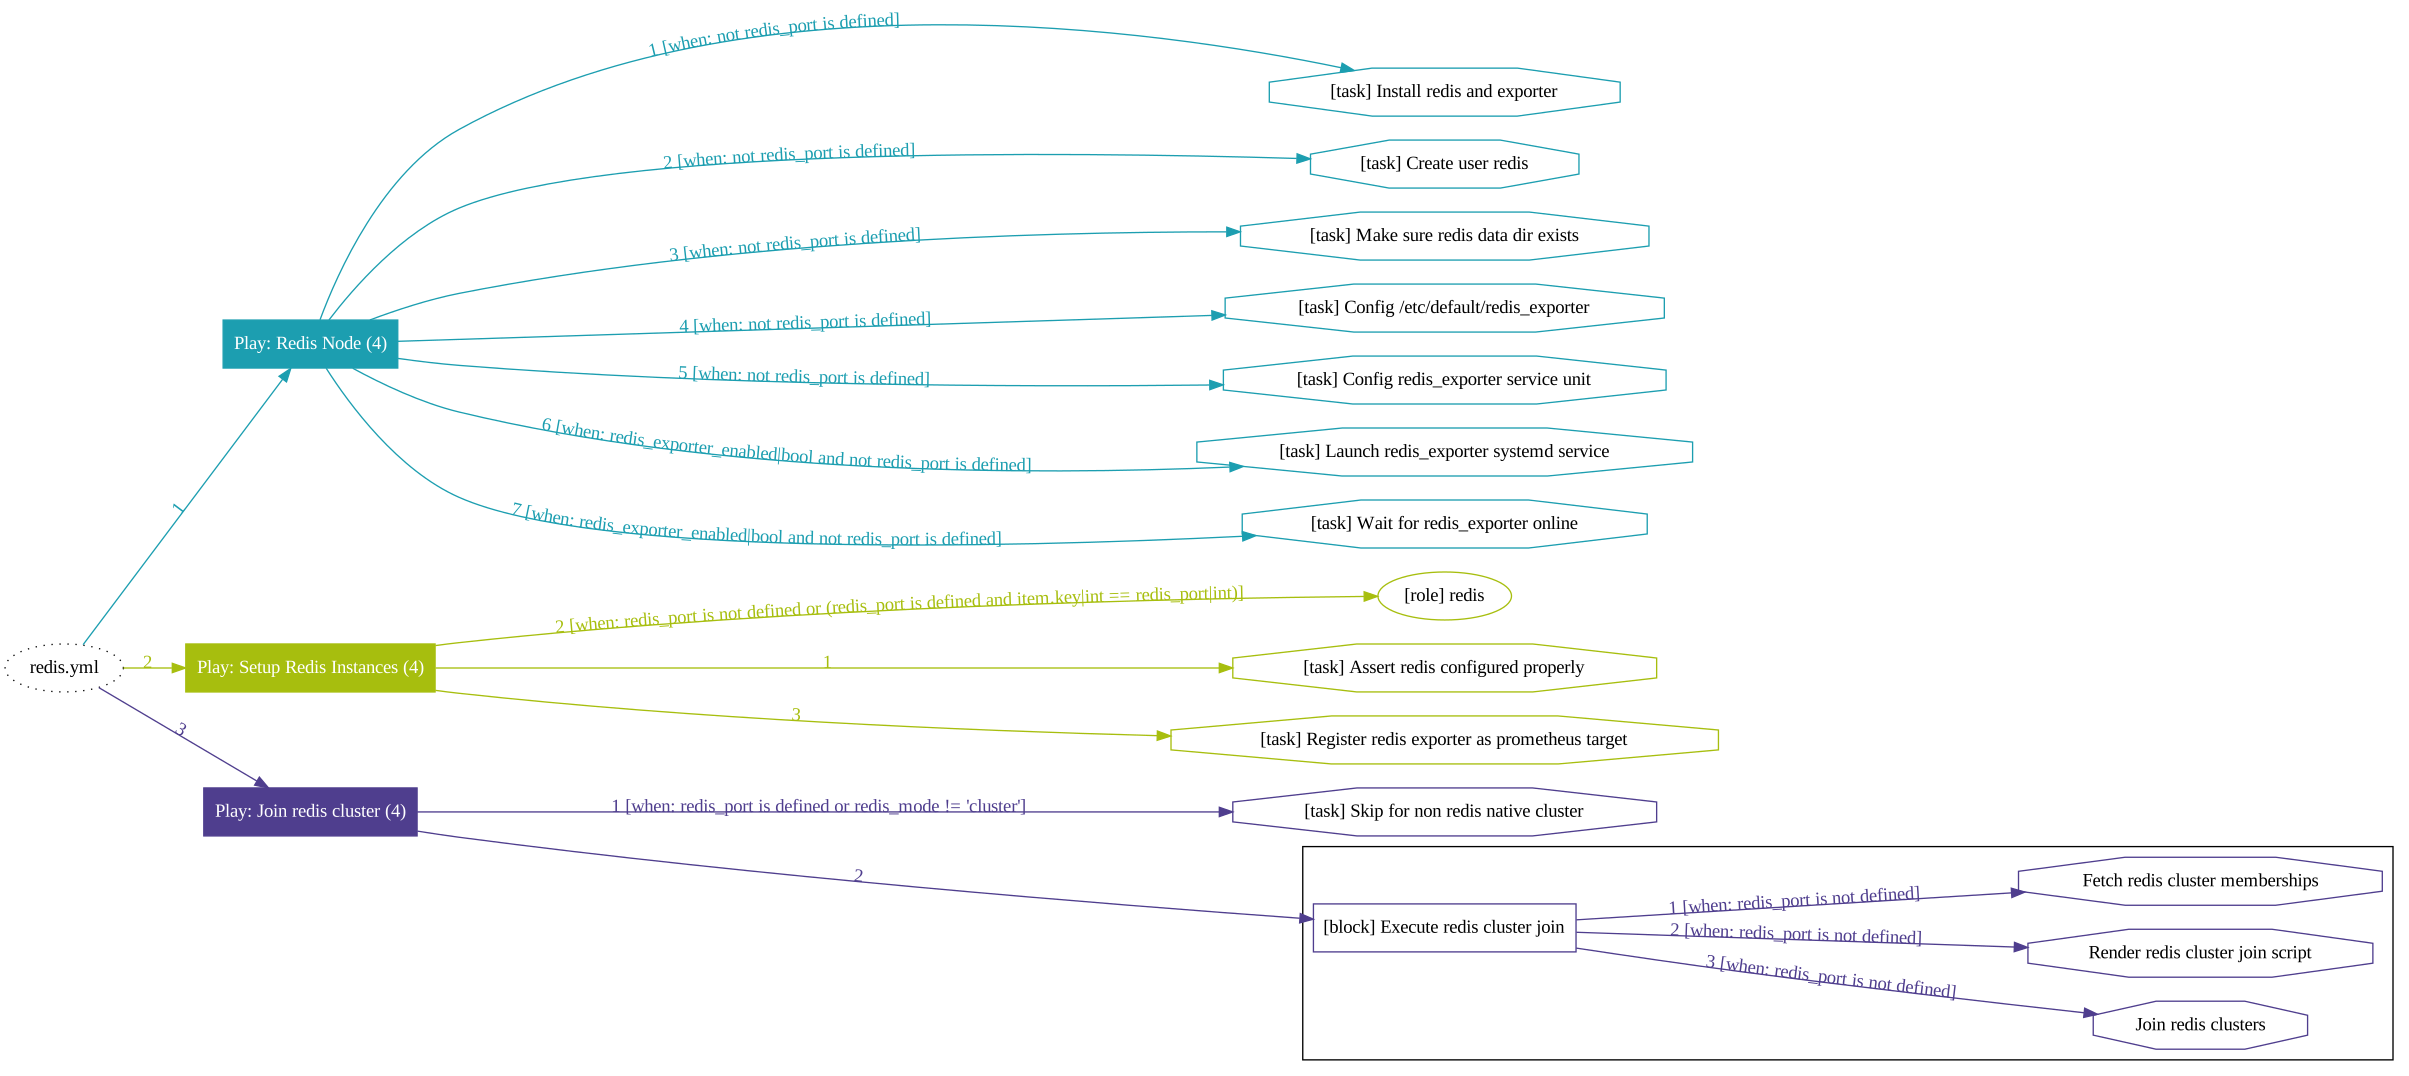
redis-remove
Remove redis instances from nodes.
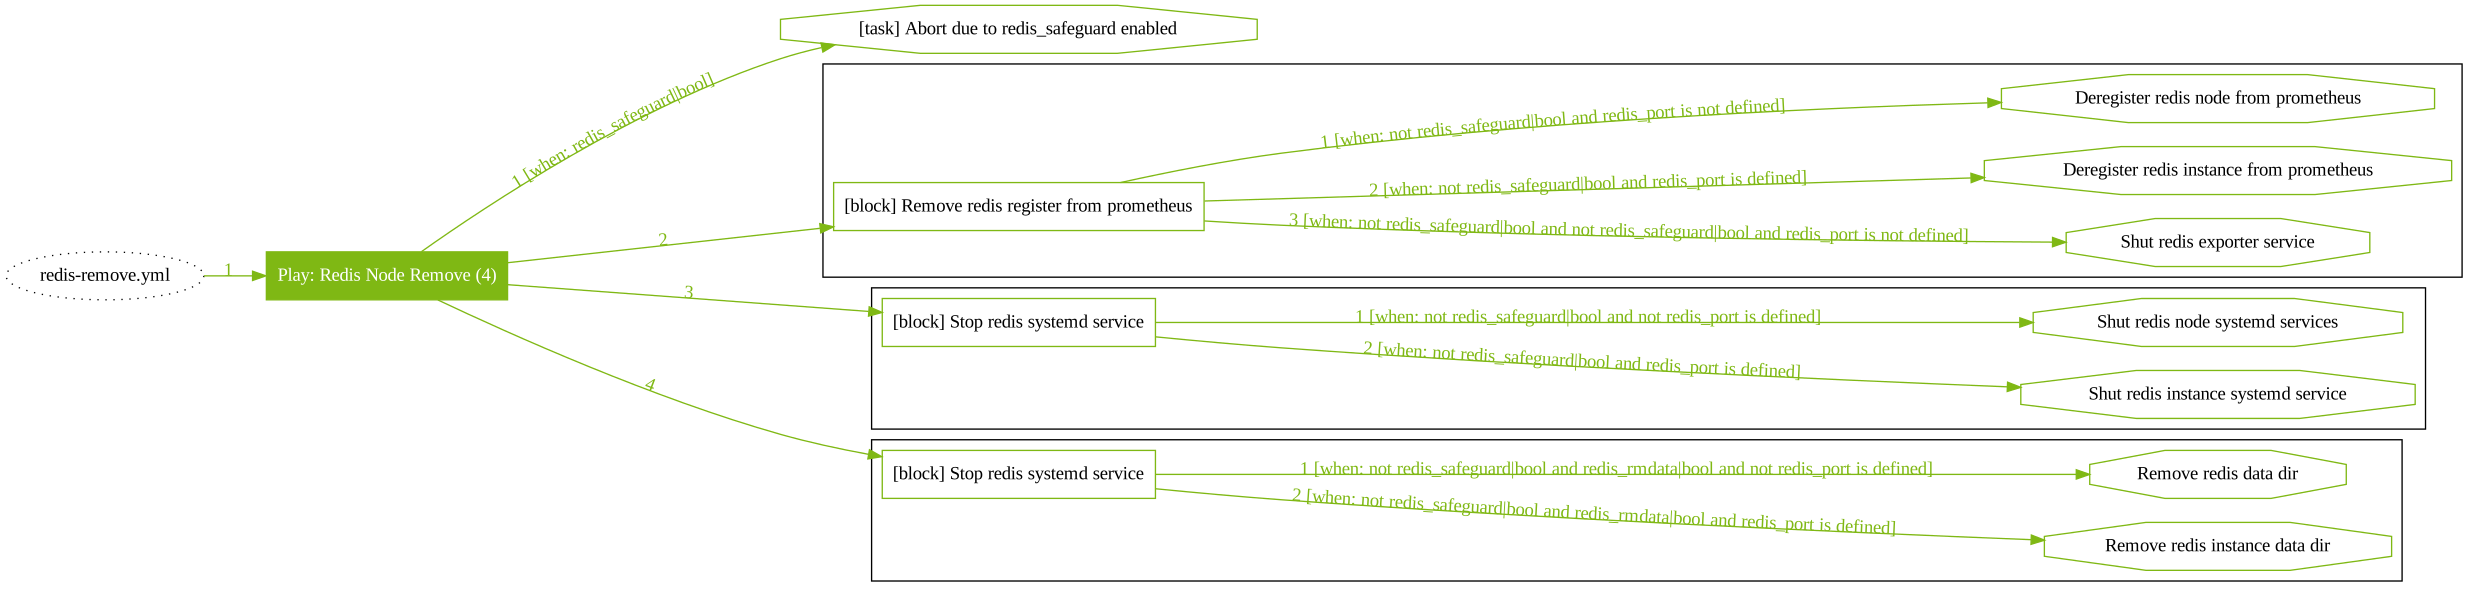
26 - Configuration
Pigsty uses declarative configuration.
Pigsty defines infra and database clusters through Inventory, and each Pigsty deploy has a corresponding config. Pigsty’s config uses the “Infra as Data” philosophy: Users describe requirements through the declarative config, and Pigsty adapts the fundamental components to the expected state.
Formally, the inventory can be implemented as a default local config file or as dynamic configuration data in CMDB. This article uses the default YAML configuration file pigsty.yml as an example. Pigsty detects the current node environment and generates the recommended config file in configure.
The main content of the inventory is config entries. The source-backed v1.5.1 summary below contains 213 parameters that can be configured at multiple levels, and most parameters can use default values. Config entry can be divided into four major categories according to category: INFRA, NODES/host nodes, PGSQL, REDIS, and further subdivided into 32 subcategories.
Configure
Go to the Pigsty project dir and execute configure. Pigsty will generate a config file based on the current machine env, a process called Configure.
configure will check the following things, minor problems will be fixed automatically, otherwise, it will prompt an error to exit.
Running ./configure directly will launch an interactive CLI wizard that prompts the user to answer the following 3 questions:
IP address
When multiple NICs with multiple IPs are detected on the current machine, the config wizard prompts you to enter the primary IP used, which is the IP you use to access the node from the internal network. Note that you should not use the public IP.
Download Package
When offline package /tmp/pkg.tgz not exists on the node, the config wizard will ask whether to download it from Github. Selecting Y will start the download, and selecting N will skip it. If your node has good Internet access with a suitable proxy config, or if you need to make offline packages, you can choose N.
Config Template
The config wizard automatically selects a config template based on the current machine env. However, you can specify the use of a config template manually with -m <mode>.
demo: The project’s default config file, the one used by the 4-node sandbox, enables all features.auto: Suitable for deployment in production env with more stable and conservative configs.- In addition, Pigsty has several preconfigured config templates that can be specified and used directly with the
-m, see thefiles/conffor details.
The most important part of the config template is to replace the placeholder IP 10.10.10.10 in the template with the real IP (intranet primary IP) of the current machine and select the appropriate database specification template according to the current machine config. You can use the default generated config file directly or make further customization based on the automatically generated config file.
Standard output of the configure
Config File
A specific sample config file is available at the root of the Pigsty project: pigsty.yml.
The top level of the config file is a single object with a key as all and contains two sub-projects: vars and children.
The content of vars is a K-V pair that defines the global config parameters, K is the name of the config entry and V is the content.
The content of children is also a K-V pair, K is the cluster name and V is the specific cluster definition, a sample cluster definition is shown below:
- The cluster definition also includes two sub-projects:
varsdefines the config at the cluster level.hostsdefine the cluster’s instance members. - The params in the cluster config override the global params, and the cluster configuration params are overridden by the configuration params of the same name at the instance level. The only mandatory cluster configuration parameter is
pg_cluster, which is the name of the cluster and is consistent with the upper-level cluster name. - The
hostsuse K-V to define the cluster instance members, K is the IP (must be ssh reachable), and V is the specific instance config params. - There are two mandatory params in the instance config:
pg_seq, andpg_role, which are the unique serial number of the instance and the role of the instance, respectively.
Pigsty config files follow Ansible rules in YAML format and use a single config file by default. The default config file path is pigsty.yml in the root dir of the Pigsty source code. The default config file is specified via inventory = pigsty.yml in ansible.cfg in the same dir. Additional config files can be specified via -i <config_path> when executing any playbook.
The config file needs to be used in conjunction with Ansible. Ansible is a popular DevOps tool. If you are proficient in Ansible, you can adapt the config file organization and structure according to Ansible’s manifest organization rules.
Please use the browse Ansible Quick Start and start executing playooks with Ansible.
Config Entry
Config entries are in the form of K-V pairs: the key is the name of the Config entry and the value is the content of the config entry.
Pigsty’s params can be configured at different levels and inherited and overwritten based on rules, with higher priority config entries overwriting lower priority config entries with the same name.
Config Entry Levels
In Pigsty’s config file, config entry can appear in three locations: global, cluster, and instance. Config entry defined in cluster vars override global config entry with same-name key override, and config entry defined in an instance, in turn, override cluster config entry with global config entry.
| Granularity | Scope | Priority | Description | Location |
|---|---|---|---|---|
| Global | Global | Low | Consistent within the same set of deployment envs | all.vars.xxx |
| Cluster | Cluster | Medium | Consistency within the same set of clusters | all.children.<cls>.vars.xxx |
| Instance | Instance | High | The most granular level of config | all.children.<cls>.hosts.<ins>.xxx |
Not all config entries are suitable for use at all levels. For example, infra params will usually only be defined in the global config, params such as database instance labels, roles, load balancing weights, and other params can only be configured at the instance level, and some operational options can only be provided using CLI params. For details of config entry, please see the list of config entry.
Default & Overwrite
In addition to the three config granularities, there are two extra levels of priority in the Pigsty config entry: default value and CLI param forced override:
- Default: When a config entry does not appear at either the global/cluster/instance level, the default config entry is used. The default value has the lowest priority. The default params are defined in
roles/<role>/defaults/main.yml. - Parameter: Config entry specified by means of CLI incoming params have the highest priority and will override all levels of config. Some config entries can only be specified by means of CLI params.
| Levels | Priority | Source | Description | Location |
|---|---|---|---|---|
| Default | Lowest | Default | Default values for code logic definitions | roles/<role>/defaults/main.yml |
| Global | Low | Global | Consistent within the same set of deployment envs | all.vars.xxx |
| Cluster | Medium | Cluster | Consistency within the same set of clusters | all.children.<cls>.vars.xxx |
| Instance | High | Instance | The most granular level of config | all.children.<cls>.hosts.<ins>.xxx |
| Argument | Highest | Parameter | Pass in CLI arguments | -e |
Config Category
The v1.5.1 source-backed summary contains 213 fixed config entries divided into four sections: INFRA, NODES, PGSQL, and REDIS, for a total of 32 categories.
Usually, only the node/database identity parameter is mandatory, other params can be modified on demand using the default values.
| Category | Section | Description | Count |
|---|---|---|---|
INFRA |
CONNECT |
Connection parameters | 1 |
INFRA |
REPO |
Local source infra | 10 |
INFRA |
CA |
Public-Private Key Infra | 5 |
INFRA |
NGINX |
Nginx Web Server | 5 |
INFRA |
NAMESERVER |
DNS Server | 1 |
INFRA |
PROMETHEUS |
Monitoring Time Series Database | 7 |
INFRA |
EXPORTER |
Universal Exporter Config | 3 |
INFRA |
GRAFANA |
Grafana Visualization Platform | 9 |
INFRA |
LOKI |
Loki log collection platform | 5 |
INFRA |
DCS |
Distributed Config Storage Meta DB | 8 |
NODES |
NODE_IDENTITY |
Node identity parameters | 5 |
NODES |
NODE_DNS |
Node Domain Name Resolution | 5 |
NODES |
NODE_PACKAGES |
Node Packages | 4 |
NODES |
NODE_KERNEL_MODULES |
Node Kernel Module | 1 |
NODES |
NODE_TUNE |
Node parameter tuning | 2 |
NODES |
NODE_ADMIN |
Node Admin User | 6 |
NODES |
NODE_TIME |
Node time zone and time sync | 4 |
NODES |
NODE_EXPORTER |
Node Indicator Exposer | 3 |
NODES |
PROMTAIL |
Log collection component | 5 |
PGSQL |
PG_IDENTITY |
PGSQL Identity Parameters | 13 |
PGSQL |
PG_BUSINESS |
PGSQL Business Object Definition | 11 |
PGSQL |
PG_INSTALL |
PGSQL Installation | 11 |
PGSQL |
PG_BOOTSTRAP |
PGSQL Cluster Initialization | 24 |
PGSQL |
PG_PROVISION |
PGSQL Cluster Provisioning | 9 |
PGSQL |
PG_EXPORTER |
PGSQL Indicator Exposer | 13 |
PGSQL |
PG_SERVICE |
PGSQL Service Access | 16 |
REDIS |
REDIS_IDENTITY |
REDIS Identity Parameters | 3 |
REDIS |
REDIS_PROVISION |
REDIS Cluster Provisioning | 14 |
REDIS |
REDIS_NODE |
REDIS Indicator Exposer | 3 |
List of config entries
| ID | Name | Section | Level | Description |
|---|---|---|---|---|
| 100 | proxy_env |
CONNECT |
G | Proxy server config |
| 110 | nginx_enabled |
REPO |
G | Enable local sources |
| 111 | repo_name |
REPO |
G | Local source name |
| 112 | repo_address |
REPO |
G | Local source external access address |
| 113 | nginx_port |
REPO |
G | Local source port |
| 114 | nginx_home |
REPO |
G | Local source file root dir |
| 115 | repo_rebuild |
REPO |
A | Rebuild Yum repo |
| 116 | repo_remove |
REPO |
A | Remove existing REPO files |
| 117 | repo_upstreams |
REPO |
G | Upstream sources of Yum repo |
| 118 | repo_packages |
REPO |
G | List of software from Yum repo |
| 119 | repo_url_packages |
REPO |
G | List of software downloaded via URL |
| 120 | ca_method |
CA |
G | CA creation method |
| 121 | ca_subject |
CA |
G | Self-signed CA themes |
| 122 | ca_homedir |
CA |
G | CA root dir |
| 123 | ca_cert |
CA |
G | CA Certificate |
| 124 | ca_key |
CA |
G | CA private key name |
| 130 | nginx_upstream |
NGINX |
G | Nginx upstream servers |
| 131 | nginx_indexes |
NGINX |
G | List of apps displayed on the navigation bar |
| 140 | dns_records |
NAMESERVER |
G | Dynamic DNS Resolution Records |
| 150 | prometheus_data_dir |
PROMETHEUS |
G | Prometheus Catalog |
| 151 | prometheus_options |
PROMETHEUS |
G | Prometheus CLI parameters |
| 152 | prometheus_reload |
PROMETHEUS |
A | Reload instead of Recreate |
| 153 | prometheus_sd_method |
PROMETHEUS |
G | Service discovery mechanism: static |
| 154 | prometheus_scrape_interval |
PROMETHEUS |
G | Prom Crawl Cycle |
| 155 | prometheus_scrape_timeout |
PROMETHEUS |
G | Prom Crawl Timeout |
| 156 | prometheus_sd_interval |
PROMETHEUS |
G | Prom Service Discovery Refresh Cycle |
| 160 | exporter_install |
EXPORTER |
G | Installation of monitoring components method |
| 161 | exporter_repo_url |
EXPORTER |
G | YumRepo for monitoring components |
| 162 | exporter_metrics_path |
EXPORTER |
G | Monitor the exposed URL Path |
| 170 | grafana_endpoint |
GRAFANA |
G | Grafana Address |
| 171 | grafana_admin_username |
GRAFANA |
G | Grafana Admin Username |
| 172 | grafana_admin_password |
GRAFANA |
G | Grafana Admin User Password |
| 173 | grafana_database |
GRAFANA |
G | Grafana Database Types |
| 174 | grafana_pgurl |
GRAFANA |
G | Grafana’s PG connection string |
| 175 | grafana_plugin_method |
GRAFANA |
G | Grafana plugin installation method |
| 176 | grafana_plugin_cache |
GRAFANA |
G | Grafana plugin cache location |
| 177 | grafana_plugin_list |
GRAFANA |
G | Installation list of Grafana plugins |
| 178 | grafana_plugin_git |
GRAFANA |
G | Installing Grafana Plugin from Git |
| 180 | loki_endpoint |
LOKI |
G | Receiving logs for the loki service |
| 181 | loki_clean |
LOKI |
A | Clean up the database dir during Loki installation |
| 182 | loki_options |
LOKI |
G | Loki’s CLI parameters |
| 183 | loki_data_dir |
LOKI |
G | Loki’s data dir |
| 184 | loki_retention |
LOKI |
G | Loki log default retention days |
| 200 | dcs_servers |
DCS |
G | DCS server name:IP list |
| 201 | dcs_registry |
DCS |
G | Service Registration Location |
| 202 | pg_dcs_type |
DCS |
G | DCS Type |
| 203 | dcs_name |
DCS |
G | DCS Cluster Name |
| 204 | dcs_clean |
DCS |
C/A | Action when DCS instance exists |
| 205 | dcs_safeguard |
DCS |
C/A | Prohibit cleaning of DCS instances |
| 206 | consul_data_dir |
DCS |
G | Consul Data Catalog |
| 207 | etcd_data_dir |
DCS |
G | Etcd Data Catalog |
| 221 | jupyter_username |
JUPYTER |
G | OS users used by Jupyter |
| 222 | jupyter_password |
JUPYTER |
G | Jupyter Lab Password |
| 300 | meta_node |
NODE_IDENTITY |
C | Meta Node |
| 301 | nodename |
NODE_IDENTITY |
I | Node instance mark |
| 302 | node_cluster |
NODE_IDENTITY |
C | Node cluster name, default nodes |
| 303 | nodename_overwrite |
NODE_IDENTITY |
C | Nodename overrides HOSTNAME |
| 304 | nodename_exchange |
NODE_IDENTITY |
C | Exchange hostnames between playbook nodes |
| 310 | node_etc_hosts_default |
NODE_DNS |
C | Static DNS Analysis |
| 311 | node_etc_hosts |
NODE_DNS |
C/I | Cluster Level |
| 312 | node_dns_method |
NODE_DNS |
C | Configure DNS server method |
| 313 | node_dns_servers |
NODE_DNS |
C | Configure a list of dynamic DNS servers |
| 314 | node_dns_options |
NODE_DNS |
C | Configure the /etc/resolv.conf |
| 320 | node_repo_method |
NODE_REPO |
C | The way nodes use Yum repos |
| 321 | node_repo_remove |
NODE_REPO |
C | Remove nodes with existing Yum repos |
| 322 | node_repo_local_urls |
NODE_REPO |
C | URL of the local source |
| 330 | node_packages_default |
NODE_PACKAGES |
C | Packages for nodes |
| 331 | node_packages |
NODE_PACKAGES |
C | Extra packages for nodes |
| 332 | node_packages_meta |
NODE_PACKAGES |
G | Packages for meta nodes |
| 333 | node_packages_meta_pip |
NODE_PACKAGES |
G | Packages installed via pip3 |
| 340 | node_disable_numa |
NODE_FEATURES |
C | Disable the node NUMA |
| 341 | node_disable_swap |
NODE_FEATURES |
C | Disable the node SWAP |
| 342 | node_disable_firewall |
NODE_FEATURES |
C | Disable the node firewall |
| 343 | node_disable_selinux |
NODE_FEATURES |
C | Disable the node SELINUX |
| 344 | node_static_network |
NODE_FEATURES |
C | Enable static DNS servers |
| 345 | node_disk_prefetch |
NODE_FEATURES |
C | Enable disk pre-reading |
| 346 | node_kernel_modules |
NODE_MODULES |
C | Enable kernel module |
| 350 | node_tune |
NODE_TUNE |
C | Node Tuning Mode |
| 351 | node_sysctl_params |
NODE_TUNE |
C | OS kernel parameters |
| 360 | node_admin_enabled |
NODE_ADMIN |
G | Create admin user |
| 361 | node_admin_uid |
NODE_ADMIN |
G | Admin UID |
| 362 | node_admin_username |
NODE_ADMIN |
G | Admin User Name |
| 363 | node_admin_ssh_exchange |
NODE_ADMIN |
C | Exchange admin user SSH keys |
| 364 | node_admin_pk_current |
NODE_ADMIN |
A | Add the current user’s public key to the admin user |
| 365 | node_admin_pk_list |
NODE_ADMIN |
C | Login admin’s public key list |
| 370 | node_timezone |
NODE_TIME |
C | NTP time zone setting |
| 371 | node_ntp_enabled |
NODE_TIME |
C | Configure NTP service |
| 372 | node_ntp_service |
NODE_TIME |
C | NTP service type: ntp or chrony |
| 373 | node_ntp_servers |
NODE_TIME |
C | NTP Server List |
| 380 | node_exporter_enabled |
NODE_EXPORTER |
C | Enable node metrics collector |
| 381 | node_exporter_port |
NODE_EXPORTER |
C | Node Indicator Exposure Port |
| 382 | node_exporter_options |
NODE_EXPORTER |
C/I | Node Metrics Collection Options |
| 390 | promtail_enabled |
PROMTAIL |
C | Enable Protail log collection |
| 391 | promtail_clean |
PROMTAIL |
C/A | Remove existing status information when installing promtail |
| 392 | promtail_port |
PROMTAIL |
G | promtail default port |
| 393 | promtail_options |
PROMTAIL |
C/I | promtail CLI parameters |
| 394 | promtail_positions |
PROMTAIL |
C | promtail status file location |
| 500 | pg_cluster |
PG_IDENTITY |
C | PG database cluster name |
| 501 | pg_shard |
PG_IDENTITY |
C | PG Cluster-owned Shard (Reserved) |
| 502 | pg_sindex |
PG_IDENTITY |
C | PG cluster’s slice number (Reserved) |
| 503 | gp_role |
PG_IDENTITY |
C | Role of PG Cluster in GP |
| 504 | pg_role |
PG_IDENTITY |
I | PG instance role |
| 505 | pg_seq |
PG_IDENTITY |
I | PG Instance Serial Number |
| 506 | pg_instances |
PG_IDENTITY |
I | All PG instances on the current node |
| 507 | pg_upstream |
PG_IDENTITY |
I | Replicated upstream nodes of instances |
| 508 | pg_offline_query |
PG_IDENTITY |
I | Offline Search |
| 509 | pg_backup |
PG_IDENTITY |
I | Storing backups on instances |
| 510 | pg_weight |
PG_IDENTITY |
I | Relative weight of instances in load balancing |
| 511 | pg_hostname |
PG_IDENTITY |
C/I | PG instance name is set to HOSTNAME |
| 512 | pg_preflight_skip |
PG_IDENTITY |
C/A | Skip PG identity parameter checks |
| 520 | pg_users |
PG_BUSINESS |
C | Business User Definition |
| 521 | pg_databases |
PG_BUSINESS |
C | Business Database Definition |
| 522 | pg_services_extra |
PG_BUSINESS |
C | Cluster Proprietary Services Definition |
| 523 | pg_hba_rules_extra |
PG_BUSINESS |
C | Cluster/instance specific HBA rules |
| 524 | pgbouncer_hba_rules_extra |
PG_BUSINESS |
C | Pgbounce specific HBA rules |
| 525 | pg_admin_username |
PG_BUSINESS |
G | PG Admin Users |
| 526 | pg_admin_password |
PG_BUSINESS |
G | PG Adimin User Passwords |
| 527 | pg_replication_username |
PG_BUSINESS |
G | PG Replica User |
| 528 | pg_replication_password |
PG_BUSINESS |
G | PG Replica User Passwords |
| 529 | pg_monitor_username |
PG_BUSINESS |
G | PG Monitor Users |
| 530 | pg_monitor_password |
PG_BUSINESS |
G | PG Monitor User passwords |
| 540 | pg_dbsu |
PG_INSTALL |
C | PG OS Super User |
| 541 | pg_dbsu_uid |
PG_INSTALL |
C | Super UID |
| 542 | pg_dbsu_sudo |
PG_INSTALL |
C | Sudo privileges for super users |
| 543 | pg_dbsu_home |
PG_INSTALL |
C | Super User’s Home Dir |
| 544 | pg_dbsu_ssh_exchange |
PG_INSTALL |
C | Exchanging Super User Keys |
| 545 | pg_version |
PG_INSTALL |
C | Large version of the installed database |
| 546 | pgdg_repo |
PG_INSTALL |
C | Add PG official repo |
| 547 | pg_add_repo |
PG_INSTALL |
C | Add PG-related upstream repos |
| 548 | pg_bin_dir |
PG_INSTALL |
C | PG Binary Dir |
| 549 | pg_packages |
PG_INSTALL |
C | List of installed PG packages |
| 550 | pg_extensions |
PG_INSTALL |
C | List of installed PG plug-ins |
| 560 | pg_clean |
PG_BOOTSTRAP |
C/A | Handling method when PG exists |
| 561 | pg_safeguard |
PG_BOOTSTRAP |
C/A | Prohibit clearing of existing PG instances |
| 562 | pg_data |
PG_BOOTSTRAP |
C | PG data dir |
| 563 | pg_fs_main |
PG_BOOTSTRAP |
C | PG master data disk mount point |
| 564 | pg_fs_bkup |
PG_BOOTSTRAP |
C | PG backup disk mount point |
| 565 | pg_dummy_filesize |
PG_BOOTSTRAP |
C | The size of the placeholder file /pg/dummy |
| 566 | pg_listen |
PG_BOOTSTRAP |
C | PG listening IP |
| 567 | pg_port |
PG_BOOTSTRAP |
C | PG listening port |
| 568 | pg_localhost |
PG_BOOTSTRAP |
C | UnixSocket address used by PG |
| 580 | patroni_enabled |
PG_BOOTSTRAP |
C | Enable Patroni |
| 581 | patroni_mode |
PG_BOOTSTRAP |
C | Patroni config mode |
| 582 | pg_namespace |
PG_BOOTSTRAP |
C | Patroni’s DCS namespace |
| 583 | patroni_port |
PG_BOOTSTRAP |
C | Patroni service port |
| 584 | patroni_watchdog_mode |
PG_BOOTSTRAP |
C | Patroni Watchdog mode |
| 585 | pg_conf |
PG_BOOTSTRAP |
C | Patroni’s config templates |
| 586 | pg_libs |
PG_BOOTSTRAP |
C | PG Default Shared database |
| 587 | pg_encoding |
PG_BOOTSTRAP |
C | PG character set encoding |
| 588 | pg_locale |
PG_BOOTSTRAP |
C | Localization rules for PG |
| 589 | pg_lc_collate |
PG_BOOTSTRAP |
C | Localized sorting rules for PG |
| 590 | pg_lc_ctype |
PG_BOOTSTRAP |
C | Localized character set definitions for PG |
| 591 | pgbouncer_enabled |
PG_BOOTSTRAP |
C | Enable Pgbouncer |
| 592 | pgbouncer_port |
PG_BOOTSTRAP |
C | Pgbouncer Port |
| 593 | pgbouncer_poolmode |
PG_BOOTSTRAP |
C | Pgbouncer pooling mode |
| 594 | pgbouncer_max_db_conn |
PG_BOOTSTRAP |
C | Pgbouncer Maximum DB connections |
| 600 | pg_provision |
PG_PROVISION |
C | Applying templates in PG clusters |
| 601 | pg_init |
PG_PROVISION |
C | Custom PG initialization script |
| 602 | pg_default_roles |
PG_PROVISION |
G/C | Default Roles and Users |
| 603 | pg_default_privileges |
PG_PROVISION |
G/C | Database default privileges config |
| 604 | pg_default_schemas |
PG_PROVISION |
G/C | Default Mode |
| 605 | pg_default_extensions |
PG_PROVISION |
G/C | Extensions installed by default |
| 606 | pg_reload |
PG_PROVISION |
A | Reload Database Config (HBA) |
| 607 | pg_hba_rules |
PG_PROVISION |
G/C | Global HBA rules |
| 608 | pgbouncer_hba_rules |
PG_PROVISION |
G/C | Pgbouncer Global HBA rules |
| 620 | pg_exporter_config |
PG_EXPORTER |
C | PG Metrics Definition Document |
| 621 | pg_exporter_enabled |
PG_EXPORTER |
C | Enable PG Indicator Collector |
| 622 | pg_exporter_port |
PG_EXPORTER |
C | PG Indicator Exposure Port |
| 623 | pg_exporter_params |
PG_EXPORTER |
C/I | Extra URL parameters for PG Exporter |
| 624 | pg_exporter_url |
PG_EXPORTER |
C/I | Acquisition of connection strings for object databases (override) |
| 625 | pg_exporter_auto_discovery |
PG_EXPORTER |
C/I | Auto-discovery of the database in the instance |
| 626 | pg_exporter_exclude_database |
PG_EXPORTER |
C/I | Automatic database exclusion list |
| 627 | pg_exporter_include_database |
PG_EXPORTER |
C/I | Automatic database capsule list |
| 628 | pg_exporter_options |
PG_EXPORTER |
C/I | PG Exporter CLI parameters |
| 629 | pgbouncer_exporter_enabled |
PG_EXPORTER |
C | Enable PGB Indicator Collector |
| 630 | pgbouncer_exporter_port |
PG_EXPORTER |
C | PGB Indicator Exposure Port |
| 631 | pgbouncer_exporter_url |
PG_EXPORTER |
C/I | Collection of connection strings for object connection pools |
| 632 | pgbouncer_exporter_options |
PG_EXPORTER |
C/I | PGB Exporter CLI Parameters |
| 640 | pg_services |
PG_SERVICE |
G/C | Global Common Service Definition |
| 641 | haproxy_enabled |
PG_SERVICE |
C/I | Enable Haproxy |
| 642 | haproxy_reload |
PG_SERVICE |
A | Reload Haproxy config |
| 643 | haproxy_auth_enabled |
PG_SERVICE |
G/C | Enable authentication for the Haproxy management interface |
| 644 | haproxy_admin_username |
PG_SERVICE |
G | HAproxy admin user name |
| 645 | haproxy_admin_password |
PG_SERVICE |
G | HAproxy admin user password |
| 646 | haproxy_exporter_port |
PG_SERVICE |
C | HAproxy metrics exposer port |
| 647 | haproxy_client_timeout |
PG_SERVICE |
C | HAproxy client timeout |
| 648 | haproxy_server_timeout |
PG_SERVICE |
C | HAproxy server timeout |
| 649 | vip_mode |
PG_SERVICE |
C | VIP mode:none |
| 650 | vip_reload |
PG_SERVICE |
A | Overload VIP Config |
| 651 | vip_address |
PG_SERVICE |
C | The cluster’s VIP address |
| 652 | vip_cidrmask |
PG_SERVICE |
C | Network CIDR mask length for VIP address |
| 653 | vip_interface |
PG_SERVICE |
C | VIP’s network card |
| 654 | dns_mode |
PG_SERVICE |
C | DNS config mode |
| 655 | dns_selector |
PG_SERVICE |
C | DNS Object Selector |
| 700 | redis_cluster |
REDIS_IDENTITY |
C | Redis Cluster Name |
| 701 | redis_node |
REDIS_IDENTITY |
I | Redis Node Serial Number |
| 702 | redis_instances |
REDIS_IDENTITY |
I | Redis Instance Definition |
| 721 | redis_mode |
REDIS_PROVISION |
C | Redis Cluster Mode |
| 722 | redis_conf |
REDIS_PROVISION |
C | Redis Config Template |
| 723 | redis_fs_main |
REDIS_PROVISION |
C | PG Instance Role |
| 724 | redis_bind_address |
REDIS_PROVISION |
C | Redis listening port |
| 725 | redis_clean |
REDIS_PROVISION |
C | Actions when Redis exists |
| 726 | redis_safeguard |
REDIS_PROVISION |
C | Disable wiping of existing Redis |
| 727 | redis_max_memory |
REDIS_PROVISION |
C/I | Maximum memory available to Redis |
| 728 | redis_mem_policy |
REDIS_PROVISION |
C | Memory Eviction Policy |
| 729 | redis_password |
REDIS_PROVISION |
C | Redis passwords |
| 730 | redis_rdb_save |
REDIS_PROVISION |
C | RDB save command |
| 731 | redis_aof_enabled |
REDIS_PROVISION |
C | Enable AOF |
| 732 | redis_rename_commands |
REDIS_PROVISION |
C | Rename Danger Command List |
| 740 | redis_cluster_replicas |
REDIS_PROVISION |
C | Each master with several slaves |
| 741 | redis_exporter_enabled |
REDIS_NODE |
C | Enabling Redis Monitoring |
| 742 | redis_exporter_port |
REDIS_NODE |
C | Redis Exporter Listening Port |
| 743 | redis_exporter_options |
REDIS_NODE |
C/I | Redis Exporter Command Parameters |
27 - Config: Infra
Use the INFRA Playbook, and deploy the PGSQL cluster to adjust the cluster state to the state described in PGSQL Config.
Use the INFRA series playbooks to configure the Pigsty infra.
Infra config deals with such issues: localYum repos, machine node base services: DNS, NTP, kernel modules, parameter tuning, admin users, installing packages, DCS Server setup, monitor infra installation, and initialization (Grafana, Prometheus, Alertmanager), global traffic portal Nginx config, etc.
Usually, the infra requires very few modifications, and the main modification is just a text replacement of the meta node IPs, which is done in ./configure automatically. The other occasional change is to the access domain defined in nginx_upstream. Other parameters are adjusted as needed.
CONNECT: Connection parametersCA: CA PKI InfraNGINX: Nginx Web ServerREPO: Local repo infraNAMESERVER: DNS ServerPROMETHEUS: Monitor Time Series DatabaseEXPORTER: Universal Exporter ConfigGRAFANA: Grafana Visualization PlatformLOKI: Loki log collection platformDCS: Distributed Configure Storage Meta DBCONSUL: DCS Implementation: ConsulETCD: DCS Implementation: ETCD
Parameter Overview
The following config entries describe the infra deployed on the meta node.
| ID | Name | Section | Type | Level | Comment |
|---|---|---|---|---|---|
| 100 | proxy_env |
CONNECT |
dict | G | proxy env variables |
| 110 | ca_method |
CA |
enum | G | ca mode, create,copy,recreate |
| 111 | ca_subject |
CA |
string | G | ca subject |
| 112 | ca_homedir |
CA |
path | G | ca cert home dir |
| 113 | ca_cert |
CA |
string | G | ca cert file name |
| 114 | ca_key |
CA |
string | G | ca private key name |
| 120 | nginx_enabled |
NGINX |
bool | C/I | enable nginx web server |
| 121 | nginx_home |
NGINX |
path | G | nginx home dir (/www) |
| 122 | nginx_port |
NGINX |
int | G | nginx listen address (80) |
| 123 | nginx_upstream |
NGINX |
upstream[] | G | nginx upstream definition |
| 124 | nginx_indexes |
NGINX |
app[] | G | nginx index page nav entries |
| 130 | repo_name |
REPO |
string | G | local yum repo name |
| 131 | repo_address |
REPO |
string | G | external access port of repo |
| 132 | repo_rebuild |
REPO |
bool | A | rebuild local yum repo |
| 133 | repo_remove |
REPO |
bool | A | remove existing repo file |
| 134 | repo_upstreams |
REPO |
repo[] | G | upstream repo definition |
| 135 | repo_packages |
REPO |
string[] | G | packages to be downloaded |
| 136 | repo_url_packages |
REPO |
url[] | G | pkgs to be downloaded via url |
| 140 | nameserver_enabled |
NAMESERVER |
bool | C/I | enable dnsmasq on meta node |
| 141 | dns_records |
NAMESERVER |
string[] | G | dynamic DNS records |
| 150 | prometheus_enabled |
PROMETHEUS |
bool | C/I | enable Prometheus on meta |
| 151 | prometheus_data_dir |
PROMETHEUS |
path | G | prometheus data dir |
| 152 | prometheus_options |
PROMETHEUS |
string | G | prometheus cli args |
| 153 | prometheus_reload |
PROMETHEUS |
bool | A | prom reload instead of init |
| 154 | prometheus_sd_method |
PROMETHEUS |
enum | G | consul |
| 155 | prometheus_scrape_interval |
PROMETHEUS |
interval | G | prom scrape interval (10s) |
| 156 | prometheus_scrape_timeout |
PROMETHEUS |
interval | G | prom scrape timeout (8s) |
| 157 | prometheus_sd_interval |
PROMETHEUS |
interval | G | prom discovery refresh interval |
| 160 | exporter_install |
EXPORTER |
enum | G | Installation of exporter |
| 161 | exporter_repo_url |
EXPORTER |
string | G | repo url for yum install |
| 162 | exporter_metrics_path |
EXPORTER |
string | G | URL path for exporting metrics |
| 170 | grafana_enabled |
GRAFANA |
bool | C/I | enable grafana on meta node |
| 171 | grafana_endpoint |
GRAFANA |
url | G | grafana API endpoint |
| 172 | grafana_admin_username |
GRAFANA |
string | G | grafana admin username |
| 173 | grafana_admin_password |
GRAFANA |
string | G | grafana admin password |
| 174 | grafana_database |
GRAFANA |
enum | G | grafana backend database type |
| 175 | grafana_pgurl |
GRAFANA |
url | G | grafana backend postgres url |
| 176 | grafana_plugin_method |
GRAFANA |
enum | G | Install grafana plugin method |
| 177 | grafana_plugin_cache |
GRAFANA |
path | G | grafana plugins cache path |
| 178 | grafana_plugin_list |
GRAFANA |
string[] | G | grafana plugins to be installed |
| 179 | grafana_plugin_git |
GRAFANA |
url[] | G | grafana plugins via git |
| 180 | loki_enabled |
LOKI |
bool | C/I | enable loki on meta node |
| 180 | loki_endpoint |
LOKI |
url | G | loki endpoint to receive log |
| 181 | loki_clean |
LOKI |
bool | A | remove existing loki data |
| 182 | loki_options |
LOKI |
string | G | loki cli args |
| 183 | loki_data_dir |
LOKI |
string | G | loki data path |
| 184 | loki_retention |
LOKI |
interval | G | loki log keeping period |
| 190 | dcs_name |
DCS |
string | G | dcs cluster name (dc) |
| 191 | dcs_servers |
DCS |
dict | G | dcs server dict |
| 192 | dcs_registry |
DCS |
enum | G | Registration Services |
| 193 | dcs_safeguard |
DCS |
bool | C/A | avoid dcs remove at all |
| 194 | dcs_clean |
DCS |
bool | C/A | purge dcs during init? |
| 195 | consul_enabled |
CONSUL |
bool | G | enable consul servers/agents |
| 196 | consul_data_dir |
CONSUL |
string | G | consul data dir path |
| 197 | etcd_enabled |
ETCD |
bool | G | enable etcd servers/clients |
| 198 | etcd_data_dir |
ETCD |
string | G | etcd data dir path |
CONNECT
proxy_env
Using a proper HTTP proxy, download speeds of several MB per second can be achieved. If you have a proxy server, please configure it via proxy_env. The sample example is as follows.
ansible_host
If considering using the Ansible connection parameter, your target machine is hidden behind an SSH springboard machine or is not accessible via ssh ip.
For example, in the example below, ansible_host tells Pigsty to access the target database node using an SSH alias using the ssh node-1 method instead of the ssh 10.10.10.11 method. This allows you to freely specify the connection method of the database node and save the connection configuration in the ~/.ssh/config of the admin user for independent management.
ansible_host is the most typical of the ansible connection parameters. Usually, as long as the user can access the target machine via ssh <name>, configuring the ansible_host variable, for instance, with a value of <name> and other common Ansible SSH connection parameters are shown below:
ansible_host: Specify the target machine’s IP, hostname, or SSH alias.
ansible_port: Specify a different SSH port than 22
ansible_user: Specify the username to use for SSH
ansible_ssh_pass: SSH password (Do not store plaintext, and input from the keyboard can be specified by the -k)
ansible_ssh_private_key_file: SSH private key path
ansible_ssh_common_args: SSH General Parameters
CA
Self-Signed CA PKI.
ca_method
CA creation method, type: enum, level: G, default value: "create".
create: Create a new CA public-private key pair.copy: Copy the existing CA public and private keys for building CA.
ca_subject
Self-signed CA theme, type: string, level: G, default value: "/CN=root-ca".
ca_homedir
CA certificate root dir, type: path, level: G, default value: "/ca".
ca_cert
CA certificate, type: string, level: G, default value: "ca.crt".
ca_key
CA private key name, type: string, level: G, default value: "ca.key".
NGINX
Pigsty exposes all Web services through Nginx: Home Page, Grafana, Prometheus, AlertManager, Consul, and other optional tools such as PGWe, Jupyter Lab, Pgadmin, Bytebase ,and other static resource & report such as pgweb schemaspy & pgbadger
Some services on the meta node can be accessed directly through the port, bypassing Nginx, but some services can only be accessed through the Nginx proxy for security reasons. Nginx distinguishes between different services by the domain name.
If the domain name configured for each service does not resolve in the current environment, you will need to configure it in /etc/hosts.
nginx_enabled
Enable nginx (and yum repo), type: bool, level: C/I, default value: true.
Setup nginx server on current meta node?
Set to false will skip it.
You can set this parameter to false on standby meta nodes when using multiple meta nodes
nginx_port
Local repo port, type: int, level: G, default value: 80.
Pigsty accesses all web services through this port on the meta node. Make sure you can access this port on the meta node.
nginx_home
Local repo root, type: path, level: G, default value: "/www".
Nginx root directory which contains static resource and repo resource.
nginx_upstream
Nginx upstream server, Type: upstream[], Level: G, default value:
Each record contains three subsections: name, domain, and endpoint, representing the component name, the external access domain, and the internal TCP port, respectively.
The name definition of the default record is fixed and referenced by hard-coding, do not modify it. Upstream server records with other names can be added at will.
The domain is the domain name that should be used for external access to this upstream server. When accessing the Pigsty Web service, the domain name should be used to access it through the Nginx proxy.
The endpoint is an internally reachable TCP port. During the Configure, the placeholder IP 10.10.10.10 will be replaced with the meta node IP.
nginx_indexes
List of applications displayed in the home navigation bar, type: app[], level: G, default value:
Each record is rendered as a navigation link to the Pigsty home page App drop-down menu, and the apps are all optional, mounted by default on the Pigsty default server under http://pigsty/.
The url parameter specifies the URL PATH for the app, with the exception that if the ${grafana} string is present in the URL, it will be automatically replaced with the Grafana domain name defined in nginx_upstream.
REPO
Pigsty is installed on a meta node. Pigsty pulls up a localYum repo for the current environment to install RPM packages.
During initialization, Pigsty downloads all packages and their dependencies (specified by repo_packages) from the Internet upstream repo (specified by repo_upstreams) to {{ nginx_home }} / {{ repo_name }} (default is /www/pigsty). The total size of all dependent software is about 1GB or so.
When creating a localYum repo, Pigsty will skip the software download phase if the directory already exists and if there is a marker file named repo_complete in the dir.
If the download speed of some packages is too slow, you can set the download proxy to complete the first download by using the proxy_env config entry or directly download the pre-packaged offline package.
The offline package is a zip archive of the {{ nginx_home }}/{{ repo_name }} dir pkg.tgz. During configure, if Pigsty finds the offline package /tmp/pkg.tgz, it will extract it to {{ nginx_home }}/{{ repo_name }}, skipping the software download step during installation.
The default offline package is based on CentOS 7.8.2003 x86_64; if you use a different OS, there may be RPM package conflict and dependency error problems; please refer to the FAQ to solve.
repo_name
Local repo name, type: string, level: G, default value: "pigsty". It is not recommended to modify this parameter.
repo_address
Local repo external access address, type: string, level: G, default value: "pigsty".
The address of the local yum repo for external services, either a domain name or an IP, the default is yum. pigsty.
If you use a domain name, you must ensure that the domain name will resolve correctly to the server where the local repo is located, i.e., the meta node.
If the local yum repo does not use the standard port 80, you need to add the port to the address and keep it consistent with the nginx_port variable.
The static DNS config node_etc_hosts_default in the nodes parameter can be used to write the pigsty local repo domain name by default for all nodes in the current env.
repo_rebuild
Rebuild Yum repo, type: bool, level: A, default value: false.
If true, then the Repo rebuild will be performed in all cases, i.e., regardless of whether the offline package exists.
repo_remove
Remove existing REPO files, type: bool, level: A, default value: true.
If true, the existing repo in /etc/yum.repos.d on the meta node will be removed and backed up to the /etc/yum.repos.d/backup dir during the local repo initialization process.
Since the content of existing reports in the OS is not controllable, it is recommended to force the removal of existing repos and configure them explicitly via repo_upstreams.
When the node has other self-configured repos or needs to download some particular version of RPM packages from a specific repo, it can be set to false to keep the existing repos.
repo_upstreams
Upstream source of Yum repo, type: repo[], level: G.
We use AliCloud’s CentOS7 mirror repo, Tsinghua University’s Grafana mirror repo, PackageCloud’s Prometheus repo, PostgreSQL official repo, and software repos such as SCLo, Harbottle, and Nginx.
repo_packages
List of software to download for Yum repo, type: string[], level: G, default value.
Each line is a set of package names separated by spaces, where the specified software will be downloaded via repotrack.
repo_url_packages
Software for direct download via URL, type: url[], level: G
Download some software via URL, not YUM:
pg_exporter: Must, core components of the monitor system.vip-manager: Must, package required to enable L2 VIP for managing VIP.loki,promtail: Must, log collection server-side and client-side binary.postgrest: Optional, automatically generate backend API interface based on PostgreSQL mode.polysh: Optional, execute ssh commands on multiple nodes in parallel.pev2: Optional, PostgreSQL execution plan visualizationpgweb: Optional, web-based PostgreSQL CLI toolredis: Optional, mandatory when Redis is installed
NAMESERVER
Pigsty will default use DNSMASQ to build an optional battery-included name server on the meta node.
nameserver_enabled
Enable DNSMASQ on the meta node, type: bool, level: C/I, default value: false.
dns_records
Dynamic DNS resolution record, type: string[], level: G, default value is [] empty list, the following resolution records are available by default in the sandbox.
PROMETHEUS
Prometheus is the core component of the Pigsty monitor system, used to pull timing data, perform metrics precomputation, and evaluate alarm rules.
prometheus_enabled
Enable Prometheus on the meta node, type: bool, level: C/I, default value: true.
prometheus_data_dir
Prometheus dir, type: path, level: G, default value: "/data/prometheus/data".
prometheus_options
Prometheus CLI parameter, type: string, level: G, default value: "--storage.tsdb.retention=15d".
The default parameter retains monitoring data for 15 days. If you have a large enough disk, you can increase the length of time that monitoring data is kept.
prometheus_reload
Reload the configuration instead of rebuilding the whole thing when performing Prometheus tasks. Type: bool, Level: A, Default: false.
By default, executing the prometheus task will clear existing monitoring data, but if set to true, it will not.
prometheus_sd_method
Service discovery mechanism: static|consul, type: enum, level: G, default value: "static".
Prometheus’s service discovery mechanism, default static, option consul Use Consul for service discovery (will be phased out).
Pigsty recommends using static for service discovery, which provides more excellent reliability and flexibility.
static service discovery relies on the config in /etc/prometheus/targets/{infra,nodes,pgsql,redis}/*.yml for service discovery.
The advantage of this method is that the monitoring system does not rely on consult. The monitoring target will give an error prompt when the node goes down instead of disappearing directly. In addition, when the pigsty monitor system is integrated with the external control mode, this mode is less invasive to the original system.
The following command can be used to generate the required monitoring object profile for Prometheus from the config file.
prometheus_scrape_interval
Prometheus crawl period, type: interval, level: G, default value: "10s".
Ten seconds - 30 seconds is a suitable crawl period. If a finer granularity of monitoring data is required, this parameter can be adjusted.
prometheus_scrape_timeout
Prometheus grab timeout, type: interval, level: G, default value: "8s".
Setting the crawl timeout can effectively avoid avalanches caused by monitoring system queries. This parameter must be less than and close to prometheus_scrape_interval to ensure that the length of each crawl does not exceed the crawling period.
prometheus_sd_interval
Prometheus service discovery refresh period, type: interval, level: G, default value: "5s".
Prometheus re-examines the local file dir every time specified by this parameter and refreshes the monitoring target object.
EXPORTER
Define generic metrics exporter options, such as how the Exporter is installed, the URL path to listen to, etc.
exporter_install
To install the monitoring component, type: enum, level: G, default value: "none".
Specify how to install Exporter:
none: No installation, (by default, the Exporter has been previously installed by thenode.pkgstask)yum: Install using yum (if yum installation is enabled, run yum to installnode_exporterandpg_exporterbefore deploying Exporter)binary: Install using a copy binary (copynode_exporterandpg_exporterbinary directly from the meta node, not recommended)
When installing with yum, if exporter_repo_url is specified (not empty), the installation will first install the REPO file under that URL into /etc/yum.repos.d. This feature allows you to install Exporter directly without initializing the node infrastructure.
It is not recommended for regular users to use binary installation. This mode is usually used for emergency troubleshooting and temporary problem fixes.
exporter_repo_url
Yum Repo URL of the monitor component, type: string, level: G, default value: "".
Default is empty; when exporter_install is yum, the repo specified by this parameter will be added to the node source list.
exporter_metrics_path
Monitor the exposed URL Path, type: string, level: G, default value: "/metrics".
The URL PATH for all Exporter externally exposed metrics, which defaults to /metrics, is referenced by the external role prometheus, and Prometheus will apply this config to the monitoring object based on the config here.
Indicator exponents affected by this parameter include:
node_exporterpg_exporterpgbouncer_porthaproxy- Patroni’s Metrics endpoint is currently fixed to
/metricsand cannot be configured, so it is not affected by this parameter. - The Metrics endpoint of the Infra component is fixed to
/metricsand is not affected by this parameter.
GRAFANA
Grafana is the visualization platform for Pigsty’s monitoring system.
grafana_enabled
Enable Grafana on the meta node, type: bool, level: C/I, default value: true.
grafana_endpoint
Grafana address, type: url, level: G, default value: "http://10.10.10.10:3000".
Grafana provides a service endpoint to the public, which is used by the Grafana initialization and installation monitoring panel to call the Grafana API.
The placeholder IP 10.10.10.10 will be replaced by the actual IP during the configure.
grafana_admin_username
Grafana administrator username, type: string, level: G, default value: "admin".
grafana_admin_password
Grafana administrator password, type: string, level: G, default value: "pigsty".
grafana_database
Grafana backend database type, type: enum, tier: G, default value: "sqlite3".
The alternative is postgres. When using postgres, you must ensure that the target database already exists and is accessible. That is, Postgres on the meta node cannot be used before the initialization of the infrastructure for the first time because Grafana was created before that database.
To avoid creating circular dependencies (Grafana depends on Postgres, PostgreSQL depends on the infra, including Grafana), you need to modify this parameter and re-execute grafana-related tasks after the first time you complete the installation.
For details, please see Tutorial: Using Postgres as a Grafana database.
grafana_pgurl
PostgreSQL connection string for Grafana, type: url, level: G, default value: "postgres://dbuser_grafana:DBUser.Grafana@meta:5436/grafana".
Only valid if the parameter grafana_database is postgres.
grafana_plugin_method
Install the Grafana plugin, type: enum, level: G, default value: "install".
How Grafana plug-ins are provisioned:
none: No plug-in installation.install: Install the Grafana plugin (default), or skip it if it already exists.reinstall: Re-download and install the Grafana plugin anyway.
Grafana requires Internet access to download several extension plug-ins, and if your meta-node does not have Internet access, you should ensure that you are using an offline installer.
The offline installation package already contains all downloaded Grafana plugins by default, located under the path specified by grafana_plugin_cache. Pigsty will package the downloaded plugins and place them under that path after the download is complete when downloading plugins from the Internet.
grafana_plugin_cache
Grafana plugin cache address, type: path, level: G, default value: "/www/pigsty/plugins.tgz".
grafana_plugin_list
List of installed Grafana plugins, type: string[], level: G, default value:
Each array element is a string that represents the name of the plugin. Plugins are installed using grafana-cli plugins install.
grafana_plugin_git
Grafana plugin installed from Git, type: url[], level: G, default value:
Some plugins cannot be downloaded via the official command line but can be downloaded via Git Clone. Plugins will be installed via cd /var/lib/grafana/plugins && git clone .
A visualization plugin will be downloaded by default: vonng-echarts-panel, which provides Echarts drawing support for Grafana.
LOKI
LOKI is the default log collection server used by Pigsty.
loki_enabled
Enable Loki on the meta node, type: bool, level: C/I, default value: true.
loki_endpoint
Loki service endpoint for receiving logs, type: url, level: G, default value: "http://10.10.10.10:3100/loki/api/v1/push".
loki_clean
Clean up the database directory when installing Loki, type: bool, level: A, default value: false.
loki_options
Command line arguments for Loki, type: string, level: G, default value: "-config.file=/etc/loki.yml -config.expand-env=true".
The default config parameters are used to specify the Loki config file location and to enable the ability to expand environment variables in the config file; it is not recommended to remove these two options.
loki_data_dir
Loki’s data directory, type: string, level: G, default value: "/data/loki".
loki_retention
Loki log default retention days, type: interval, level: G, default value: "15d".
DCS
Distributed Configuration Store (DCS) is a distributed, highly available meta-database that provides HA consensus and service discovery.
Pigsty supports Consul & ETCD as DCS. Use dcs_registry to specify where to register service,
Availability of Consul/ETCD is critical for postgres HA. Special care needs to be taken when using the DCS service in a production env.
Availability of DCS itself is achieved through multiple peers. For example, a 3-node DCS cluster allows up to one node to fail, while a 5-node DCS cluster allows 2 nodes to fail.
In a large-scale production env, it is recommended to use at least 3~5 DCS Servers.
The DCS servers used by Pigsty are specified by the parameter dcs_servers, either by using an existing external DCS server cluster or by deploying DCS Servers using nodes managed by Pigsty itself.
By default, Pigsty deploys setup DCS services when nodes are included in management (nodes.yml), and if the current node is defined in dcs_servers, the node will be initialized as a DCS Server.
Pigsty deploys a single node DCS Server on the meta node itself by default. You can use any node as DCS Servers. Before deploying any HA Postgres Cluster, you should ensure that all DCS Servers have been initialized. (Which is done during nodes.yml)
dcs_name
DCS cluster name, type: string, level: G, default value: "pigsty".
Represents the data center name in Consul, and used as initial cluster token in Etcd.
dcs_servers
DCS Server, type: dict, level: G, default value:
Key is the DCS server instance name, and Value is the server IP address. By default, Pigsty will configure the DCS service for the node in the node initialization playbook, which defaults to Consul.
You can use an external DCS server and fill in the addresses of all external DCS Servers. Otherwise, Pigsty will deploy a single instance DCS Server on the meta node (10.10.10.10 placeholder) by default.
If the current node is defined in dcs_servers, i.e., the IP address matches any Value, the node will be initialized as a DCS Server, and its Key will be used as a Consul Server.
dcs_registry
Where to register service, type: enum, level: G, default value: "consul".
none: No service registration is performed (nonewill disableprometheus_sd_method= consul ).consul: Registering services to Consul.etcd: Registering services into Etcd (not supported yet).
pg_dcs_type
PostgreSQL HA DCS type, type: enum, level: G, default value: "consul".
The available v1.5.1 Patroni DCS backends are consul and etcd. The tagged Patroni and environment templates implement both; this is separate from the still-unimplemented dcs_registry=etcd service-registration option.
dcs_safeguard
Assure that any running consul instance will not be purged by any nodes playbook., level: C/A, default: false
Check SafeGuard for details.
dcs_clean
Remove an existing Consul instance during node initialization? The role fallback is true for Consul in v1.5.1 and the bundled pigsty.yml also sets dcs_clean: true; set it to false and/or enable dcs_safeguard for protected environments.
This allows the removal of any running consul instance during nodes.yml, which makes it a true idempotent playbook.
It’s a dangerous option so you’d better disable it by default and use it with -e CLI args.
This parameter not working when dcs_safeguard is set to true
Consul
Consul is used for service mesh, traffic control, health check, service registry, service discovery & consensus.
consul_enabled
Enable consul: bool, level: G, default value: true.
Setup consul servers & agents on all nodes.
consul_data_dir
Consul data directory, type: string, level: G, default value: "/data/consul".
ETCD
ETCD is used for HA PostgreSQL Leader election, alternative to Consul.
etcd_enabled
Enable etcd: bool, level: G, default value: true.
Setup etcd servers on nodes in dcs_servers, and write credential to all client nodes.
etcd_data_dir
ETCD data directory, type: string, level: G, default value: "/data/etcd".
28 - Config: Nodes
Pigsty provides host provisioning and monitoring functions. The nodes.yml playbook can be executed to configure the node to the corresponding state and incorporate it into the Pigsty monitor system.
NODE_IDENTITY: Node identity parametersNODE_DNS: Node domain name resolutionNODE_PACKAGE: Node Repo & PackagesNODE_TUNE: Node features & kernel tuningNODE_ADMIN: Node admin user & dirNODE_TIME: Node time zone, NTP, crontabDOCKER: Node docker daemonNODE_EXPORTER: Node metrics exporterPROMTAIL: Logger agent
| ID | Name | Section | Type | Level | Comment |
|---|---|---|---|---|---|
| 300 | meta_node |
NODE_IDENTITY |
bool | C | mark this node as meta |
| 301 | nodename |
NODE_IDENTITY |
string | I | node instance identity |
| 302 | node_cluster |
NODE_IDENTITY |
string | C | node cluster identity |
| 303 | nodename_overwrite |
NODE_IDENTITY |
bool | C | overwrite hostname with nodename |
| 304 | nodename_exchange |
NODE_IDENTITY |
bool | C | exchange static hostname |
| 310 | node_etc_hosts_default |
NODE_DNS |
string[] | C | static DNS records |
| 311 | node_etc_hosts |
NODE_DNS |
string[] | C/I | extra static DNS records |
| 312 | node_dns_method |
NODE_DNS |
enum | C | how to setup dns service? |
| 313 | node_dns_servers |
NODE_DNS |
string[] | C | dynamic DNS servers |
| 314 | node_dns_options |
NODE_DNS |
string[] | C | /etc/resolv.conf options |
| 320 | node_repo_method |
NODE_PA |
enum | C | how to use yum repo (local) |
| 321 | node_repo_remove |
NODE_REPO |
bool | C | remove existing repo file? |
| 322 | node_repo_local_urls |
NODE_REPO |
url[] | C | local yum repo url list |
| 330 | node_packages_default |
NODE_PACKAGES |
string[] | C | pkgs to be installed on all node |
| 331 | node_packages |
NODE_PACKAGES |
string[] | C | extra pkgs to be installed |
| 332 | node_packages_meta |
NODE_PACKAGES |
string[] | G | meta node only packages |
| 333 | node_packages_meta_pip |
NODE_PACKAGES |
string | G | meta node pip3 packages |
| 340 | node_disable_firewall |
NODE_TUNE |
bool | C | disable firewall? |
| 341 | node_disable_selinux |
NODE_TUNE |
bool | C | disable selinux? |
| 342 | node_disable_numa |
NODE_TUNE |
bool | C | disable numa? |
| 343 | node_disable_swap |
NODE_TUNE |
bool | C | disable swap? |
| 344 | node_static_network |
NODE_TUNE |
bool | C | use static DNS config? |
| 345 | node_disk_prefetch |
NODE_TUNE |
bool | C | enable disk prefetch? |
| 346 | node_kernel_modules |
NODE_TUNE |
string[] | C | kernel modules to be installed |
| 347 | node_tune |
NODE_TUNE |
enum | C | node tune mode |
| 348 | node_sysctl_params |
NODE_TUNE |
dict | C | extra kernel parameters |
| 350 | node_data_dir |
NODE_ADMIN |
path | C | default data disk mountpoint |
| 351 | node_admin_enabled |
NODE_ADMIN |
bool | G | create admin user? |
| 352 | node_admin_uid |
NODE_ADMIN |
int | G | admin user UID |
| 353 | node_admin_username |
NODE_ADMIN |
string | G | admin user name |
| 354 | node_admin_ssh_exchange |
NODE_ADMIN |
bool | C | exchange admin ssh keys? |
| 355 | node_admin_pk_current |
NODE_ADMIN |
bool | A | pks to be added to admin |
| 356 | node_admin_pk_list |
NODE_ADMIN |
key[] | C | add current user’s pkey? |
| 360 | node_timezone |
NODE_TIME |
string | C | node timezone |
| 361 | node_ntp_enabled |
NODE_TIME |
bool | C | setup ntp on node? |
| 362 | node_ntp_service |
NODE_TIME |
enum | C | ntp mode: ntp or chrony? |
| 363 | node_ntp_servers |
NODE_TIME |
string[] | C | ntp server list |
| 364 | node_crontab_overwrite |
NODE_TIME |
bool | C/I | overwrite instead of append /etc/crontab |
| 365 | node_crontab |
NODE_TIME |
string[] | C/I | crontab list of node |
| 370 | docker_enabled |
DOCKER |
bool | C | docker enabled? |
| 371 | docker_cgroups_driver |
DOCKER |
string | C | docker cgroup driver |
| 372 | docker_registry_mirrors |
DOCKER |
string[] | C | docker registry mirror location |
| 373 | docker_image_cache |
DOCKER |
path | C | docker image cache tarball |
| 380 | node_exporter_enabled |
NODE_EXPORTER |
bool | C | node_exporter enabled? |
| 381 | node_exporter_port |
NODE_EXPORTER |
int | C | node_exporter listen port |
| 382 | node_exporter_options |
NODE_EXPORTER |
string | C/I | node_exporter extra cli args |
| 390 | promtail_enabled |
PROMTAIL |
bool | C | promtail enabled ? |
| 391 | promtail_clean |
PROMTAIL |
bool | C/A | remove promtail status file ? |
| 392 | promtail_port |
PROMTAIL |
int | G | promtail listen port |
| 393 | promtail_options |
PROMTAIL |
string | C/I | promtail cli args |
| 394 | promtail_positions |
PROMTAIL |
string | C | path to store promtail status file |
NODE_IDENTITY
Each node has identity parameters that are configured through the parameters in <cluster>.hosts and <cluster>.vars.
Pigsty uses IP as a unique identifier for database nodes. This IP must be the IP that the database instance listens to and serves externally, but it is inappropriate to use a public IP. Users can also indirectly operate the management target node through an SSH tunnel or springboard machine transit. However, the primary IPv4 is still the core identity of the node when identifying the database node. This is very important. The IP is the inventory_hostname of the host in the inventory, which is reflected as the key in the <cluster>.hosts object.
In the Pigsty monitor system, nodes also have two crucial identity parameters: nodename and node_cluster. These will be used in the monitor system as the node’s instance identity (ins) and cluster identity (cls). Pigsty uses node-exclusive 1:1 deployment by default, so the identity params of the instances (pg_cluster and pg_instance) can be borrowed to the ins and cls tags of the nodes via the pg_hostname parameter.
nodename and node_cluster are not mandatory; when left blank or empty, nodename will use the node’s current hostname, while node_cluster will use the fixed default value: nodes.
| Name | Type | Level | Necessity | Comment |
|---|---|---|---|---|
inventory_hostname |
ip |
- | Required | Node IP |
nodename |
string |
I | Optional | Node Name |
node_cluster |
string |
C | Optional | Node cluster name |
The following cluster config declares a three-node node cluster:
meta_node
This node is a meta node, type: bool, level: C, default value: false.
Nodes under the meta grouping carry this flag in the inventory by default. Nodes with this flag will be additionally configured at node package installation with:
Install the RPM pkgs specified by node_packages_meta and install the Python pkgs set by node_packages_meta_pip.
nodename
Specifies the node name, type: string, level: I, the default value is null.
Null or empty string means nodename will be set to node’s current hostname.
no name is specified for the node, and the existing Hostname is used directly as the node name.
The node name nodename will be used as the name of the node instance (ins tag) in the Pigsty monitor system. In addition, if nodename_overwrite is true, the node name will also be used as the HOSTNAME.
Note: If the pg_hostname option is enabled, Pigsty will borrow the identity parameter of the one-by-one corresponding PG instance on the current node, such as pg-test-1, as the node name when initializing the node.
node_cluster
Node cluster name, type: string, level: C, default value: "nodes".
The default null value will directly use the fixed value nodes as the node cluster identity.
The node cluster name node_cluster will be used as the node cluster (cls) label in the Pigsty monitor system.
Note: If the pg_hostname option is enabled, Pigsty will borrow the identity parameter of the one-by-one corresponding PG cluster on the current node, such as pg-test, as the node cluster name when initializing the node.
nodename_overwrite
Override machine HOSTNAME with node name, type: bool, level: C, default value: true.
Defaults to true, a non-empty node name nodename will override the current hostname of the node.
No changes are made to the hostname if the nodename parameter is undefined, empty, or an empty string.
nodename_exchange
Exchange hostnames between playbook nodes, type: bool, level: C, default value: false.
When this parameter is enabled, node names are exchanged between the same group of nodes executing the nodes.yml playbook, written to /etc/hosts.
NODE_DNS
Pigsty configs static DNS records and dynamic DNS resolver for the nodes.
If you already have a DNS server, set node_dns_method to none to disable dynamic DNS setup.
node_etc_hosts
DNS records specific to the cluster instance level, type: string[], level: C/I, default value is an empty array [].
node_etc_hosts is an array. Each element is a string shaped like an ip domain_name, representing a DNS resolution record. Each of which is written to /etc/hosts when the machine node is initialized, suitable for cluster/instance specific records.
node_etc_hosts_default
Write to static DNS resolution of the machine, type: string[], level: C, default value:
node_etc_hosts_default is an array. Each element is a string shaped like an ip domain_name, representing a DNS resolution record. Each of which is written to /etc/hosts when the machine node is initialized, suitable for global config of infra addresses.
Make sure to write a DNS record like 10.10.10.10 pigsty yum.pigsty to /etc/hosts to ensure that the local yum repo can be accessed using the domain name before the DNS Nameserver starts.
node_dns_method
Config DNS server, type: enum, level: C, default value: "add".
The default config of dynamic DNS servers for machine nodes has three modes:
add: Append the records innode_dns_serversto/etc/resolv.confand keep the existing DNS servers. (default)overwrite: Overwrite/etc/resolv.confwith the record innode_dns_serversnone: If a DNS server is provided in the production env, the DNS server config can be skipped.
node_dns_servers
Config dynamic DNS server list, type: string[], level: C, default value is 10.10.10.10.
Pigsty adds meta nodes as DNS Server by default, and DNSMASQ on the meta node responds to DNS requests in the env.
node_dns_options
If node_dns_method is configured as add or overwrite, the records in this config entry will be appended or overwritten to /etc/resolv.conf. Please see the Linux doc for /etc/resolv.conf for the exact format.
The default parsing options added by Pigsty:
NODE_REPO
Pigsty configure yum repos & install packages from it.
node_repo_method
A node using Yum repo, type: enum, level: C, default value: "local".
The machine node Yum software repo is configured in three modes:
local: Use the local Yum repo on the meta node, the default behavior (recommended).public: To install using internet sources, write the public repo inrepo_upstreamto/etc/yum.repos.d/.none: No config and modification of local repos.
node_repo_remove
Remove nodes with existing Yum repos, type: bool, level: C, default value: true.
If enabled, Pigsty will move repo file in /etc/yum.repos.d to backup dir: /etc/yum.repos.d/backup
node_repo_local_urls
URL address of the local repo, type: url[], level: C, default value is local.
node_repo_method configured as local, the Repo file URLs listed here will be downloaded to /etc/yum.repos.d.
Here is an array of Repo File URLs that Pigsty will add by default to the machine’s source config for the local Yum repos on the meta node.
NODE_PACKAGES
node_packages
List of extra installed software for the node, type: string[], level: C, default value:
There is a list of extra pkgs to install via yum, with an empty list by default.
Like node_packages_default, the former is usually configured globally, while node_packages makes exceptions for specific nodes.
node_packages_default
List of node installation software, type: string[], level: C, default value:
The package list is an array, but each element can contain multiple pkgs separated by commas. The list of pkgs installed by Pigsty by default is as follows:
node_packages_meta
List of software required by the meta node, type: string[], level: G, default value:
The pkgs listed in node_packages_meta will only be installed on the meta node, and infra software generally used on the meta node must be specified here.
node_packages_meta_pip
Package installed on the meta node via pip3, type: string, level: G, default value: "jupyterlab".
The package will be downloaded to {{ nginx_home }}/{{ repo_name }}/python dir and then installed uniformly.
Currently, jupyterlab will be installed by default, providing a complete Python runtime env.
NODE_TUNE
Configure some features, kernel modules, and tuning templates on the node.
node_disable_firewall
Turn off node firewall, type: bool, level: C, default value: true, please keep it off.
node_disable_selinux
Close node SELINUX, type: bool, level: C, default value: true, please keep it off.
node_disable_numa
Close the node NUMA, type: bool, level: C, default value: false.
Boolean flag, default is not off. Note that turning off NUMA requires a reboot of the machine before it can take effect!
If you don’t know how to set the affinity with a specific CPU core, it is recommended to turn off NUMA when using the database in a production env.
node_disable_swap
Turn off node SWAP, type: bool, level: C, default value: false.
Turning off SWAP is not recommended and can be done to improve performance if there is enough memory and the database is deployed exclusively.
SWAP should be disabled when your node is used for a Kubernetes deployment.
node_static_network
Use static DNS servers, Type: bool, Level: C, Default: true, Enabled by default.
Enabling static networking means that machine reboots will not overwrite your DNS Resolv config with NIC changes. It is recommended to allow for it.
node_disk_prefetch
Enable disk pre-reading, type: bool, level: C, default value: false, not enabled by default.
Instances deployed against HDDs optimize throughput and are recommended to be enabled when using HDDs.
node_kernel_modules
Enabled kernel module, type: string[], level: C, default value:
An array consisting of kernel module names declaring the kernel modules that need to be installed on the node. Pigsty will enable the following kernel modules by default:
node_tune
Node tuning mode, type: enum, level: C, default value: "tiny".
Prefabricated solutions for machine tuning, based on the tuned service. There are four pre-production models:
tiny: Micro Virtual Machineoltp: Regular OLTP templates with optimized latencyolap: Regular OLAP templates to optimize throughputcrit: Core financial business templates, optimizing the number of dirty pages
Usually, the database tuning template pg_conf should be paired with the machine tuning template. See Customize PGSQL Template for details.
node_sysctl_params
OS kernel parameter, type: dict, level: C, default value is an empty dictionary. Dictionary K-V structure, Key is kernel sysctl parameter name, Value is the parameter value.
NODE_ADMIN
Host Node Admin Users.
node_data_dir
Mountpoint of major data disk, level: C, default value: /data.
If specified, this path will be used as major data disk mountpoint.
And a dir will be created and throwing a warning if path not exists.
The data dir is owned by root with mode 0777.
node_admin_enabled
Create admin user, type: bool, level: G, default value: true.
To create an admin user on each node (password-free sudo and ssh), an admin user named dba (uid=88) will be created, which can access other nodes in the env and perform sudo from the meta node via SSH password-free.
node_admin_uid
Admin user UID, type: int, level: G, default value: 88, note UID namespace conflict.
node_admin_username
Admin username, type: string, level: G, default value: "dba".
node_admin_ssh_exchange
Exchange node admin SSH keys between instances, type: bool, level: C, default value: true.
When enabled, Pigsty will exchange SSH public keys between members during playbook execution, allowing admins node_admin_username to access each other from different nodes.
node_admin_pk_current
Whether to add the public key of the current node & user to the admin account, type: bool, level: A, default value: true.
When enabled, on the current node, the SSH public key (~/.ssh/id_rsa.pub) of the current user is copied to the authorized_keys of the target node admin user.
When deploying in a production env, be sure to pay attention to this parameter, which installs the default public key of the user currently executing the command to the admin user of all machines.
node_admin_pk_list
The list of public keys for login able admin, type: key[], level: C, default value is an empty array; the demo has the default public key for vagrant users.
Each element of the array is a string containing the key written to the admin user ~/.ssh/authorized_keys, and the user with the corresponding private key can log in as an admin user.
When deploying in production envs, be sure to note this parameter and add only trusted keys to this list.
NODE_TIME
The node time zone is synchronized with time.
If the node is already configured with an NTP server, you can configure node_ntp_enabled to false to skip the setting of the NTP service.
node_timezone
Node time zone, type: string, level: C, default value: "Asia/Hong_Kong".
The default time zone used in the demo is "Asia/Hong_Kong" please adjust it according to your actual situation. (Please don’t use Asia/Shanghai time zone, the abbreviation CST will cause a series of log time zone parsing problems)
Select false, or leave it blank, and Pigsty will not modify the time zone config of this node.
node_ntp_enabled
Is the NTP service configured? , type: bool, level: C, default value: true.
Value is true: Pigsty will override the node’s /etc/ntp.conf or /etc/chrony.conf by filling in the NTP server specified by node_ntp_servers.
If the server node is already configured with an NTP server, it is recommended to turn it off and use the original NTP server.
node_ntp_service
NTP service type: ntp or chrony, type: enum, level: C, default value: "ntp".
Specify the type of NTP service used by the system; by default, ntp is used as the time service:
ntp: Traditional NTP Servicechrony: Time services used by CentOS 7/8 by default
It only takes effect if node_ntp_enabled is true.
node_ntp_servers
List of NTP servers, type: string[], level: C, default value:
It only takes effect if node_ntp_enabled is true.
node_crontab_overwrite
Overwrite instead of append /etc/crontab, type: bool, level: C/I, default value: true
if true, records in node_crontab will render to/etc/crontab instead of appending to it.
node_crontab
Crontab of this node, type: string[], level: C/I, default value: []
Each element of the array is a string in /etc/crontab.
DOCKER
Pigsty install docker on all meta nodes by default, disabled on common nodes by default.
docker_enabled
Enable docker on current node? type: bool, level: C, default value: false. default true on meta nodes.
docker_cgroups_driver
CGroup drivers for docker, type: string, level: C, default value: systemd.
docker_registry_mirrors
Docker registry mirror list, type: string[], level:C, default value: [].
docker_image_cache
Local image cache, type: path, level: C, default value: "/tmp/docker.tgz".
The local image cache will be loaded into docker when the target path exists.
NODE_EXPORTER
NodeExporter is used to collect monitor metrics data from the host.
node_exporter_enabled
Enable node indicator collector, type: bool, level: C, default value: true.
node_exporter_port
NodeExposure Port, type: int, level: C, default value: 9100.
node_exporter_options
Node metrics collection option, type: string, level: C/I, default value: "--no-collector.softnet --no-collector.nvme --collector.ntp --collector.tcpstat --collector.processes"
Pigsty enables ntp, tcpstat, processes three extra metrics, collectors, by default, and disables softnet, nvme two default metrics collectors.
PROMTAIL
Host log collection component, used with Loki infrastructure config.
promtail_enabled
Enable Protail log collection service at the current node, type: bool, level: C, default value: true.
When promtail is enabled, Pigsty will generate a config file for Promtail, as defined in the inventory, to grab the following logs and send them to the Loki instance specified by loki_endpoint.
-
INFRA: Infra logs, collected only on meta nodes.nginx-access:/var/log/nginx/access.lognginx-error:/var/log/nginx/error.loggrafana:/var/log/grafana/grafana.log
-
NODES: Host node logs, collected on all nodes.syslog:/var/log/messagesdmesg:/var/log/dmesgcron:/var/log/cron
-
PGSQL: PostgreSQL logs, collected when a node is defined withpg_cluster.postgres:/pg/data/log/*.csvpatroni:/pg/log/patroni.logpgbouncer:/var/log/pgbouncer/pgbouncer.log
-
REDIS: Redis logs, collected when a node is defined withredis_cluster.redis:/var/log/redis/*.log
promtail_clean
Remove existing state information when installing protail, type: bool, level: C/A, default value: false.
The default is not to clean up; when you choose to clean up, Pigsty will remove the existing state file promtail_positions when deploying Promtail, which means that Promtail will recollect all logs on the current node and send them to Loki.
promtail_port
The default port used by promtail, type: int, level: G, default value: 9080.
promtail_options
Promtail CLI param, type: string, level: C/I, default value: "-config.file=/etc/promtail.yml -config.expand-env=true".
Extra CLI params passed in when running the protail database, default value: '-config.file=/etc/promtail.yml -config.expand-env=true'.
There are already params for specifying the config file path and expanding the environment variables in the config file, which are not recommended to be modified.
promtail_positions
Path to promtail status file, type: string, level: C, default value:"/var/log/positions.yaml"
Promtail records the consumption offsets of all logs, which are periodically written to the file specified by promtail_positions.
29 - Config: PGSQL
Use the PGSQL Playbook, and deploy the PGSQL cluster to adjust the cluster state to the state described in the PGSQL config.
Pigsty has 100+ config parameters for describing a PostgreSQL cluster. However, users usually only need to care about a few parameters in identity params and business objects: the former expresses the database cluster “Who is it? Where is it?” and the latter represents the database “What does it look like? What’s in it?”.
The params on the PostgreSQL are divided into seven main sections:
PG_IDENTITY: Defining the identity of a PostgreSQL cluster.PG_BUSINESS: Customized cluster templates: users, databases, services, privilege rules.PG_INSTALL: Install PostgreSQL pkgs, extension plugins, and prepare dir and tool scripts.PG_BOOTSTRP: Generate config template, pull up PostgreSQL cluster, build M-S replication, and enable connection pooling.PG_PROVISION: PGSQL cluster template provisioning, creating users and databases, configuring privileges role HBA, mode and extensions.PG_EXPORTER: PGSQL-exporter, database, and connection pool config monitoring component.PG_SERVICE: Expose the PostgreSQL service, install the LB HAProxy, enable VIP, and configure DNS.
| ID | Name | Section | Type | Level | Comment |
|---|---|---|---|---|---|
| 500 | pg_cluster |
PG_IDENTITY |
string | C | PG Cluster Name |
| 501 | pg_shard |
PG_IDENTITY |
string | C | PG Shard Name (Reserve) |
| 502 | pg_sindex |
PG_IDENTITY |
int | C | PG Shard Index (Reserve) |
| 503 | gp_role |
PG_IDENTITY |
enum | C | gp role of this PG cluster |
| 504 | pg_role |
PG_IDENTITY |
enum | I | PG Instance Role |
| 505 | pg_seq |
PG_IDENTITY |
int | I | PG Instance Sequence |
| 506 | pg_instances |
PG_IDENTITY |
{port:ins} | I | PG instance on this node |
| 507 | pg_upstream |
PG_IDENTITY |
string | I | PG upstream IP |
| 508 | pg_offline_query |
PG_IDENTITY |
bool | I | allow offline query? |
| 509 | pg_backup |
PG_IDENTITY |
bool | I | make base backup on this ins? |
| 510 | pg_weight |
PG_IDENTITY |
int | I | relative weight in LB |
| 511 | pg_hostname |
PG_IDENTITY |
bool | C/I | set PG ins name as hostname |
| 512 | pg_preflight_skip |
PG_IDENTITY |
bool | C/A | skip preflight param validation |
| 520 | pg_users |
PG_BUSINESS |
user[] | C | business users definition |
| 521 | pg_databases |
PG_BUSINESS |
database[] | C | business databases definition |
| 522 | pg_services_extra |
PG_BUSINESS |
service[] | C | ad hoc service definition |
| 523 | pg_hba_rules_extra |
PG_BUSINESS |
rule[] | C | ad hoc HBA rules |
| 524 | pgbouncer_hba_rules_extra |
PG_BUSINESS |
rule[] | C | ad hoc pgbouncer HBA rules |
| 525 | pg_admin_username |
PG_BUSINESS |
string | G | admin user’s name |
| 526 | pg_admin_password |
PG_BUSINESS |
string | G | admin user’s password |
| 527 | pg_replication_username |
PG_BUSINESS |
string | G | replication user’s name |
| 528 | pg_replication_password |
PG_BUSINESS |
string | G | replication user’s password |
| 529 | pg_monitor_username |
PG_BUSINESS |
string | G | monitor user’s name |
| 530 | pg_monitor_password |
PG_BUSINESS |
string | G | monitor user’s password |
| 540 | pg_dbsu |
PG_INSTALL |
string | C | os dbsu for postgres |
| 541 | pg_dbsu_uid |
PG_INSTALL |
int | C | dbsu UID |
| 542 | pg_dbsu_sudo |
PG_INSTALL |
enum | C | sudo priv mode for dbsu |
| 543 | pg_dbsu_home |
PG_INSTALL |
path | C | home dir for dbsu |
| 544 | pg_dbsu_ssh_exchange |
PG_INSTALL |
bool | C | exchange dbsu ssh keys? |
| 545 | pg_version |
PG_INSTALL |
int | C | major PG version to be installed |
| 546 | pgdg_repo |
PG_INSTALL |
bool | C | add official PGDG repo? |
| 547 | pg_add_repo |
PG_INSTALL |
bool | C | add extra upstream PG repo? |
| 548 | pg_bin_dir |
PG_INSTALL |
path | C | PG binary dir |
| 549 | pg_packages |
PG_INSTALL |
string[] | C | PG packages to be installed |
| 550 | pg_extensions |
PG_INSTALL |
string[] | C | PG extension pkgs to be installed |
| 560 | pg_safeguard |
PG_BOOTSTRAP |
bool | C/A | disable pg instance purge |
| 561 | pg_clean |
PG_BOOTSTRAP |
bool | C/A | purge existing pgsql during init |
| 562 | pg_data |
PG_BOOTSTRAP |
path | C | pg data dir |
| 563 | pg_fs_main |
PG_BOOTSTRAP |
path | C | pg main data disk mountpoint |
| 564 | pg_fs_bkup |
PG_BOOTSTRAP |
path | C | pg backup disk mountpoint |
| 565 | pg_dummy_filesize |
PG_BOOTSTRAP |
size | C | /pg/dummy file size |
| 566 | pg_listen |
PG_BOOTSTRAP |
ip | C | pg listen IP |
| 567 | pg_port |
PG_BOOTSTRAP |
int | C | pg listen port |
| 568 | pg_localhost |
PG_BOOTSTRAP |
ip | path | C |
| 580 | patroni_enabled |
PG_BOOTSTRAP |
bool | C | Is patroni & postgres enabled? |
| 581 | patroni_mode |
PG_BOOTSTRAP |
enum | C | patroni working mode |
| 582 | pg_dcs_type |
PG_BOOTSTRAP |
enum | G | dcs to be used consul/etcd |
| 583 | pg_namespace |
PG_BOOTSTRAP |
path | C | namespace for patroni |
| 584 | patroni_port |
PG_BOOTSTRAP |
int | C | patroni listen port (8080) |
| 585 | patroni_watchdog_mode |
PG_BOOTSTRAP |
enum | C | patroni watchdog policy |
| 586 | pg_conf |
PG_BOOTSTRAP |
string | C | patroni template |
| 587 | pg_libs |
PG_BOOTSTRAP |
string | C | default preload shared database |
| 588 | pg_delay |
PG_BOOTSTRAP |
interval | I | apply delay for standby leader |
| 589 | pg_checksum |
PG_BOOTSTRAP |
bool | C | enable data checksum |
| 590 | pg_encoding |
PG_BOOTSTRAP |
enum | C | character encoding |
| 591 | pg_locale |
PG_BOOTSTRAP |
enum | C | locale |
| 592 | pg_lc_collate |
PG_BOOTSTRAP |
enum | C | collate rule of locale |
| 593 | pg_lc_ctype |
PG_BOOTSTRAP |
enum | C | ctype of locale |
| 594 | pgbouncer_enabled |
PG_BOOTSTRAP |
bool | C | is pgbouncer enabled |
| 595 | pgbouncer_port |
PG_BOOTSTRAP |
int | C | pgbouncer listen port |
| 596 | pgbouncer_poolmode |
PG_BOOTSTRAP |
enum | C | pgbouncer pooling mode |
| 597 | pgbouncer_max_db_conn |
PG_BOOTSTRAP |
int | C | max connection per database |
| 600 | pg_provision |
PG_PROVISION |
bool | C | provision template to pgsql? |
| 601 | pg_init |
PG_PROVISION |
string | C | path to postgres init script |
| 602 | pg_default_roles |
PG_PROVISION |
role[] | G/C | list or global default roles/users |
| 603 | pg_default_privileges |
PG_PROVISION |
string[] | G/C | list of default privileges |
| 604 | pg_default_schemas |
PG_PROVISION |
string[] | G/C | list of default modes |
| 605 | pg_default_extensions |
PG_PROVISION |
extension[] | G/C | list of default extensions |
| 606 | pg_reload |
PG_PROVISION |
bool | A | reload config? |
| 607 | pg_hba_rules |
PG_PROVISION |
rule[] | G/C | global HBA rules |
| 608 | pgbouncer_hba_rules |
PG_PROVISION |
rule[] | G/C | global pgbouncer HBA rules |
| 620 | pg_exporter_config |
PG_EXPORTER |
string | C | pg_exporter config path |
| 621 | pg_exporter_enabled |
PG_EXPORTER |
bool | C | pg_exporter enabled ? |
| 622 | pg_exporter_port |
PG_EXPORTER |
int | C | pg_exporter listen address |
| 623 | pg_exporter_params |
PG_EXPORTER |
string | C/I | extra params for pg_exporter url |
| 624 | pg_exporter_url |
PG_EXPORTER |
string | C/I | monitor target pgurl (overwrite) |
| 625 | pg_exporter_auto_discovery |
PG_EXPORTER |
bool | C/I | enable auto-database-discovery? |
| 626 | pg_exporter_exclude_database |
PG_EXPORTER |
string | C/I | excluded list of databases |
| 627 | pg_exporter_include_database |
PG_EXPORTER |
string | C/I | included list of databases |
| 628 | pg_exporter_options |
PG_EXPORTER |
string | C/I | cli args for pg_exporter |
| 629 | pgbouncer_exporter_enabled |
PG_EXPORTER |
bool | C | pgbouncer_exporter enabled ? |
| 630 | pgbouncer_exporter_port |
PG_EXPORTER |
int | C | pgbouncer_exporter listen addr? |
| 631 | pgbouncer_exporter_url |
PG_EXPORTER |
string | C/I | target pgbouncer url (overwrite) |
| 632 | pgbouncer_exporter_options |
PG_EXPORTER |
string | C/I | cli args for pgbouncer exporter |
| 640 | pg_services |
PG_SERVICE |
service[] | G/C | global service definition |
| 641 | haproxy_enabled |
PG_SERVICE |
bool | C/I | haproxy enabled ? |
| 642 | haproxy_reload |
PG_SERVICE |
bool | A | haproxy reload instead of reset |
| 643 | haproxy_auth_enabled |
PG_SERVICE |
bool | G/C | enable auth for haproxy admin ? |
| 644 | haproxy_admin_username |
PG_SERVICE |
string | G | haproxy admin user name |
| 645 | haproxy_admin_password |
PG_SERVICE |
string | G | haproxy admin password |
| 646 | haproxy_exporter_port |
PG_SERVICE |
int | C | haproxy exporter listen port |
| 647 | haproxy_client_timeout |
PG_SERVICE |
interval | C | haproxy client timeout |
| 648 | haproxy_server_timeout |
PG_SERVICE |
interval | C | haproxy server timeout |
| 649 | vip_mode |
PG_SERVICE |
enum | C | vip working mode |
| 650 | vip_reload |
PG_SERVICE |
bool | A | reload vip configuration |
| 651 | vip_address |
PG_SERVICE |
string | C | vip address used by cluster |
| 652 | vip_cidrmask |
PG_SERVICE |
int | C | vip network CIDR length |
| 653 | vip_interface |
PG_SERVICE |
string | C | vip network interface name |
| 654 | dns_mode |
PG_SERVICE |
enum | C | cluster DNS mode |
| 655 | dns_selector |
PG_SERVICE |
string | C | cluster DNS ins selector |
PG_IDENTITY
pg_cluster, pg_role, pg_seq belong to identity params .
In addition to the IP, these three parameters are the minimum set of parameters necessary to define a new set of clusters. A typical example is shown below:
All other params can be inherited from the global config or the default config, but the identity params must be explicitly specified and manually assigned. The current PGSQL identity params are as follows:
| Name | Type | Level | Description |
|---|---|---|---|
pg_cluster |
string |
C | PG database cluster name |
pg_seq |
number |
I | PG database ins serial number |
pg_role |
enum |
I | PG database ins role |
pg_shard |
string |
C | PG database slice set cluster name (placeholder) |
pg_sindex |
number |
C | PG database slice set cluster number (placeholder) |
pg_cluster: It identifies the name of the cluster, which is configured at the cluster level.pg_role: Configured at the instance level, identifies the role of the ins. Only theprimaryrole will be handled specially. If not filled in, the default is thereplicarole and the specialdelayedandofflineroles.pg_seq: Used to identify the ins within the cluster, usually with an integer number incremented from 0 or 1, which is not changed once it is assigned.{{ pg_cluster }}-{{ pg_seq }}is used to uniquely identify the ins, i.e.pg_instance.{{ pg_cluster }}-{{ pg_role }}is used to identify the services within the cluster, i.e.pg_service.pg_shardandpg_sindexare used for horizontally sharding clusters, reserved for Citus and Greenplum multicluster management.
pg_cluster
PG cluster name, type: string, level: cluster, no default. A mandatory parameter must be provided by the user.
The cluster name will be used as the namespace for the resources within the cluster. The naming needs to follow a specific naming pattern: [a-z][a-z0-9-]* to be compatible with the requirements of different constraints on the identity.
pg_shard
Shard to which the PG cluster belongs (reserved), type: string, level: cluster, No default.
Only sharding clusters require this parameter to be set. When multiple clusters serve the same business in a horizontally sharded fashion, Pigsty refers to this group of clusters as a Sharding Cluster.
pg_shard is the name of the shard set cluster to which the cluster belongs. A shard set cluster can be specified with any name, but Pigsty recommends a meaningful naming pattern.
For example, a cluster participating in a sharded cluster can use the shard cluster name pg_shard + shard + the cluster’s shard number pg_sindex to form the cluster name:
pg_sindex
PG cluster’s slice number (reserved), type: int, level: C, no default.
The sharded cluster’s slice number, used in conjunction with pg_shard is usually assigned sequentially starting from 0 or 1. Only sharded clusters require this param to be set.
gp_role
Current role of PG cluster in GP, type: enum, level: C, default value:
Greenplum/MatrixDB-specific to specify the role this PG cluster plays in a GP deployment. The optional values are :
master: Facilitator Nodessegment: Data Nodes
Identity parameter, cluster level parameter, and mandatory parameter when deploying GPSQL.
pg_role
PG instance role, type: enum, level: I, no default, mandatory parameter, must be provided by the user.
Roles for PG ins, default roles include primary, replica, and offline.
primary: Primary, there must be one and only one member of the cluster asprimary.replica: Replica for carrying online read-only traffic.offline: Offline replica for taking on offline read-only traffic, such as statistical analysis/ETL/personal queries, etc.
Identity params, required params, and instance-level params.
pg_seq
PG ins serial number, type: int, level: I, no default value, mandatory parameter, must be provided by the user.
A serial number of the database ins, unique within the cluster, is used to distinguish and identify different instances within the cluster, assigned starting from 0 or 1.
pg_instances
All PG instances on the current node, type: {port:ins}, level: I, default value:
This parameter can be used to describe when the node is deployed by more than one PG ins, such as Greenplum’s Segments, or when using monly mode to supervise existing ins.
pg_instances is an array of objects with keys as ins ports and values as a dictionary whose contents can be parameters of any PGSQL board, see MatrixDB deploy for details.
pg_upstream
The replicated upstream node of the instance, type: string, level: I, the default value is null.
Ins-level config entry with IP or hostname to indicate the upstream node for stream replication.
-
When configuring this parameter for a replica, the IP filled in must be another node within the cluster. Instances will be stream replicated from that node, and this option can be used to build cascaded replication.
-
When this parameter is configured for the primary of the cluster, it means that the entire cluster will run as a Standby Cluster, receiving changes from upstream nodes. The
primaryin the cluster will play the role ofstandby leader.
Using this parameter flexibly, you can build a standby cluster, complete the splitting of the sharded cluster, and realize the delayed cluster.
pg_offline_query
Allow offline queries, type: bool, level: I, default value: false.
When set to true, the user group dbrole_offline can connect to the ins and perform offline queries, regardless of the role of the current ins.
More practical for cases with a small number of ins (one primary & one replica), the user can mark the only replica as pg_offline_query = true, thus accepting ETL, slow queries with interactive access.
pg_backup
Store cold standbys on the ins, type: bool, level: I, default value: false.
Not implemented, the tag bit is reserved and the ins node with this tag is used to store the base cold standby.
pg_weight
The relative weight of the ins in load balancing, type: int, level: I, default value: 100.
When adjusting the relative weight of an instance in service, this parameter can be modified at the instance level and applied to take effect as described in SOP: Cluster Traffic Adjustment.
pg_hostname
Set PG ins name to HOSTNAME, type: bool, level: C/I, default value: true.
Use the PG ins name and cluster name as the node’s name and cluster name when initializing the nodean , enabled by default in the bundled v1.5.1 inventory.
When using the node: PG 1:1 exclusive deploy mode, you can assign the identity of the PG ins to the node, making the node consistent with the PG’s monitor identity.
pg_preflight_skip
Skip preflight param validation, type: bool, level: C/A, default value: false.
If not initializing a new cluster, the task of Patroni and Postgres initialization can be completely skipped with this parameter.
PG_BUSINESS
Users need to focus on this part of the parameters to declare their required database objects on behalf of the business.
Customized cluster templates: users, databases, services, privilege patterns.
- Business User Definition:
pg_users - Business Database Definition:
pg_databases - Cluster Proprietary Services Definition:
pg_services_extra - Cluster/ins specific HBA rules:
pg_hba_rules_extra - Pgbounce specific HBA rules:
pgbouncer_hba_rules_extra
Special DB users, it is recommended to change these user passwords in the production env.
- PG Admin User:
pg_admin_username/pg_admin_password - PG Replication User:
pg_replication_username/pg_replication_password - PG Monitor Users:
pg_monitor_username/pg_monitor_password
pg_users
Business user definition, type: user[], level: C, default value is an empty array.
Used to define business users at the cluster level, each object in the array defines a user or role, a complete user definition is as follows:
- Each user or role must specify a
nameand the rest of the fields are optional, anamemust be unique in this list. passwordis optional, if left blank then no password is set, you can use the MD5 ciphertext password.login,superuser,createdb,createrole,inherit,replicationandbypassrlsare all boolean types used to set user attributes. If not set, the system defaults are used.- Users are created by
CREATE USER, so they have theloginattribute by default. If the role is created, you need to specifylogin: false. expire_atandexpire_inare used to control the user expiration time.expire_atuses a date timestamp in the shape ofYYYY-mm-DD.expire_inuses the number of days to expire from now, and overrides theexpire_atoption ifexpire_inexists.- New users are not added to the Pgbouncer user list by default, and
pgbouncer: truemust be explicitly defined for the user to be added to the Pgbouncer user list. - Users/roles are created sequentially, and users defined later can belong to the roles defined earlier.
- Users can add default privilegs groups for business users via the
rolesfield:dbrole_readonly: Default production read-only user with global read-only privileges. (Read-only production access)dbrole_offline: Default offline read-only user with read-only access on a specific ins. (offline query, personal account, ETL)dbrole_readwrite: Default production read/write user with global CRUD privileges. (Regular production use)dbrole_admin: Default production management user with the privilege to execute DDL changes. (Admin User)
Configure pgbouncer: true for the production account to allow it to access through the connection pool; regular users should not access the database through the connection pool.
pg_databases
Business database definition, type: database[], level: C, default value is an empty array.
Used to define business users at the cluster level, each object in the array defines a business database, a complete database definition as follows:
In each DB definition, the DB name is mandatory and the rest are optional.
name: Database name, Must.owner: Database owner, default ispostgrestemplate: The template used for database creation, default istemplate1.encoding: The default character encoding of the database, which isUTF8by default, is consistent with the ins by default. It is recommended not to configure and modify it.locale: The default localization rule for the database, which defaults toC, is recommended not to be configured to be consistent with the instance.lc_collate: The default localized string sorting rule for the database, which is set the same as the instance by default, should not be modified and must be consistent with the DB template. It is strongly recommended not to configure, or configure toC.lc_ctype: The default LOCALE of the database, by default, is the same as the ins setting, do not modify or set it, it must be consistent with the DB template. Configure to C oren_US.UTF8.allowconn: Allow database connection, default istrue, not recommended to change.revokeconn: Reclaim privilege to connect to the database. The default isfalse. To betrue, thePUBLIC CONNECTprivilege on the database will be reclaimed. Only the default user (dbsu|monitor|admin|replicator|owner) can connect. In addition, theadmin|ownerwill have GRANT OPTION, which can give other users connection privileges.tablespace: The tablespace associated with the database, the default ispg_default.connlimit: Database connection limit, default is-1, i.e. no limit.extensions: An array of objects, each of which defines an extension in the database, and its installed mode.parameters: K-V objects, each K-V defines a parameter that needs to be modified against the database viaALTER DATABASE.pgbouncer: Boolean option to join this database to Pgbouncer or not. All databases are joined to Pgbouncer unlesspgbouncer: falseis explicitly specified.comment: Database note information.
pg_services_extra
Cluster Proprietary Service Definition, Type: service[], Level: C, Default:
Used to define additional services at the cluster level, each object in the array defines a service, a complete service definition is as follows:
Each cluster can define multiple services, each containing any number of cluster members. Services are distinguished by port, name, and src_port are mandatory and must be unique within the array.
MUST OPTION
-
Name(
service.name):The full name of the service is prefixed by the cluster name and suffixed by
service.name, connected by-. For example, the service withname=primaryin thepg-testcluster has the full-service namepg-test-primary. -
Port(
service.port):In Pigsty, services are exposed to the public by default in the form of NodePort, so exposing the port is mandatory. However, if you use an external LB service access scheme, you can also differentiate the services in other ways.
-
Selector(
service.selector):The selector specifies the ins members of the service, in the form of JMESPath, filtering variables from all cluster ins members. The default
[]selector will pick all cluster members.
Optional
-
Backup Selector(
service.selector):The optional backup selector
service.selector_backupselects or marks the list of ins used for service backup, i.e. the backup ins take over the service only when all other members of the cluster fail. For example, theprimaryins can be added to thereplicaservice’s alternative set, so that the primary can still carry the cluster’s read-only traffic when all replicas fail. -
Source IP(
service.src_ip) :Indicates the IP used externally by the service. The default is
*, which is all IPs on the local. Usingvipwill use thevip_addressvariable to take the value, or you can fill in the specific IP supported by the NIC. -
Host port(
service.dst_port):Which port on the target ins will the service’s traffic be directed to?
postgreswill point to the port the database is listening on,pgbouncerwill point to the port the connection pool is listening on, or you can fill in a fixed port. -
Health Check method(
service.check_method):How does the service check the health status of the instance? Currently, only HTTP is supported.
-
Health Check Port(
service.check_port):Which port of the service check-ins gets the health status of the ins?
patroniwill get it from Patroni (default 8008),pg_exporterwill get it from PG Exporter (default 9630), or you can fill in a custom port. -
Health Check Path(
service.check_url):The service performs HTTP checks using the URL PATH.
/is used as a health check by default, and PG Exporter and Patroni provide a variety of health checks that can be used to differentiate between primary & replica traffic. For example,/primarywill only return success for the primary, and/replicawill only return success for the replica./read-onlywill return success for any instance that supports read-only (including the primary). -
Health Check Code(
service.check_code):The code expected by the HTTP health check, default is 200.
-
Haproxy Specific Placement(
service.haproxy) :Proprietary config entries for service provisioning software (HAproxy).
<service>.haproxy
These parameters are now defined in service, using
service.haproxyto override the parameter config of the ins.maxconn
HAProxy maximum number of front and back-end connections, default is 3000.
balance
In the algorithm used by haproxy LB, the optional policy is
roundrobin, andleastconn, the default isroundrobin.default_server_options
Default options for Haproxy backend server ins:
'inter 3s fastinter 1s downinter 5s rise 3 fall 3 on-marked-down shutdown-sessions slowstart 30s maxconn 3000 maxqueue 128 weight 100'
pg_hba_rules_extra
Cluster/ins specific HBA rule, Type: rule[], Level: C, Default:
Set the client IP black and white list rules for the database. An array of objects, each of which represents a rule, each of which consists of three parts:
title: Rule headings, which are converted to comments in the HBA filerole: Apply for roles,commonmeans apply to all instances, other values (e.g.replica,offline) will only be installed to matching roles. For example,role='replica'means that this rule will only be applied to instances withpg_role == 'replica'.rules: Array of strings, each record represents a rule that will eventually be written topg_hba.conf.
As a special case, the HBA rule for role == 'offline' is additionally installed on instance of pg_offline_query == true.
pg_hba_rules is similar, but is typically used for global uniform HBA rule settings, and pg_hba_rules_extra will append to pg_hba.conf in the same way.
If you need to completely overwrite the cluster’s HBA rules and do not want to inherit the global HBA config, you should configure pg_hba_rules at the cluster level and override the global config.
pgbouncer_hba_rules_extra
Pgbounce HBA rule, type: rule[], level: C, default value is an empty array.
Similar to pg_hba_rules_extra for extra config of Pgbouncer’s HBA rules at the cluster level.
pg_admin_username
PG admin user, type: string, level: G, default value: "dbuser_dba".
The DB username is used to perform PG management tasks (DDL changes), with superuser privileges by default.
pg_admin_password
PG admin user password, type: string, level: G, default value: "DBUser.DBA".
The database user password used to perform PG management tasks (DDL changes) must be in plaintext. The default is DBUser.DBA and highly recommended changes!
It is highly recommended to change this parameter when deploying in production envs!
pg_replication_username
PG replication user’s name, type: string, level: G, default value: "replicator".
For performing PostgreSQL stream replication, it is recommended to keep global consistency.
pg_replication_password
PG’s Replication User Password, type: string, level: G, default value: "DBUser.Replicator".
The password of the database user used to perform PostgreSQL stream replication must be in plaintext. The default is DBUser.Replicator.
It is highly recommended to change this parameter when deploying in production envs!
pg_monitor_username
PG monitor user, type: string, level: G, default value: "dbuser_monitor".
The database user name is used to perform PostgreSQL and Pgbouncer monitoring tasks.
pg_monitor_password
PG monitor user password, type: string, level: G, default value: "DBUser.Monitor".
The password of the database user used to perform PostgreSQL and Pgbouncer monitoring tasks, must be in plaintext.
It is highly recommended to change this parameter when deploying in production envs!
PG_INSTALL
PG Install is responsible for completing the installation of all PostgreSQL dependencies on a machine with the base software. The user can configure the name, ID, privileges, and access of the dbsu, configure the sources used for the installation, configure the installation address, the version to be installed, and the required pkgs and extensions plugins.
Such parameters only need to be modified when upgrading a major version of the database as a whole. Users can specify the software version to be installed via pg_version and override it at the cluster level to install different database versions for different clusters.
pg_dbsu
PG OS dbsu, type: string, level: C, default value: "postgres", not recommended to modify.
When installing Greenplum / MatrixDB, modify this parameter to the corresponding recommended value: gpadmin|mxadmin.
pg_dbsu_uid
dbsu UID, type: int, level: C, default value: 26.
UID of the dbsu is used by the database by default. The default value is 26, consistent with the official RPM pkg-config of PG under CentOS, no modification is recommended.
pg_dbsu_sudo
Sudo privilege for dbsu, type: enum, level: C, default value: "limit".
none: No Sudo privilegelimit: Limited sudo privilege to execute systemctl commands for database-related components, default.all: Fullsudoprivilege, password required.nopass: Fullsudoprivileges without a password (not recommended).
The database superuser pg_dbsu has restricted sudo privilege by default: limit.
pg_dbsu_home
Home dir of dbsu pg_dbsu, type: path, level: C, default value: "/var/lib/pgsql".
pg_dbsu_ssh_exchange
Exchange the SSH key of dbsu pg_dbsu between executing machines. Type: bool, Level: C, Default: true.
pg_version
Installed major PG version, type: int, level: C, default value: 14.
The current instance’s installed a major PG version. Default is 14, supported as low as 10.
Note that PostgreSQL physical stream replication cannot span major versions, please configure this variable at the global/cluster level to ensure that all ins within the entire cluster have the same major version number.
pgdg_repo
Add the official PG repo? , type: bool, level: C, default value: false.
Use this option to download and install PostgreSQL-related pkgs directly from official Internet repos without local repos.
pg_add_repo
Add PG-related upstream repos? , type: bool, level: C, default value: false
If used, the official PGDG repo will be added before installing PostgreSQL.
pg_bin_dir
PG binary dir, type: path, level: C, default value: "/usr/pgsql/bin".
The default value is a softlink created manually during the installation process, pointing to the specific Postgres version dir installed.
For example /usr/pgsql -> /usr/pgsql-14. For more details, please see FHS.
pg_packages
List of installed PG pkgs, type: string[], level: C, default value:
${pg_version} in the package will be replaced with the actual installed PostgreSQL version pg_version.
When you specify a special pg_version for a particular cluster, you can adjust this parameter at the cluster level accordingly (e.g. some extensions did not exist when PG14 beta was installed).
pg_extensions
PG plugin list, type: string[], level: C, default value:
${pg_version} will be replaced with the major PG version number pg_version.
PG_BOOTSTRAP
On a machine with Postgres, create a set of databases.
- Cluster identity definition, clean up existing ins, make dir, copy tools and scripts, configure environment variables.
- Render Patroni config templates, and pull up primary and replica using Patroni.
- Configure Pgbouncer, initialize the business users and database, and register the database and data source services to DCS.
With pg_conf you can use the default cluster templates (OLTP / OLAP / CRIT / TINY). If you create a custom template, you can clone the default config in roles/postgres/templates and adapt it after modifying. Please refer to customize pgsql cluster for details.
pg_safeguard
Assure that any running pg instance will not be purged by any pgsql playbook., level: C/A, default: false
Check SafeGuard for details.
pg_clean
Remove an existing PostgreSQL instance during initialization? The role fallback is false, while the disposable bundled v1.5.1 pigsty.yml sets pg_clean: true; protected environments should set it to false and enable pg_safeguard.
This allows the removal of any running pg instance during pgsql.yml, which makes it a true idempotent playbook.
It’s a dangerous option so you’d better disable it by default and use it with -e CLI args.
This parameter not working when pg_safeguard is set to true
pg_data
PG data dir, type: path, level: C, default value: "/pg/data", not recommended to change.
pg_fs_main
PG main data disk mountpoint, type: path, level: C, default value: "/data".
Pigsty’s default dir structure assumes that there is a main data disk mountpoint on the system that holds the DB dir along with another state.
pg_fs_bkup
PG backup disk mountpoint, type: path, level: C, default value: "/data/backups".
Pigsty’s default dir structure assumes that there is a backup data disk mountpoint on the system that holds backup and archive data. However, users can also specify a sub-dir on the primary data disk as the backup disk home mountpoint.
pg_dummy_filesize
Size of the file /pg/dummy, type: size, level: C, default value: "64MiB".
A placeholder file is a pre-allocated empty file that takes up disk space. When the disk is full, removing the placeholder file can free up some space, it is recommended to use 4GiB, and 8GiB for production env.
pg_listen
PG listen IP address, type: ip, level: C, default value: "0.0.0.0".
PG listen to IP address, default all IPv4 0.0.0.0, if you want to include all IPv6, you can use *.
pg_port
PG listen to Port, type: int, level: C, default value: 5432, not recommended to change.
pg_localhost
PG’s UnixSocket dir, type: ip|path, level: C, default value: "/var/run/postgresql".
The Unix socket dir holds the Unix socket files for PostgreSQL and Pgbouncer, which are accessed through the local Unix socket when the client does not specify an IP to access the database.
patroni_enabled
Enabled Patroni, type: bool, level: C, default value: true.
If disable, Pigsty will skip pulling up patroni. This option is used when setting up extra staff for an existing ins.
patroni_mode
Patroni work mode, type: enum, level: C, default value: "default".
default: Enable Patroni to enter HA auto-switching mode.pause: Enable Patroni to automatically enter maintenance mode after completing initialization (no automatic M-S S switching).remove: Initialize the cluster with Patroni and remove Patroni after initialization.
pg_dcs_type
Which type of DCS to be used, type: enum, hierarchy: G, default value: "consul".
There are two available options: consul and etcd.
consul_enabled or etcd_enabled should be true if default internal DCS are used.
pg_namespace
DCS namespace used by Patroni, type: path, level: C, default value: "/pg".
patroni_port
Patroni listens to port, type: int, level: C, default value: 8008.
The Patroni API server listens to the port for service and health checks to the public by default.
patroni_watchdog_mode
Patroni Watchdog mode, type: enum, level: C, default value: "automatic".
When an M-S switchover occurs, Patroni will try to shut down the primary before elevating the replica. If the primary is still not shut down within the specified time, Patroni will use the Linux kernel module softdog to fence shutdown according to the config.
off: No usingwatchdog.automatic: Enablewatchdogif the kernel hassoftdogenabled, not forced, default behavior.required: Forcewatchdog, or refuse to start ifsoftdogis not enabled on the system.
Enabling Watchdog means that the system prioritizes ensuring data consistency and drops availability. If availability is more important to your system, it is recommended to turn off Watchdog on the meta node.
pg_conf
Patroni’s template, type: string, level: C, default value: "tiny.yml"
The Patroni template was used to pull up the Postgres cluster. Pigsty has 4 pre-built templates:
oltp.ymlRegular OLTP template, default config.olap.ymlOLAP templates to improve parallelism, optimize for throughput, and optimize for long-running queries.crit.ymlCore business templates, based on OLTP templates optimized for security, data integrity, using synchronous replication, forced to enable data checksum.tiny.ymlMicro templates optimized for low-resource scenarios have demo clusters running in VMs.
pg_libs
Shared database loaded by PG, type: string, level: C, default value: "timescaledb, pg_stat_statements, auto_explain".
Fill in the string of the shared_preload_libraries parameter in the Patroni template to control the dynamic database that PG starts preloading. In the current version, the following databases are loaded by default: timescaledb, pg_stat_statements, auand to_explain.
If Citus support is enabled by default, you need to modify this parameter by adding citus to the first position: citus, timescaledb, pg_stat_statements, auto_explain.
pg_delay
Apply delay for delayed standby cluster, type: interval, level: I, default: 0
Specify a recovery min apply delay for Delayed Replica, can only be set on standby cluster initialization.
pg_checksum
Enable data checksums? , type: bool, class: C , default: "false"
Data checksum is enforced when using crit template.
pg_encoding
PG character set encoding, type: enum, level: C, default value: "UTF8". It is not recommended to modify this parameter if there is no special need.
pg_locale
The locale for PG, type: enum, level: C, default value: "C".
It is not recommended to modify this parameter if there is no special need, improper sorting rules may have a significant impact on database performance.
pg_lc_collate
Collate rule of locale, type: enum, level: C, default value: "C".
Users can implement the localization sorting function by COLLATE expression, wrong localization sorting rule may cause exponential performance loss for some operations, please modify this parameter when you ensure there is a localization requirement.
pg_lc_ctype
C-type of locale, type: enum, level: C, default value: "en_US.UTF8"
Some PG extensions (pg_trgm) require extra character classification definitions to work properly for internationalized characters, so Pigsty will use the en_US.UTF8 character set definition by default, and it is not recommended to modify this parameter.
pgbouncer_enabled
Enable Pgbouncer, type: bool, level: C, default value: true.
pgbouncer_port
Pgbouncer listen port, type: int, level: C, default value: 6432.
pgbouncer_poolmode
Pgbouncer pooling mode, type: enum, level: C, default value: "transaction".
transaction, Transaction-level connection pooling, by default, has good performance but affects the use of PreparedStatements with some other session-level features.session, Session-level connection pooling for maximum compatibility.statements, Statement-level join pooling, consider using this pattern if the queries are all point-and-click.
pgbouncer_max_db_conn
Max connection per database, type: int, level: C, default value: 100.
When using Transaction Pooling mode, the number of active server connections is usually in single digits. If Session Pooling mode is used, this parameter can be increased appropriately.
PG_PROVISION
PG_BOOTSTRAP is responsible for creating a completely new set of Postgres clusters, while PG_PROVISION is responsible for creating the default objects in this new set of database clusters, including:
- Basic roles: read-only role, read-write role, admin role
- Basic users: replica user, dbsu, monitor user, the admin user
- Default privileges in the template database
- Default mode
- Default Extensions
- HBA black and white list rules
Pigsty provides rich customization options, if you want to further customize the PG cluster, you can see Customize: PGSQL Cluster.
pg_provision
Provision template to pgsql (app template), type: bool, level: C, default: true.
Provision of the PostgreSQL cluster. Setting to false will skip the tasks defined by pg_provision. Note, however, that the creation of the four default dbsu, replication user, admin user, and monitor user is not affected by this.
pg_init
Custom PG init script, type: string, level: C, default value: "pg-init".
The path to pg-inits Shell script, which defaults to pg-init, is copied to /pg/bin/pg-init and then executed.
The default pg-init is just a wrapper for the SQL command:
/pg/tmp/pg-init-roles.sql: Default role creation script generated frompg_default_roles./pg/tmp/pg-init-template.sql: SQL commands produced according topg_default_privileges,pg_default_schemas,pg_default_extensions. Will be applied to both the default database templatetemplate1and the default adminpostgres.
Users can add their cluster init logic in a custom pg-init script.
pg_default_roles
List or global default roles/users, type: role[], level: G/C, default value:
This parameter defines the default role and default user in PostgreSQL in the form of an array of objects, which are defined in the same form as in pg_users.
pg_default_privileges
List of default privilegs, type: string[], level: G/C, default value:
Please refer to default privilege for details.
pg_default_schemas
List of default schemas, type: string[], hierarchy: G/C, default value: [monitor].
Pigsty creates a schema named monitor for installing monitoring extensions by default.
pg_default_extensions
List of defalut extensions, array of objects, type extension[], hierarchy: G/C, default value:
If the extension does not specify a schema field, the extension will install to the corresponding schema based on the current search_path, e.g., public.
pg_reload
Reload Database Config (HBA), type: bool, level: A, default value: true.
When set to true, Pigsty will execute the pg_ctl reload application immediately after generating HBA rules.
When generating the pg_hba.conf file and manually comparing it before applying it to take effect, you can specify -e pg_reload=false to disable it.
pg_hba_rules
PostgreSQL global HBA rule, type: rule[], hierarchy: G/C, default value:
This parameter is formally identical to pg_hba_rules_extra, and it is recommended to configure a uniform pg_hba_rules globally and use pg_hba_rules_extra for extra customization. The rules in both parameters are applied sequentially, with the latter taking higher priority.
pgbouncer_hba_rules
PgbouncerL global HBA rule, type: rule[], level: G/C, default value:
The default Pgbouncer HBA rules are simple:
- Allow login from local with password
- Allow password login from the intranet network break
Users can customize it.
PG_EXPORTER
PG Exporter for monitoring Postgres with Pgbouncer connection pools.
pg_exporter_config
PG-exporter config file, type: string, level: C, default value: "pg_exporter.yml".
The default config file used by pg_exporter defines the database and connection pool monitor metrics in Pigsty. The default is pg_exporter.yml.
The PG-exporter config file used by Pigsty is supported by default from PostgreSQL 10.0 and is currently supported up to the latest PG 14 release. There are several of optional templates.
pg_exporter_basic.yml: contains only basic metrics, not Object monitor metrics within the database.pg_exporter_fast.yml: metrics with shorter cache time definitions.
pg_exporter_enabled
Enable PG-exporter, type: bool, level: C, default value: true.
Whether to install and configure pg_exporter, when false, the config of pg_exporter on the current node will be skipped, and this Exporter will be skipped when registering monitoring targets.
pg_exporter_port
PG-exposure listen to Port, type: int, level: C, default value: 9630.
pg_exporter_params
Extra params for PG-exporter URL , type: string, level: C/I, default value: "sslmode=disable".
pg_exporter_url
Monitor target pgurl(override), type: string, level: C/I, default value: "".
The PG URL used by PG-exporter to connect to the database should be the URL to access the postgres managed database, which is configured as an environment variable in /etc/default/pg_exporter.
Optional param, defaults to the empty string, if the pg_exporter_url option is configured, the URL will be used directly as the monitor target pgurl. Otherwise, Pigsty will generate the target URL for monitoring using the following rule:
pg_monitor_username: Monitor User Namepg_monitor_password: Monitor User password | 568 |pg_localhost|PG_BOOTSTRAP| ip|path | C | pg’s UnixSocket address |pg_port: PG Listen Portpg_exorter_params: Extra Params for PG-exporter
The above params will be stitched together in the following manner:
If the pg_exporter_url param is specified, Exporter will use that connection string directly.
Note: When only a specific business database needs to be monitored, you can use the PGURL of that database directly. if you need to monitor all business databases on a particular database ins, it is recommended to use the PGURL of the meta database postgres.
pg_exporter_auto_discovery
Auto-database-discovery, type: bool, level: C/I, default value: true.
Enable auto-database-discovery, enabled by default. When enabled, PG Exporter automatically detects changes to the list of databases and creates a crawl connection for each database.
When off, monitoring of objects in the library is not available.
Note that if you have many databases (100+) or a very large number of objects in the database (several k, a dozen), please carefully evaluate the overhead incurred by object monitoring.
pg_exporter_exclude_database
DB auto-discovery exclusion list, type: string, level: C/I, default value: "template0,template1,postgres".
Database name list, when auto-database-discovery is enabled, databases in this list will not be monitored (excluded from monitor objects).
pg_exporter_include_database
Auto-database-discovery capsule list, type: string, level: C/I, default value: "".
Database name list, when auto-database-discovery is enabled, databases that are not in this column table will not be monitored.
pg_exporter_options
Cli args for PG-exporter , type: string, level: C/I, default value:"--log.level=info --log.format=\"logger:syslog?appname=pg_exporter&local=7\"".
pgbouncer_exporter_enabled
Pgbouncer-exporter enabled, type: bool, level: C, default value: true.
pgbouncer_exporter_port
PGB-exporter listens to Port, type: int, level: C, default value: 9631.
pgbouncer_exporter_url
Monitor target pgurl, type: string, level: C/I, default value: "".
The DB’s URL used by PGBouncer Exporter to connect, should be the URL to access the pgbouncer managed database. An optional parameter, default is the empty string.
Pigsty generates the target URL for monitoring by default using the following rules, if the pgbouncer_exporter_url option is configured, this URL will be used directly as the connection string.
This option is configured as an environment variable in /etc/default/pgbouncer_exporter.
pgbouncer_exporter_options
Cli args for PGB Exporter, type: string, level: C/I, default value: "--log.level=info --log.format=\"logger:syslog?appname=pgbouncer_exporter&local=7\".
The INFO level log is about to be typed into syslog.
PG_SERVICE
Listen to PostgreSQL service, install the load balancer HAProxy, enable VIP, and configure DNS.
pg_services
Global generic PG service definition, type: service[], level: G, default value:
An array consisting of service definition objects that define the services listened to the public. The form is consistent with pg_service_extra.
haproxy_enabled
Enable Haproxy, type: bool, tier: C/I, default value: true.
Pigsty deploys Haproxy on all database nodes by default, enabling Haproxy LB only on specific instance/nodes by overriding ins-level variables.
haproxy_reload
Reload Haproxy config, type: bool, level: A, default value: true.
If turned off, Pigsty will not perform Reload operation after rendering the HAProxy config file, and users can check it by themselves.
haproxy_auth_enabled
Enable auth for Haproxy, type: bool, level: G/C, default value: false.
Not enabled by default, we recommend enabling it in production envs or adding access control to Nginx or other access layers.
haproxy_admin_username
HAproxy admin user name, type: string, level: G, default value: "admin".
haproxy_admin_password
HAproxy admin user password, type: string, level: G, default value: "pigsty".
haproxy_exporter_port
HAproxy-exporter listen port, type: int, tier: C, default value: 9101.
haproxy_client_timeout
HAproxy client timeout, type: interval, level: C, default value: "24h".
haproxy_server_timeout
HAproxy server timeout, type: interval, level: C, default value: "24h".
vip_mode
VIP mode: none, type: enum, level: C, default value: "none".
none: No VIP setting, default option.l2: Layer 2 VIP bound to the primary (requires all members to be in the same Layer 2 network broadcast domain).l4: Reserved value for traffic distribution via an external L4 load balancer. (not included in Pigsty’s current implementation).
VIPs are used to ensure the HA of reading and writing services with LBs. When using L2 VIPs, Pigsty’s VIPs are hosted by a vip-manager and will be bound to the cluster primary.
This means that it is always possible to access the cluster primary through a VIP, or the LB on the primary through a VIP (which may have performance pressure).
Note that when using Layer 2 VIP, you must ensure that the VIP candidate ins are under the same Layer 2 network (VLAN, switch).
vip_reload
Overloaded VIP config, type: bool, level: A, default value: true.
vip_address
VIP address used by the cluster, type: string, level: C, default value.
vip_cidrmask
Network CIDR mask length for VIP address, type: int, level: C, default value.
vip_interface
VIP network interface, type: string, level: C, default value: "eth0".
dns_mode
DNS config mode (reserved parameter), type: enum, level: C, default value.
dns_selector
DNS resolution object selector (reserved parameter), type: string, level: C, default value.
30 - Config: REDIS
Config Redis cluster and manipulate REDIS playbook behavior. Refer to Redis Deployment for details.
-
REDIS_IDENTITY: REDIS Identity Params -
REDIS_NODE: REDIS Software, Dir & Exporter -
REDIS_PROVISION: REDIS Server Provisioning
| ID | Name | Section | Type | Level | Comment |
|---|---|---|---|---|---|
| 700 | redis_cluster |
REDIS_IDENTITY |
string | C | redis cluster identity |
| 701 | redis_node |
REDIS_IDENTITY |
int | I | redis node identity |
| 702 | redis_instances |
REDIS_IDENTITY |
instance[] | I | redis instances definition on this node |
| 710 | redis_fs_main |
REDIS_NODE |
path | C | main data disk for redis |
| 711 | redis_exporter_enabled |
REDIS_NODE |
bool | C | install redis exporter on redis nodes |
| 712 | redis_exporter_port |
REDIS_NODE |
int | C | default port for redis exporter |
| 713 | redis_exporter_options |
REDIS_NODE |
string | C/I | default cli args for redis exporter |
| 720 | redis_safeguard |
REDIS_PROVISION |
bool | C | set to true to disable purge |
| 721 | redis_clean |
REDIS_PROVISION |
bool | C | purge existing redis during init |
| 722 | redis_rmdata |
REDIS_PROVISION |
bool | C | remove redis data dir with it? |
| 723 | redis_mode |
REDIS_PROVISION |
enum | C | standalone,cluster,sentinel |
| 724 | redis_conf |
REDIS_PROVISION |
string | C | which config template will be used |
| 725 | redis_bind_address |
REDIS_PROVISION |
ip | C | e.g 0.0.0.0, empty will use inventory_hostname as bind address |
| 726 | redis_max_memory |
REDIS_PROVISION |
size | C/I | max memory used by each redis instance |
| 727 | redis_mem_policy |
REDIS_PROVISION |
enum | C | memory eviction policy |
| 728 | redis_password |
REDIS_PROVISION |
string | C | empty password disable password auth (masterauth & requirepass) |
| 729 | redis_rdb_save |
REDIS_PROVISION |
string[] | C | RDB save cmd, disable with empty array |
| 730 | redis_aof_enabled |
REDIS_PROVISION |
bool | C | enable redis AOF |
| 731 | redis_rename_commands |
REDIS_PROVISION |
object | C | rename dangerous commands |
| 732 | redis_cluster_replicas |
REDIS_PROVISION |
int | C | how much replicas per master in redis cluster ? |
REDIS_IDENTITY
Identity parameters are the information that must be provided to define a Redis cluster, including:
| Name | Level | Description | Example |
|---|---|---|---|
redis_cluster |
MUST, cluster level | Cluster name | redis-test |
redis_node |
MUST, node level | Node Number | primary, replica |
redis_instances |
MUST, node level | Ins Definition | { 6001 : {} ,6002 : {}} |
redis_clusteridentifies the Redis cluster name, configured at the cluster level, and serves as the top-level namespace for cluster resources.redis_nodeidentifies the serial number of the node in the cluster.redis_instancesis a JSON object with the Key as the ins port and the Value as a JSON object containing the instance-specific config.
redis_cluster
Redis cluster identity, type: string, level: C, default value:
Redis cluster identity will be used as a namespace for resources within the cluster and needs to follow specific naming patterns: [a-z][a-z0-9-]* to be compatible with different constraints on identity identification. It is recommended to use redis- as the cluster name prefix.
Identity param is required params and cluster-level params.
redis_node
Redis node identity, type: int, level: I, default value:
Redis node identity, unique in the cluster, is used to distinguish and identify different nodes, starting with an assignment of 0 or 1.
redis_instances
Redis instances definition on this node, type: instance[], level: I, default value.
This database node deployed all Redis ins in JSON K-V object format. The key is the numeric type port number, and the value is the JSON config entry specific to that instance.
Sample example:
Each Redis ins listens on a unique port on the node. You can configure separate parameter options for Redis ins (currently, only replica_of is supported for pre-built M-S replication).
Identity params required params and instance-level params.
REDIS_NODE
redis_fs_main
Primary data disk for Redis, type: path, level: C, default value: "/data".
Pigsty will create the redis dir under that dir to store Redis data. For example, /data/redis.
See FHS: Redis for details.
redis_exporter_enabled
Enable Redis exporter, type: bool, level: C, default: true.
Redis Exporter is enabled by default, one on each Redis node deployed and listens on port 9121 by default.
redis_exporter_port
Redis Exporter listens port, type: int, tier: C, default value: 9121.
Note: If you modify this default port, you will need to replace this port along with the relevant config rule file in Prometheus.
redis_exporter_options
Redis Exporter command parameter, type: string, level: C/I, default value: "".
REDIS_PROVISION
redis_safeguard
Disable erasure of existing Redis, type: bool, level: C/A, default value: false.
if true, redis.yml and redis-remove.yml will not remove running redis instance
redis_clean
What to do when Redis exists, type: bool, level: C/A, default value: true.
If true, redis.yml will purge existing instance during init.
redis_rmdata
Remove the Redis data directory together with an instance, type: bool, level: A, default value: true.
When false, residual RDB/AOF files remain and may be loaded by a later instance using the same directory.
redis_mode
Redis cluster mode, type: enum, level: C, default value: "standalone".
Specifies the mode of this Redis cluster, with three optional modes:
standalone: Default mode, deploys a series of independent Redis ins.cluster: Redis native cluster modesentinel: Redis HA component: sentinel
Pigsty also sets up standalone Redis based on the replica_of parameter when using the standalone mode.
Pigsty creates a native Redis cluster using all defined instances according to the redis_cluster_replicas parameter when using cluster mode.
redis_conf
Redis config template, type: string, level: C, default value: "redis.conf".
redis_bind_address
Redis listener address, type: ip, level: C, default value: "0.0.0.0".
Redis listener the IP, or inventory_hostname if left blank. The default listener has all local IPv4.
redis_max_memory
Max memory used by each Redis ins, type: size, level: C/I, default value: "1GB"
Max memory used by each Redis ins, default is 1GB; it is recommended to configure this parameter at the cluster level to keep the cluster ins config consistent.
redis_mem_policy
Memory eviction policy, type: enum, level: C, default value: "allkeys-lru".
Other optional policies include:
volatile-lruallkeys-lruvolatile-lfuallkeys-lfuvolatile-randomallkeys-randomvolatile-ttlnoeviction
redis_password
Redis password, type: string, level: C, default value: "".
masterauth & requirepass password to use, leave blank to disable password, disabled by default.
Be careful with security, do not place Redis on the public network without password protection.
redis_rdb_save
RDB SAVE directives, type: string[], level: C, default value: [ "1200 1" ].
Redis SAVE directives, the config will enable RDB functionality, each Save policy as a string。
redis_aof_enabled
Enable AOF, type: bool, level: C, default value: false.
redis_rename_commands
Rename dangerous commands, Type: object, Level: C, Default value: {}.
JSON dictionary renames the command represented by Key to the command represented by Value to avoid misuse of dangerous commands.
redis_cluster_replicas
How many replicas per primary in Redis cluster, type: int, tier: C, default: 1.
31 - Customize: PGSQL
The Patroni template is used to customize the specification config of the PostgreSQL cluster, while the Postgres template is used to customize the content of the PostgreSQL cluster.
Pigsty provides nearly 100 parameters on PGSQL describing the PostgreSQL cluster.
However, if you profoundly customize the database cluster created by Pigsty, you can see the Patroni template and Postgres template.
Patroni Templates
Pigsty uses Patroni to manage and initialize Postgres clusters. Suppose you wish to modify the default config params, specifications and tuning schemes, HA policies, DCS access, and control APIs of the PostgreSQL cluster. You can do so by modifying the Patroni template.
Pigsty uses Patroni to do the main provisioning work. Even if the user selects no Patroni mode, pulling up the database cluster will be taken care of by Patroni, and removing the Patroni component after the creation is completed.
Users can do most PostgreSQL cluster customization through the Patroni config file. Please refer to Patroni’s official doc for the Patroni config file format.
Predefined Patroni templates
Pigsty provides several predefined initialization templates for initializing the cluster definition files, located by default in roles/postgres/templates/.
| Conf | CPU | Mem | Disk | Description |
|---|---|---|---|---|
oltp |
64 | 400GB | 4TB | Production OLTP template, default config, optimized latency and performance for production models. |
olap |
64 | 400GB | 4TB | Produce OLAP templates, improve parallelism, optimize for throughput, long queries. |
crit |
64 | 400GB | 4TB | Production core business templates, based on OLTP templates optimized for RPO, security, and data integrity, with synchronous replication and data checksum, enabled. |
tiny |
1 | 1GB | 40GB | Micro templates optimized for low-resource scenarios, such as demo clusters running in virtual machines. |
mini |
2 | 4GB | 100GB | 2C4G model OLTP template |
small |
4 | 8GB | 200GB | 4C8G model OLTP template |
medium |
8 | 16GB | 500GB | 8C16G model OLTP template |
large |
16 | 32GB | 1TB | 16C32G model OLTP template |
xlarge |
32 | 64GB | 2TB | 32C64G model OLTP template |
Specify the path to the template to be used via the pg_conf, or fill in the template name if using a predefined template. If a custom Patroni config template is used, the companion node optimization template should also be used for the machine nodes.
During Configure, Pigsty detects the corresponding default specifications that are automatically selected based on the specifications of the current machine (management machine).
Custom Patroni templates
When customizing Patroni templates, you can use several existing templates as a baseline from which to make changes.
Place them in the templates/ dir, just name them in <mode>.yml format.
Please keep the template variables in Patroni, otherwise, the related parameters may not work properly. For example pg_libs.
Finally, in the pg_conf config file, specify the name of your newly created template, e.g., olap-32C128G-nvme.yml.
Postgres templates
The template template1 in the cluster can be customized using the PG template config entry.
This way ensures that any database newly created in that cluster comes with the same default config: schema, extensions, and default privileges.
Related docs
When customizing a template, the relevant parameters are first rendered as SQL scripts to be executed on the deployed cluster.
pg-init
pg-init is the path to a Shell script for customizing the initialization template that will be executed as a Postgres user, only on the primary, with the primary pulled up at execution. It can run any shell command or any SQL command via psql.
Pigsty will use the default pg-init shell script if this config entry is not specified.
This script can be appended if the user needs to perform complex customization logic. Note pg-init is used to customize database clusters, usually achieved by modifying database templates. When this script is executed, the cluster has been started, but the business users and DB have not yet been created. Therefore the changes to the database templates are reflected in the business database defined by default.
32 - Pigsty Dashboards
Pigsty provides a professional and easy-to-use PostgreSQL monitor system that distills the industry’s monitoring best practices.
The Pigsty monitoring dashboard consists of several relatively independent boards.
| Application | Description |
|---|---|
| Home | Home |
PGSQL |
PostgreSQL Database Monitor |
REDIS |
Redis Database Monitor |
NODES |
Host Node Monitor |
INFRA |
Infra monitoring/logging |
| APP | Extra added applications |
HOME
Pigsty’s home page provides navigation to the various boards.
PGSQL
The PostgreSQL monitoring dashboard has its level, from the top down, as follows:
- Global: Focuses on the entire environment, the big picture global metrics.
- Cluster: Focuses on aggregated metrics for a single database cluster.
- Instance: Focuses on singleton instance objects: database instances, nodes, LBs, and various topic boards.
- Database (objects): Detailed information about activities, tables, and queries within the database.
Most of the monitoring dashboards can be jumped level through tables and tuples.
REDIS
REDIS monitor is divided into a global overview, singleton clusters, and singleton instances.
NODES
NODES monitor is divided into a global overview, single-node clusters, and single nodes.
INFRA
INFRA Monitor is used to monitoring the infra and contains the following Dashboards.
- Infra Overview: Overview of the infra
- Logs Instance: View logs on single nodes
- Nodes Alert: Host Alert
- PGSQL Alert: PostgreSQL Alert
APP
Pigsty comes with a typical application, PGLOG, for analyzing CSV log samples from PG.
Visit https://github.com/vonng/pigsty-app for more sample applications.
33 - Service Discovery
This article describes the mechanism used by the Pigsty monitor system Prometheus to discover monitor objects.
The basis of service discovery is identity. For more identity information, please refer to the section entity.
It would help if you also associated monitor targets with the identity in the monitor system, and Pigsty provides two implementations.
- Static File Service Discovery: Using an automatically maintained configuration file (default).
- Consul service discovery: Uses automatically maintained Consul service registration information.
The static file is the default service discovery mechanism. Before v1.0.0, Consul was the default service discovery method, and the discovery mechanism could be configured via parameters.
Identity
All instances have an Identity, and the Identifier is the metadata associated with the instance to identify it.
An Identity parameter is a unique identifier that must be defined for any cluster with an instance.
| name | variables | abbreviation | type | description |
|---|---|---|---|---|
| cluster | pg_cluster |
cls |
Core identity parameters | Cluster name, top-level namespace for resources within the cluster |
| role | pg_role |
role |
core identity parameters | instance role, primary, replica, offline,… |
| seq | pg_seq |
seq |
core identity parameters | Instance serial number, positive integer, unique within the cluster. |
| instance | pg_instance |
ins |
derived identity parameters | ${pg_cluster}-${pg_seq} |
| service | pg_service |
svc |
derived identity parameters | ${pg_cluster}-${pg_role} |
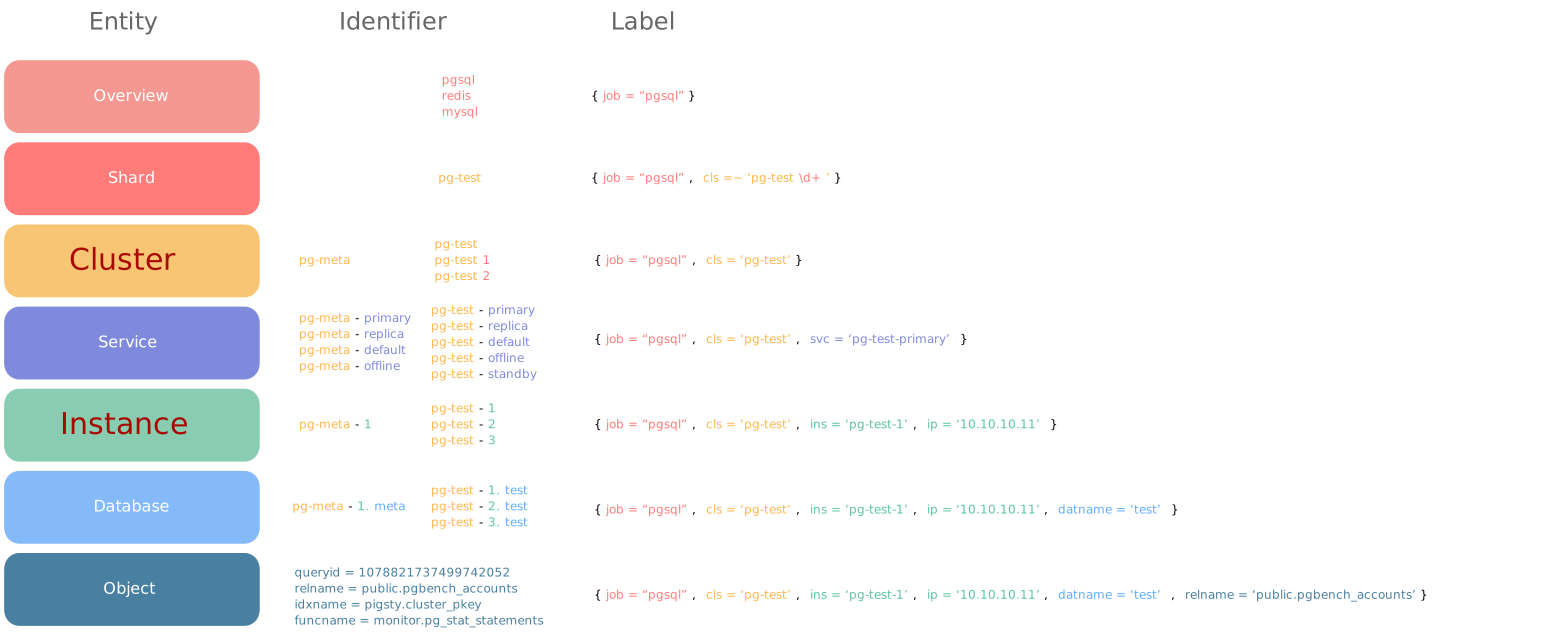
Attach Identity
After naming the objects in the system, you also need to associate identity information to specific instances.
Identity information is business-given metadata, and the database instance is not aware of this identity information.
The most straightforward way to associate identities is Operator’s memory: the DBA remembers in his mind that the instance on IP 10.2.3.4 is the one used for payments. In contrast, the instance on the other one is used for user management. A better way to manage the identity of cluster members is through the config file or by using service discovery.
Pigsty provides both ways of identity management: service discovery based on the Consul and service discovery based on the config file.
The parameter prometheus_sd_method controls this behavior.
consul: service discovery based on Consul, default config.static: service discovery based on local config files.
Pigsty recommends using static service discovery, which is more concise and more reliable as the monitor system does not need to rely on Consul.
Static File Service Discovery
Static file service discovery is the default method of monitor object discovery, and Pigsty pulls the config using the following config by default.
The /etc/prometheus/targets dir holds the monitor object definition files generated by Pigsty, and pgsql is the name of the default environment.
Each instance is register by a standalone file:
Its content is the identifier on a single instance, with monitor objects.
Maintenance Document Service Discovery
When using static file service discovery, these config files are automatically maintained for all cluster expansion and downsize.
The config files will be regenerated for all instances in the environment using the following command.
Default Targets
Each managed Postgres instance includes several capture ports.
- Node Exporter for capturing machine node metrics.
- PG Exporter for capturing database metrics.
- PGBouncer Exporter for capturing connection pool metrics (uses the same binary as PG Exporter).
- Patroni for capturing HA components.
- HAProxy for capturing LB metrics (built-in support, no separate deployment required).
Prometheus on the meta node captures these capture ports.
In addition, the optional Promtail for collecting Postgres, Patroni, and Pgbouncer logs.
All monitoring ports are registered to Consul by default, but Prometheus manages these tasks by default using static file service discovery.
Users can use Consul service discovery by configuring prometheus_sd_method as consul to manage instances dynamically.
Consul Service Discovery
Pigsty has built-in DCS-based config management and automatic service discovery, which provides a visual overview of all nodes and services in the system and their health status. All services in Pigsty are automatically registered with DCS.
Users can also use the DNS and service discovery mechanism provided by Consul to achieve automatic DNS-based traffic switching.
Consul uses a Client/Server architecture, with one to five Consul Servers in the entire environment for the actual metadata storage. Consul Agent is deployed on all nodes to proxy the communication between local services and the Consul Server. Pigsty registers services by default using local Consul config files.
Service Registration
A consul agent is running on each node, and services are registered to DCS by the consul agent using JSON config files.
The default location of the JSON config file is /etc/consul.d/, using the naming pattern of svc-<service>.json, taking postgres as an example.
Where the meta and tags sections are the metadata of the service and store the identity information of the instance.
Service Inquiry
Users can discover services registered to Consul through the DNS service provided by Consul, or by calling the Consul API directly.
See Consul doc for ways to consult consul services using the DNS API.
Service Discovery
Prometheus automatically discovers monitor objects in the env via consul_sd_configs. Services tagged with both pg and exporter are automatically identified as crawlers.
Figure: In services discovered by Prometheus, identity information has been associated with the metric dimension of the instance.
Service Maintenance
A database primary-replica switch occurs, resulting in a registered role that is different from the actual role of the instance. This is when such anomalies need to be handled through the anti-entropy process. Patroni-based failover can fix the registered roles normally through callback logic, but manually done role switchover requires manual intervention to take it. Service registrations to the database can be detected and fixed automatically using the following script. It is recommended to configure Crontab on the database instance or set up periodic patrol tasks on the meta node.
Labels
Either through Consul or static file service discovery. The end effect is to achieve an association between identity information and instance metrics.
This correlation is achieved through the dimensional labels of the monitoring metrics.
However, all original metrics related to database clusters in Pigsty must have both cls and ins tags and remain immutable throughout their lifecycle.
| Identity parameters | Dimension labels | Sample values |
|---|---|---|
pg_cluster |
cls |
pg-test |
pg_instance |
ins |
pg-test-1 |
node_ip |
ip |
10.10.10.11 |
Read the next section of metrics to learn how labels organize these metrics.
34 - Metrics
Metric is the core concept of Pigsty’s monitor system.
Format
Metrics are formally cumulative, atomic logical units of measure that can be updated and statistically aggregated over periods.
Metrics typically exist as time series with dimension labels. For example, pg:ins:qps_realtime in the Pigsty sandbox refers to the presentation of real-time QPS for all instances.
Users can perform operations on indicators: summation, derivation, aggregation, etc.
Model
Each Metric class of data usually corresponds to multiple time series. Dimensions distinguish different time series corresponding to the same metric.
Metrics + dimension, which can precisely locate a time series. Each time series is an array of (timestamp, fetch) binaries.
Pigsty uses Prometheus’ metrics model, whose logical concept can be represented by the following SQL DDL.
Take pg:ins:qps as an example:
pg_upis a metric with 4-time series, representing the aliveness status of all instances in the sandbox.pg_up{ins": "pg-test-1", ...}is a time series which represent aliveness of the specific instancepg-test-1.
Sources
Pigsty has four primary sources of monitor data: database, connection pool, OS, and LB. Exposed to the public via the corresponding exporter.
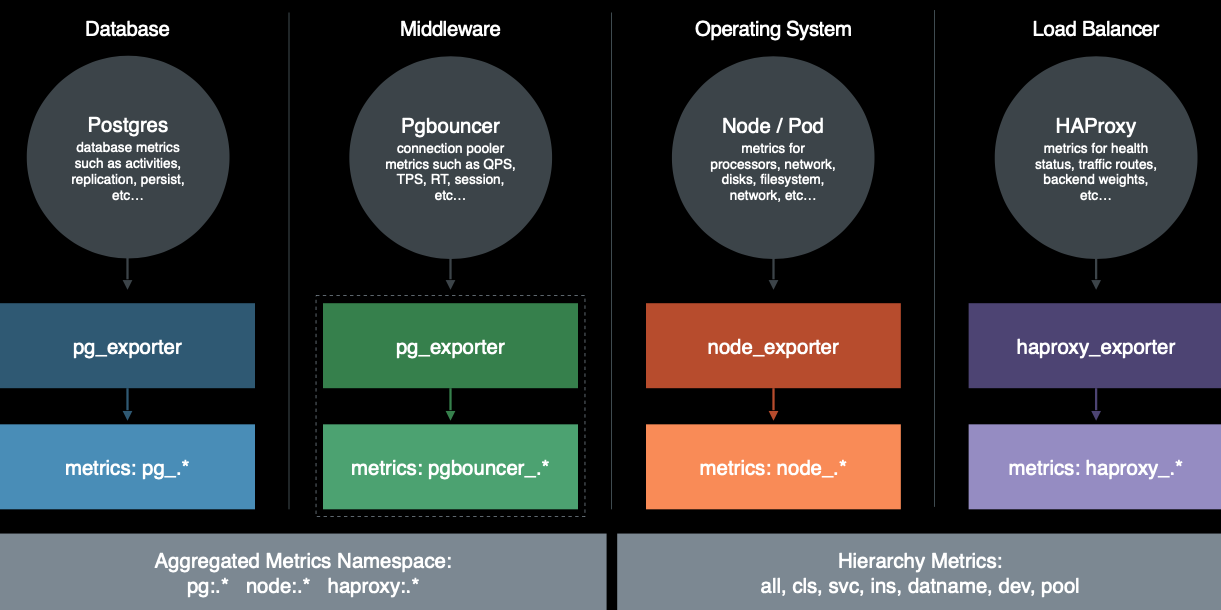
Full sources include.
- PostgreSQL’s monitoring metrics
- Statistical metrics from the PostgreSQL logs
- PostgreSQL system directory information
- Metrics from Pgbouncer connection pool median price
- PgExporter metrics
- Metrics of the database working node Node
- LB Haproxy metrics
- DCS (Consul) working metrics
- Monitor system working metrics: Grafana, Prometheus, Nginx
- Blackbox probing metrics (listed for future coverage in v1.5.1)
Please refer to the v1.5.1 PG exporter definitions section for a complete list of available metrics.
Numbers
Among the database metrics, there are about 230 original metrics related to Postgres and about 50 original metrics related to middleware. Pigsty then designs about 350 DB-related derived metrics based on these actual metrics through hierarchical aggregation and precomputation.
Thus, there are 621 monitor metrics for each database cluster and its attachments for each database cluster. There are 281 machine primitive metrics and 83 derived metrics for a total of 364. Together with the 170 metrics for load balancers, Pigsty has close to 1200 classes of metrics.
Note that here we identify the difference between metric and time-series. We use the term class rather than the individual. This is because a metric may correspond to many time series.
As of 2021, Pigsty’s metrics coverage is one of the best among all open source/commercial monitor systems known to the authors. See Cross-Sectional Comparison for details.
Hierarchy
Pigsty also produces Derived Metrics based on existing metrics.
For example, metrics can be aggregated at different levels.
| Entity | Identifier | Example | Label Keys |
|---|---|---|---|
| Environment | job |
pgsql, redis, staging |
{job} |
| Shard | pg-test-shard\d+ |
{job, cls*} |
|
| Cluster | cls |
pg-meta, pg-test |
{job, cls} |
| Service | pg-meta-primary, pg-test-replica |
{job, cls} |
|
| Instance | ins |
pg-meta-1, pg-test-1 |
{job, cls, ins, ip, instance} |
| Database | datname |
test |
{..., datname} |
| Object | public.pgbench_accounts |
{..., datname, <object>} |
Take the derived process of TPS metrics as an example.
The original data is the transaction counters captured from Pgbouncer. There are four instances in the cluster and two databases on each instance, so there are eight DB-level TPS metrics for one instance.
The following chart, which is a cross-sectional comparison of QPS for each instance within the entire cluster, uses predefined rules here to first obtain 8 DB-level TPS metrics by deriving the original transaction counters, then aggregating the 8 DB-level time series into four instance-level TPS metrics, and finally aggregating these four instance-level TPS metrics into cluster-level TPS metrics.
Pigsty defines a total of 360 classes of derived aggregated metrics, with more to come. The rules for defining derived metrics are described in Reference: Derived-Metrics.
Special Metric
The catalog is a special indicator.
The boundary between Catalog and Metrics distinction is blurred. For example, the number of pages and the number of tuples in a table, Catalog, or Metrics?
The main difference between Catalog and Metrics in practice is that the information in Catalog is infrequently changed, such as the definition of a table. It would be a waste to grab it once every few seconds like Metrics. So this type of information, which is more static, is classified as Catalog.
The catalog is mainly captured by timed tasks (e.g., Patrol), not Prometheus. Some essential Catalog information, such as some information in pg_class, is also converted to metrics and captured by Prometheus.
Pigsty provides the PGCAT series of monitoring panels to capture and present information directly from the Catalog of the target database.
Summary
After understanding Pigsty metrics, it is helpful to know how Pigsty’s alert system uses these metrics data for practical production purposes.
35 - Alerting
Pigsty uses Prometheus as the primary alerting system.
- Prometheus + AlertManager (primary)
- Grafana (backup), not enabled by default
Alert
Alerts are critical for daily fault response and improving system availability.
Missing alarms will lead to reduced availability, and false alarms will lead to reduced sensitivity, and it is necessary to design the alarm rules prudently.
- A reasonable definition of alert levels and the corresponding processing flow.
- A reasonable definition of alert indicators, removal of duplicate alert items, and replenishment of missing alert items.
- Scientific config of alert thresholds based on historical monitoring data reduces the false alert rate.
- Reasonably rationalize the special case rules to eliminate false alerts caused by maintenance work, ETL, and offline queries.
Alert Taxonomy
Categorized by source module
INFRA: Infra alerts: alerts generated by infra software such as Prometheus, Grafana, Consul, DNS, Nginx, etc.NODES: Node alerts, OS, hardware resources, infra software, load balancing, and other alerts, usually handled by DBA.PGSQL: PostgreSQL alerts, alerts from database/connection pool/load-balancing cluster, usually R&D and DBA concern, DBA handle.REDIS: Redis alerts, R&D and DBA attention, DBA handle.……: Application board alerts, with alerts by the business side itself, but DBA will set alerts for business metrics like QPS, TPS, Rollback, and Seasonality.- Pigsty uses the
categorytag{infra,pgsql,nodes,redis,....}to identify the level of alerts.
Categorized by urgency
- P0: CRIT: Incidents with a significant off-site impact require urgent intervention. For example, the primary is down; replication is down. (Incident)
- P1: WARN: Incidents with minor off-site impact, or incidents with redundant processing, requiring response processing at the minute level. (WARN)
- P2: INFO: Impending impact, let loose may worsen at the hourly level, requires a response at the hourly level. (Incident)
- Pigsty uses the
severitytag{CRIT, WARN, INFO}to identify the level of urgency of the alert.
Category by Indicator Type
- Errors: PG Down, PGB Down, Exporter Down, Stream Replication Outage, Single Set Cluster Multi-Master.
- Traffic: QPS, TPS, Rollback, Seasonality
- Latency: Average Response Time, Replication Latency
- Saturation: Connection Stacking, Number of Idle Transactions, CPU, Disk, Age (Transaction Number), Buffer.
Alert Visualization
Pigsty uses timeline status charts to present alert information in various monitor dashboards. The horizontal axis represents a period, and a color bar represents an alert event. Only alerts in the Firing state are displayed in the alert chart; alerts in the Pending state are usually hidden or shown in gray.
Alert Rules
Alert rules can be roughly divided into four types: error, delay, saturation, and traffic.
- Errors: mainly focus on the aliveness of each component, as well as network outages, brain fractures, and other abnormalities, and the level is usually high (P0|P1).
- Latency: mainly concerned with query response time, replication latency, slow queries, and long transactions.
- Saturation: mainly focus on CPU, disk (these two belong to system monitoring but are very important for DB), connection pool queue, number of database back-end connections, age (essentially the saturation of available thing numbers), SSD life, etc.
- Traffic: QPS, TPS, Rollback (traffic is usually related to business indicators belonging to business monitoring), seasonality of QPS, and a burst of TPS.
Prometheus alert rule
The alert rules are defined using Prometheus syntax, and the full alerting rules are detailed in:
- Infrastructure Alert Rule
- Host Node Alert Rules
- PostgreSQL Cluster Alert Rules
- Redis Cluster Alert Rules
Typical alerts
Errors
A database instance going down will immediately trigger a P0 alert.
When using PostgreSQL in a production environment, the effect of Pgbouncer failure is basically equivalent to Postgres failure, and its survivability alert rule level is unified with Postgres.
Monitor agent Exporter downtime usually indicates a severe failure: HAProxy and Node Exporter downtime usually means that the LB and database nodes themselves are down and need to be focused on.
The duration threshold for all survivability detection is set to 1 minute, which for a 15s acquisition cycle typically means four consecutive failed probes. Regular fast restart operations usually do not trigger survivability alerts.
Cluster brain fracture partitioning
The cluster should have only one partition. If the number of partitions in the cluster is not 1, it means the cluster has entered an abnormal state: unwritable or brain fractured, which will trigger the P0 alarm immediately. Because the detection threshold is 1 minute, so the regular Failover and Switchover usually do not easily trigger this alert.
Latency
There are two alerts related to replication latency: replication outage, and high replication latency, graded as a P1 warning.
-
Where replication break is an error that is determined using the indicator:
pg_downstream_count{state="streaming"}. If the number of replicas in the currentstreamingstate changes negatively, the broken alert is triggered.walsenderwill determine the replication state, the replica will break directly, and the buffer backlog will go fromstreamingtocatchupstate, which will also trigger this alert. Replication interruptions can cause clients to read stale data, which has some off-site impact and is rated as P1. -
Replication latency can be determined using either latency time or latency bytes. The number of delay bytes is the authoritative indicator. Under normal conditions, replication latency time in 100 milliseconds and replication latency bytes in the order of 100 KB are standard. Based on historical experience data, the time alert threshold of 1MB and 1s is currently used.
In addition, there are corresponding alert rules for query latency and disk latency.
For example, the average disk read/write response time lasts more than 32ms for one minute, or the average query RT in Pgbouncer exceeds 16ms will trigger a P1 alert.
Saturation
Saturation metrics primary resources, including many system-level monitoring metrics. Mainly includes CPU, disk, connection pool queue, number of database back-end connections, age (essentially saturation of available thing numbers), SSD life, etc.
Database Load
Database load is the combined maximum (percentage, but can exceed 100% when overloaded) of machine CPU usage, Pgbouncer time utilization, Postgres time utilization (14 introduced). Load is the most critical metric in Pigsty, concentrating on the load water level of the database instances and clusters.
Queueing Detection
The heap contains two main types of metrics, the number of back-end connections and active connections of the PG on the one hand, and the queuing of the connection pool on the other.
PGB queuing is the decisive metric; it represents that perceptible blocking has occurred on the user side, so the presence of queuing lasting 1 minute triggers a P0 alert.
When using Session Pooling mode, this alert metric can be relaxed appropriately.
The number of back-end connections is a vital warning metric. If the back-end connections consistently reach the maximum number of connections, it often means an avalanche as well. The number of queued connections in the connection pool also reflects this situation but does not cover the case where the application is directly connected to the database.
Currently, Pigsty uses connection utilization as an alerting metric, i.e., the percentage of available database connections that have been used, with a P1 alert departing if it exceeds 70% for 3 minutes.
Idle in Transaction
The number of connections with Idle in Transaction status in the database, more than 2 for 3 minutes, is the departure of the P1 alert.
Resource Alert
Age (XID) usage exceeds 80% departure P0 alert, which means the system is about to run out of transaction number resources and enter the XID Wraparound state.
36 - Install Applications
Pigsty can be used to deploy and monitor PostgreSQL and make and distribute data Applications.
Pigsty provides three sample applications.
pglog, which analyzes PostgreSQL CSV log samples.covid, which visualizes WHO COVID-19 data and accesses country outbreak data.pglog, NOAA ISD, allows querying weather observation records from 1901 for 30,000 surface weather stations.
Structure of the application
A Pigsty application typically includes at least one or all of the following.
- A graphical interface (Grafana Dashboard Definition) placed in the
uidir. - Data definitions (PostgreSQL DDL File), placed in the
sqldir. - Data files (various resources, files to download), placed in the
datadir. - Logical scripts (executing various types of logic), placed in the
bindir.
A Pigsty application will provide an installation script in the application root dir: install or a shortcut to it. You need to use an admin user to install the meta node. The installation script detects the current environment (gets METADB_URL, PIGSTY_HOME, GRAFANA_ENDPOINT to perform the installation).
Dashboards with the APP label are included in the App drop-down menu in the Pigsty Grafana home page navigation. The home page dashboard navigation includes dashboards with the APP and Overview labels.
You can download the app with the base data from https://github.com/Vonng/pigsty/releases/download/v1.5.1/app.tgz.
COVID
A more straightforward sample data application: visualize WHO COVID-19 data and access country outbreak data.
Public demo: http://demo.pigsty.cc/d/covid-overview
Installation method
For finer control.
If data is already downloaded (e.g., get applications via downloading app.tgz), run make all2 instead to skip the download.
ISD
A feature-complete data application that queries 30,000 surface weather stations worldwide for weather observations from 1901 onwards.
Public demo: http://demo.pigsty.cc/d/isd-overview
Project address: https://github.com/Vonng/isd
Installation
For more fine-grained control.
PGLOG CSVLOG Sample Analysis
PGLOG Analysis & PGLOG Session provide introspection about PostgreSQL csvlog sample (via table pglog.sample on cmdb).
- PGLOG Analysis: Analysis of csvlog sample on CMDB (focusing on entire log sample).
- PGLOG Session: Analysis of csvlog sample (focusing on the single session).
There are some handy alias & func sets on the meta node.
Load csvlog from stdin into sample table.
Get log from pgsql node.
Combine theme to fetch and load csvlog sample.
37 - Docker Applications
Pigsty v1.5.1 comes with Docker and Docker Compose deployment support, where Docker Daemon will be enabled by default on the meta node.
You can use Docker to deploy and launch software applications quickly. You can directly access the PostgreSQL/Redis database deployed on the host in the container using the connection string.
- PgAdmin4: A GUI tool for managing PostgreSQL instances.
- PGWeb: A tool automatically generates back-end API services based on PG database schema.
- PostgREST: A tool to automatically generate backend API services based on PG database schema.
- ByteBase: A GUI tool for making PostgreSQL schema changes.
- Jupyter Lab: A battery-included Python lab environment for data analysis and processing.
You can also use Docker to execute some battery-included command tools.
- SchemaSPY: Generates detailed visual reports of database schemas.
- Pgbadger: Generate database log report.
You can also use Docker to pull up some battery-included open-source SaaS services.
- Gitlab: open-source code hosting platform.
- Habour: open-source mirror repo
- Jira: open-source project management platform.
- Confluence: open-source knowledge hosting platform.
- Odoo: open-source ERP
- Mastodon: PG-based social network
- Discourse: open-source forum based on PG and Redis
Add Upstream to Nginx
Most of the software described in this article provides a web interface to the public. While it can be accessed directly via IP: Port, we recommend using a domain name and unifying access from the Nginx proxy. Use the following configuration and commands to register a new service with Nginx.
PgAdmin4
PGAdmin4 is the popular PG control tool; use the following command to pull up the PgAdmin4 service on the meta node, default to host 8885 port, username [email protected], password: pigsty.
Copy the server access information to the /tmp/servers.json file and re-import it.
PGWeb
PGWeb is a browser-based PG client tool. Use the following command to pull up the PGWEB service on the meta node, defaulting to the host 8081 port.
Users need to fill in the database connection string, for example, the default CMDB:
postgres://dbuser_dba:[email protected]:5432/meta?sslmode=disable.
PostgREST
PostgREST is a binary component that automatically generates a REST API based on the PostgreSQL database schema.
The following command will pull up postgrest using docker (local port 8082, using the default admin user, exposing the Pigsty CMDB schema).
http://home.pigsty.cc:8883/ shows the available API that exposed by PostgREST
Visiting http://10.10.10.10:8884 will show all the definitions of the auto-generated APIs, which can be automatically generated in the Swagger Editor.
curl http://10.10.10.10:8884/pg_cluster will anonymously access the data table pigsty.pg_cluster.
If you want to add, delete, check and design more fine-grained privilege control, please refer to Tutorial 1 - The Golden Key to generate a signed JWT.
ByteBase
ByteBase is a tool for making database schema changes. The following command will start a ByteBase on meta node port 8887.
Visit http://10.10.10.10:8887/ to use ByteBase. To start schema changes, you need to create the project, environment, instance, and database.
Jupyter
Jupyter Lab is a data analysis environment. The following command will start a Jupyter Server on port 8084.
Visit http://10.10.10.10:8888/ to use JupyterLab, (you need to fill in the auto-generated Token). Note that Pigsty also has JupyterLab installed on the host.
SchemaSPY
Generate a database schema report using CMDB as an example. The following docker, using.
Then visit http://pigsty/schema/pg-meta/meta/pigsty to access the Schema report.
Gitlab
Please refer to the Gitlab Docker Deploy Doc to complete the Docker deployment.
Discourse
Build open source forum Discourse. You need to adjust the config app.yml, focusing on the SMTP part of the config.
Sample Discourse config
Then, just execute the following command and pull up Discourse.
Mastodon
The v1.5.1 source reserved this section, but did not ship or document a Mastodon deployment template.
38 - Upgrade Grafana Backend Database
You can use postgres as the database used by the Grafana backend.
In this tutorial, you will learn about the following.
- How to create a new cluster
- How to create a new biz user in an existing database cluster
- How to create a new biz database in an existing database cluster
- How to access databases created by Pigsty
- How to manage dashboards in Grafana
- How to manage PostgreSQL DataSources in Grafana
- How to do upgrade the grafana database
TL; DR
Create Postgres Cluster
We can define a new database grafana on pg-meta.
A Grafana-specific database cluster can also be created on a new machine node: pg-grafana.
Define Cluster
To create a new dedicated database cluster pg-grafana on two bare nodes 10.10.10.11, 10.10.10.12,
define it in the config file.
Create Cluster
Complete the creation of the database cluster pg-grafana with the following command: pgsql.yml.
This command calls Ansible Playbook pgsql.yml to create the database cluster.
The business users and databases defined in pg_users and pg_databases are created automatically when the cluster is initialized. After creating the cluster using this configuration, the following connection string access database can be used.
By default, Pigsty is installed on a single meta node. Then the required users and databases for Grafana are created on the existing pg-meta database cluster instead of using the pg-grafana cluster.
Create Biz User
The convention for business object management is to create users first and then create the database.
Define User
To create a user dbuser_grafana on a pg-meta cluster, add the following user definition to pg-meta’s cluster definition.
Add location: all.children.pg-meta.vars.pg_users.
If you have defined a different password here, replace the corresponding parameter with the new password.
Create User
Complete the creation of the dbuser_grafana user with the following command.
Calls Ansible Playbook pgsql-createuser.yml to create the user
The dbrole_admin role has the privilege to perform DDL changes in the database, which is precisely what Grafana needs.
Create Biz Database
Define database
Create business databases in the same way as business users. First, add the definition of the new database grafana to the cluster definition of pg-meta.
Add location: all.children.pg-meta.vars.pg_databases.
Create database
Use the following command to complete the creation of the grafana database.
Calls Ansible Playbook pgsql-createdb.yml to create the database.
Access Database
Check Connectivity
You can access the database using different services or access methods.
We will use the default service that accesses the database directly from the primary through the LB.
First, check if the connection string is reachable and if you have privileges to execute DDL commands.
Config Grafana
For Grafana to use the Postgres data source, you need to edit /etc/grafana/grafana.ini and modify the config entries.
Change the default config entries.
Subsequently, restart Grafana.
See from the monitor system that the new grafana database is already active, then Grafana has started using Postgres as the primary backend database. However, the original Dashboards and Datasources in Grafana have disappeared. You need to re-import Dashboards and Postgres Datasources.
Manage Dashboard
You can reload the Pigsty monitor dashboard by going to the files/ui dir in the Pigsty dir using the admin user and executing grafana.py init.
Execution results in:
This script detects the current environment (defined at ~/pigsty during installation), gets Grafana access information, and replaces the URL connection placeholder domain name (*.pigsty) in the monitor dashboard with the real one in use.
As a reminder, using grafana.py clean will clear the target monitor dashboard, and using grafana.py load will load all the monitor dashboards in the current dir. When Pigsty’s monitor dashboard changes, you can use these two commands to upgrade all the monitor dashboards.
Manage DataSources
When creating a new PostgreSQL cluster with pgsql.yml or a new business database with pgsql-createdb.yml, Pigsty will register the new PostgreSQL data source in Grafana, and you can access the target database instance directly through Grafana using the default admin user. Most of the functionality of the application pgcat relies on this.
To register a Postgres database, you can use the register_grafana task in pgsql.yml.
Update Grafana Database
You can directly change the backend data source used by Grafana by modifying the Pigsty config file. Edit the grafana_database and grafana_pgurl parameters in pigsty.yml and change them.
Then re-execute the grafana task in infral.yml to complete the Grafana upgrade.
39 - Jupyter Lab
TL;DR
Jupyter Config
| ID | Name | Section | Type | Level | Comment |
|---|---|---|---|---|---|
| 220 | jupyter_port |
JUPYTER |
int | G | jupyter server listen port |
| 221 | jupyter_username |
JUPYTER |
bool | G | os user for jupyter lab |
| 222 | jupyter_password |
JUPYTER |
bool | G | password for jupyter lab |
Jupyter Lab is a complete data science R&D env based on IPython Notebook for data analysis and visualization. It is currently an optional Beta feature and is only enabled in the demo by default.
Because JupyterLab provides a Web Terminal feature, it is recommended to use infra-jupyter to deploy it manually on the meta node.
Default Values
jupyter_port
Jupyter server listen port, type: int, level: G, default value: 8888.
When JupyterLab is enabled, Pigsty will run the local Notebook server using the user-specified by the jupyter_username parameter.
In addition, you need to make sure that the config node_packages_meta_pip parameter contains the default value 'jupyterlab'.
JupyterLab can be accessed by navigating from the Pigsty home page or through the default domain lab.pigsty, and listens on port 8888.
jupyter_username
The OS user used by Jupyter, type: bool, level: G, default value: "jupyter".
The same goes for other usernames, but the particular username default will run Jupyter Lab with the user currently running the installation (usually admin).
jupyter_password
Password for Jupyter Lab, type: bool, level: G, default value: "pigsty".
If Jupyter is enabled, it is highly recommended to change this password. Salted and obfuscated passwords are written to ~jupyter/.jupyter/jupyter_server_config.json by default.
Jupyter Playbook
infra-jupyter
Playbook infra-jupyter.yml will install JupyterLab on the meta node.
It’s a handy data analysis IDE for python. It’s also risky because of its web shell functionality. So it’s disabled by default. And enabled only in the Demo environment.
Refer to Config: Jupyter for configuring Jupiter, then execute this playbook.
If Jupyter is enabled in the production environment, be sure to change the password of Jupyter.
40 - Backup and Recovery
Backup & Recovery matters.
Failures can be divided into two categories: hardware/resource failures and software/human errors.
Replication aims for the former, while delayed replica & cold backups aim for the latter.
Pigsty has complete support for backups. There is battery-included physical replication that can be configured by simply declaring replica & delayed roles. And handy cold backup scripts for cold backup.
- Physical Replica (Hot/Warm Standby)
- Delayed Replica
- Cold Standby
Physical Replica
In Pigsty, physical backups are created by specifying roles (pg_role) for the database instances. For example, the following configuration declares a HA database cluster with one primary & two replicas.
Hot Standby
replica= Hot Standby, which carries read-only traffic and maintains real-time synchronization with the primary, with a few replication delays.
It is consistent with the primary and will take over the work of the primary when it fails, and will also take over online read-only traffic. A hot standby that uses sync replication to keep up with the primary in real-time can also be called a sync backup. Under normal circumstances, the latency of physical replication can be in the range of 1ms-100ms / tens of KB to several MB, depending on the network conditions and load level.
Please refer to Classic Physical Replication.
Warm Standby
offline= Warm Standby, warm standby, does not carry online traffic. Backup, or for offline/analysis queries only.
Please refer to offline deployment.
Sync Standby
standby= Sync Standby. Strict real-time sync with the primary.
Use sync commit replica, also called sync standby. Please refer to sync standby deployment for details.
Delayed Replica
Delayed is a quick measure of software failure/human error. Changes are received in real-time from the primary using the standard primary-replica stream replication mechanism but are delayed for a specific period (e.g., one hour, a day) before the application is executed. Thus, it is a copy of the historical state of the original primary. When there is a problem like mistaken data deletion, the delay provides a time window to salvage: immediately query the data from the delayed and backfill the original primary.
A delayed replica can be created using the function standby cluster. For example, now you want to specify a delayed replica for the pg-test cluster: pg-testdelay, which is the state of pg-test 1 hour ago. If there is a mis-deletion of data, it can be immediately retrieved from the delayed and poured back into the original cluster.
After creation, edit the Patroni config file for the delayed cluster using pg edit-config pg-testdelay in the meta node and change standby_cluster.recovery_min_apply_delay to the delay value you expect.
Cold Backup
Cold backup is the final safeguard for your data assets.
The cold backup database exists as a static file of the data-dir and is a binary backup of the database dir. Cold backups are the last resort in case of accidental deletion of databases or tables, or catastrophic failure of the whole cluster/whole server room.
Pigsty provides a script for making cold backups pg-backup, which can be executed as dbsu on the database node to create a full physical backup of the current instance and place it in the /pg/backup (by default located in {{ pg_fs_bkup }}/backup).
With parameters, you can specify the backup database URL, backup-dir, file name, encryption method, retention policy for existing backups, etc.
This script will use pg_basebackup to initiate a backup from the specified PGURL (default is the local database instance), using a tar archive with lz4 compression and optional openssl RC4 stream encryption.
The backup file is placed in the /pg/backup/ dir by default, and the default file name consists of a prefix, cluster name, and date, e.g., backup_pg-meta_20210805.tar.lz4.
The default backup cleanup policy is to clean up old backup files 1200 minutes (20 hours old) when the latest backup completes.
Restoring from cold backup
To use this backup, you need to set the cluster to maintenance mode (pt pause), stop the data cluster primary, and empty the dataset cluster dir. Then the backup file is unpacked to /pg/data.
There are other handy tools can be used for manage backups: pg_backrest & pg_probackup.
41 - Offline Installation
Pigsty downloads all dependent packages from the Internet and creates local Yum repo during initialization.
The total size of all the dependent software is about 1GB or so. Although Pigsty has tried to use mirror repos as much as possible to speed up the download, the download of a small number of packages may still be blocked by firewalls and may appear very slow. You can set the download proxy to complete the first download by using the proxy_env config entry.
If you are using an OS other than CentOS 7.8, it is recommended that you use the full online download and installation process. And cache the downloaded software after the first initialization is complete. See Making an offline pkg.
If you wish to skip the extended download process, or if the execution control meta-node does not have Internet access, consider downloading a pre-packaged offline pkg.
Contents
To quickly pull up Pigsty, it is recommended to use the offline package and upload method to complete the installation.
The offline pkg includes all packages from the local Yum repo. Pigsty is installed at Infra Init when the local Yum repo is created by default.
By default, {{ nginx_home }} is the root dir of the Nginx static file server, which defaults to /www, and repo_name is a custom local source name, which defaults to pigsty.
The /www/pigsty dir contains all RPM packages, and the offline pkg is actually a zip archive of the /www/pigsty dir.
The principle of the offline pkg is that Pigsty checks if the local Yum repo-related files already exist during the execution of the infra initialization. If they already exist, download the package, and its dependencies are skipped.
The marker file used for the check is {{ repo_home }}/{{ repo_name }}/repo_complete, which defaults to /www/pigsty/repo_complete. If this marker file exists, it means that the local YUM repo has been created. Otherwise, Pigsty will perform the usual download logic. Once the download is complete, you can archive a compressed copy of the dir for accelerating the initialization of other environments.
The marker file used for the check is {{ nginx_home }}/{{ repo_name }}/repo_complete, by default /www/pigsty/repo_complete, if this marker file exists, (usually set by Pigsty after the local source is created), then the local source has created and can be used directly. Otherwise, Pigsty will perform the usual download logic. Once the download is complete, you can archive a compressed copy of the directory, which can be used to speed up the initialization of other environments.
Sandbox Environment
Downloading offline installers
Pigsty comes with a sandbox. The offline installer for the sandbox is placed in the files dir by default and can be downloaded from the Github Release page.
Pigsty’s official CDN also provides the latest version of pkg.tgz for download. Just execute the following command.
Upload offline pkg
When using the Pigsty sandbox, after downloading the offline pkg to the dir of the local files, you can directly upload the offline pkg to the meta node using the shortcut command make copy-pkg provided by Makefile.
Using make upload will also copy the local offline pkg (Yum cache) to the meta node.
Make offline pkg
When using the Pigsty sandbox, you can make an offline pkg from the cache of meta nodes in the sandbox by make cache and copying it locally.
Prepare pkg.tgz for Production
Before using an offline pkg in a production environment, you must ensure that the OS of the production environment is the same as the OS on which the offline pkg was made. Pigsty uses CentOS 7.8 by default.
If you need to run Pigsty on other versions of OS (e.g., CentOS 7.3, 7.7), it is recommended that you perform the initialization process thoroughly in a sandbox with the same version of the operating system installed, without using the offline pkg and by downloading directly from the upstream repo.
After the regular initialization is completed, users can make the software cache for a specific OS as an offline package by make cache or manually executing the relevant commands.
To build an offline installer package from a local meta node that has completed initialization.
Using an offline pkg in a production environment is similar to a sandbox. You need to copy pkg.tgz to the meta node and then unzip the offline pkg to the target address.
Here, take the default /www/pigsty as an example. To extract all the contents of the zip package (RPM package, repo_complete markup file, meta DB of repodata source, etc.) to the target dir /www/pigsty, you can use the following command.
42 - CMDB Usage
Instead of a static config file, you can use postgres as an inventory for Pigsty.
Using CMDB as a dynamic Inventory for Ansible has several advantages: metadata is presented as data tables in a highly structured way, and database constraints ensure consistency. The CMDB also allows you to use third-party tools to manage Pigsty metadata.
Currently, Pigsty’s CMDB only supports PostgreSQL clusters. If your pigsty.yml contains Redis and MatrixDB, it will report an error. It is recommended to use a separate pigsty.yml config file to manage Redis and Greenplum clusters.
The Pigsty CMDBmode is automatically created during the initialization of the pg-meta meta DB (files/cmdb.sql) and is located in the meta database’s pigsty mode of the meta DB. Static config files can be loaded into the CMDB using bin/inventory_load.
You must execute infra.yml entirely in the meta node after installation before you can use CMDB.
By default, executing the script without parameters will load $PIGSTY_HOME/pigsty.yml into the CMDB under the name pgsql.
CMDB as Inventory
Once the original config file is loaded into the CMDB as the initial data, Ansible can be configured to use the CMDB as the inventory.
You can switch back to a static config file.
Modifying the inventory is essentially a matter of editing ansible. cfg in the Pigsty dir.
43 - Migration Tutorial
An auxiliary playbook, pgsql-migration.yml, provides a battery-included migration method based on logical replication.
By filling in the information about the source and host clusters, the playbook will automatically create the scripts needed for the migration and simply execute them in sequence during the database migration.
Prepare
SRC and DST Clusters
Suppose you want to migrate the pg-meta cluster in the sandbox (containing the Pigsty meta DB with the pgbench test tables) to the pg-test cluster.
First, create a new empty target cluster pg-test, then edit the variables list in pgsql-migration.yml and fill in the relevant information (connection information for the host cluster’s primary).
Execute pgsql-migration.yml, which by default creates the ~/migration/pg-meta.meta dir on the meta node, containing the resources and scripts used for the migration.
Manual Template
Announcement
- Operation Notice
- Business Party Notification
Preparations
- Prepare source and host clusters
- Repair Source HBA
- Create Source Replication User
- External Resource Request
- Create Cluster Profile
- Configure business users
- Configure business database
- Configure business whitelist
- Create business cluster
- Fix Replication Identity
- Identify migration target
- Generate schema synchronization command
- Generate serial number synchronization command
- Generate create publish command
- Generate create subscription command
- Generate progress check command
- Generate check command
Stock Migration
- Synchronize database schema
- Create publish at the source
- Create a subscription to host
- Wait for logical replication sync
Switch moment
- Prepare
- Stop source write traffic
- Synchronize sequence numbers with other objects
- Verify data consistency
- Flow Switching
- Aftercare
44 - PGSQL SOP: Standard Operating Procedure
Most cluster management operations require using the admin user on the meta node and the execution of the corresponding Ansible Playbook in the Pigsty root dir.
Unless otherwise specified, the following examples demonstrate a three-node cluster pg-test in a sandbox.
Cheatsheet
Cluster Admin
Manage PostgreSQL clusters and instances by executing the following commands on the meta node using the admin user.
Patroni Admin
Pigsty uses Patroni to manage PostgreSQL instance databases by default. You need to use the patronictl command to manage Postgres clusters, including cluster config changes, restarts, Failover, Switchover, redoing specific instances, switching automatic/manual HA mode, etc.
Users can use patronictl to manage all database clusters as postgres on the meta node, with alias pt already created on all hosted machines: alias pt='patronictl -c /pg/bin/patroni.yml'.
The commonly used management commands are shown below. For more orders, please refer to pg --help.
Component Admin
In Pigsty deployments, all components are managed by systemd; except for PostgreSQL, which Patroni manages.
Exception: exception when
patroni_modeisremove, Pigsty will usesystemdto manage Postgres directly.
The following components can be reloaded via systemctl reload.
The config of the infra components can also be reloaded via systemctl reload on the meta node.
When Patroni manages Postgres, do not use pg_ctl to manipulate the database cluster (/pg/data).
After entering maintenance mode via pg pause <cluster>, you can manually manage the database.
Common Tasks
Case 1: Cluster Create and Expand
Cluster create/expand uses the playbook pgsql.yml to create a cluster using the cluster name as the execution object and to create a new instance/cluster expand using a single instance in the cluster as the execution object.
Cluster Creation
The above two playbooks can be simplified as follows.
Cluster Expansion
Suppose you have a test cluster pg-test with two instances 10.10.10.11 and 10.10.10.12, and now you expand one additional 10.10.10.13.
Modify config
First, you need to modify the corresponding config in the inventory (pigsty.yml or CMDB).
Please make sure to note that the pg_seq must be unique for each instance in the cluster.
Execute changes
Then, execute the following command to complete the initialization of cluster members.
Adjusting Roles
Cluster expansion will result in changes in cluster membership. Please refer to Case 8: Cluster Role Adjustment to distribute the traffic to the new instance.
Frequently Asked Questions
FAQ 1: Database and Consul already exist, execution aborted
Pigsty uses a SafeGuard to avoid accidental deletion of running instances; please use the pgsql-remove playbook to complete the instance destruction first and then reuse the node. For an emergency overwrite installation, you can use the following parameters to force the running instance to be erased during the installation (Danger!!!)
pg_clean= truepg_safeguard= falsedcs_clean= truedcs_safeguard= false
For example: ./pgsql.yml -l pg-test -e pg_clean=true will force an override install of the pg-test cluster.
When the execution of a Consul instance is aborted, you can also take the above parameters to force the running instance to be erased.
FAQ 2: The database is too extensive, waiting for the replica to come online timeout
When an expansion operation gets stuck at the Wait for postgres replica online step and aborts, it is usually because the existing database instance is too large and exceeds Ansible’s timeout wait time.
If you abort with an error, the instance will continue to pull up the replica instance in the background. You can use the pg list pg-test command to list the current status of the cluster, and when the status of the new replica is running, you can use the following command to continue the Ansible Playbook from where it was aborted.
Another way is to directly and explicitly specify subsequent tasks.
If pulling up a new replica node is aborted due to some accident, please refer to FAQ 1.
FAQ 3: The cluster is in maintenance mode, and the replica is not automatically pulled up.
Solution 1: Use pg resume pg-test to configure the cluster in auto switchover mode and perform the replica creation operation.
Solution 2, use pg reinit pg-test pg-test-3 to manually complete the instance initialization. This command can also be used to redo existing instances in the cluster.
FAQ 4: Cluster replica with clonefrom tag, but not suitable for use or pull failed due to data corruption
Find the problem machine, switch to postgres user, modify the patroni config file and reload it to take effect。
FAQ 5: How to create a fixed admin user using an existing user
By default, the system uses dba as the admin user, which should be able to ssh into the remote database node and execute sudo commands password-free from the admin machine.
If the assigned machine does not have this user by default, but you have another admin user (e.g., vagrant) that can ssh into the remote node and execute sudo, you can run the following command to log into the remote machine using the other user and automatically create the standard admin user.
If you specify the -k|--ask-pass -K|--ask-become-pass parameter, you should enter the admin user’s SSH login password and sudo password before executing.
Once executed, you can log in to the target database machine from the admin user on the meta node (default dba) and run other playbooks.
FAQ 6: Cluster replica with clonefrom tag, but not usable or failed to pull due to data corruption
Find the machine in question, switch to the postgres user, modify the patroni config file and reload it to take effect.
Case 2: Cluster Destruction and Downsize
Cluster destruction/downsize uses a dedicated playbook pgsql-remove that, when used against a cluster, will take the entire cluster destruction.
When used against a single instance in the cluster, the instance will be removed from the cluster.
Note that removing the cluster primary directly will cause the cluster to Failover, so please remove all replicas first when removing instances one by one.
Note that the pgsql-remove playbook is not affected by the security insurance parameter and will remove the database instance and the cluster directly, so please use it carefully!
Cluster Destruction
Cluster Downsize
Adjustment of roles
Note: Cluster downsizing will result in a change in cluster membership. When downsizing, the health check of this instance is false, and the traffic carried initially by this instance will be immediately transferred to other members. However, you still need to refer to the instructions in Reference Case 8: PGSQL Role Adjustment to completely remove this offline instance from the cluster config.
Downline Offline Instance
Note that in the default config, if an instance with pg_role = offline or pg_offline_query = true is taken offline, only the primary instance remains in the cluster. Then there will be no instances left to carry offline read traffic.
Case 3: Cluster Config Change and Restart
Cluster config modification
Modifying the PostgreSQL cluster config needs to be done via pg edit-config <cluster>, especially for the synchronous replication option synchronous_mode, which must be changed in the Patroni config entry (.synchronous_mode), not (postgresql. parameters.synchronous_mode and other parameters).
After the config is saved, configs that do not require a restart can take effect by confirmation.
Please note that the parameters modified by pg edit-config are cluster parameters. The config parameters in the scope of individual instances (e.g., Patroni’s Clonefrom tag, etc.) need to be modified directly in the Patroni config file (/pg/bin/patroni.yml), and systemctl reload patroni to take effect.
Please note that HBA rules are created automatically by Pigsty. Please do not use Patroni to manage HBA rules.
Cluster reboot
Configs that require a restart then need to schedule a database restart. Restarting the cluster can be done with the following command.
The pending restart notation is displayed in the ``pg list
Case 4: Create PGSQL Biz User
A new business user can be created in an existing database via pgsql-createuser.yml.
Business users are usually those used by software programs in a production environment, and users who need to access the database through connection pools must be managed in this way. Other users can be created and managed using Pigsty or can be maintained and managed.
The above command can be abbreviated as:
If you need to create both the business user and the business database, you should usually create the business user first.
If the database is configured with an OWNER, create the corresponding OWNER user first and then make the corresponding database.
Case 5: Create PGSQL BIZ DB
A new business database can be created in an existing database cluster by pgsql-createdb.yml.
A business database refers to a database object that is created and used by a user. If you wish to access this database through a connection pool, it must be created using the playbook provided by Pigsty to maintain the config in the connection pool consistent with PostgreSQL.
The above command can be abbreviated as:
If the database is configured with an OWNER, please create the corresponding OWNER user first before creating the corresponding database.
Register the new database as a Grafana data source
Executing the following command will register all the business databases on all instances in the pg-test cluster into Grafana as PostgreSQL data sources for use by the PGCAT application.
Case 6: APPLY PGSQL HBA
Users can adjust the HBA config of an existing database cluster/instance via the pg_hba subtask of pgsql.yml.
This task should be re-executed when the cluster undergoes Failover, Switchover, and HBA rule adjustments to adjust the cluster’s IP black and white list rules to the expected behavior.
Pigsty strongly recommends using config files to automatically manage HBA rules unless you know exactly what you do.
The HBA config is generated by combining pg_hba_rules with pg_hba_rules_extra, both of which are arrays of rule config objects. The sample example is as follows.
The following command will regenerate the HBA rule and apply it to take reloadable.
The above command can be abbreviated as follows:
Case 7: PGSQL LB Traffic Control
HAProxy controls the cluster traffic of PostgreSQL in Pigsty by default, and users can control the cluster traffic directly through the WebUI provided by HAProxy.
Controlling traffic using HAProxy Admin UI
Pigsty’s HAProxy provides an Admin UI on port 9101 (haproxy_exporter_port by default, which can be accessed by default via Pigsty’s default domain name suffixed with the instance name (pg_ cluster-pg_seq) to access it. The admin UI comes with optional auth options enabled by the parameter (haproxy_auth_enabled). Admin interface auth is not enabled by default, and when enabled, it is required to use the username specified by haproxy_admin_username and haproxy_admin_password with the username and password to log in.
Use your browser to access http://pigsty/<ins> (the domain name varies by configuration, you can also click there from the PGSQL Cluster Dashboard) to access the LB admin interface on the corresponding instance. Sample Interface
Here you can control the traffic of one service per set of masses and each back-end server. For example, you can select that Server to drain the corresponding Server, set the MAINT state, and apply it. If you are using multiple HAProxy for load balancing simultaneously, you will need to perform this action on each LB in turn.
Modify Cluster Configuration
When a cluster changes its members, you should adjust the load balancing config of all cluster members at the appropriate time to faithfully reflect the cluster architecture changes, such as when a primary-replica switch occurs.
In addition, by configuring the pg_weight parameter, you can explicitly control the percentage of load carried by each instance in the cluster. The change requires regenerating the HAProxy config file in the cluster and reloading the reload to take effect. For example, this config reduces the relative weight of instance 2 in all services from the default of 100 to 0.
Use the following command to adjust the cluster config and take effect.
The config and enable commands can be combined and abbreviated as follows:
Case 8: PGSQL Role Adjustment
This describes Pigsty’s default HAProxy access method, which may be different if you are using L4 VIP or other access methods.
This adjustment is required when any kind of role change occurs in the cluster. The pg_role parameter of the cluster and instance in the inventory does not truly reflect the server state.
For example, when a cluster is scaled downsize, cluster load balancing immediately redistributes traffic based on health checks but does not remove config entries for downstream instances.
After cluster expansion, the LB config of existing instances will not change. You can access all current cluster members via HAProxy on the new instance. Still, the HAProxy config on the old instance remains unchanged, so no traffic is distributed to the new instance.
1. Modify the config file pg_role
When a primary-replica switch of the cluster has occurred, the pg_role of the cluster members should be adjusted according to the current actual situation.
For example, when pg-test has a Failover or Switchover that causes the pg-test-3 instance to become the new primary, you should modify the role of pg-test-3 to primary and configure the original primary pg_role to the replica.
Also, you should ensure that at least one instance in the cluster can be used to provide Offline services, so configure the instance parameter for pg-test-1: pg_offline_query: true.
It is highly discouraged to configure more than one Offline instance for a cluster, as slow queries and long transactions may cause online read-only traffic to suffer.
2. Adjusting cluster instance HBAs
The HBA rules that apply to different roles should also be returned when the cluster role changes.
Use the method described in Case 6: APPLY PGSQL HBA to adjust the cluster HBA rules
3. Adjusting the cluster load balancing config
HAProxy dynamically distributes request traffic based on the health check results returned by Patroni in the cluster, so node failure does not affect external requests. However, users should adjust the cluster load balancing config at the right time (e.g., after waking up in the morning). For example, take the failure out of the cluster config entirely instead of continuing to freeze in the cluster with a health check DOWN status.
Use the method described in Case 7: PGSQL LB Traffic Control to tune the cluster load balancing config.
4. Consolidation Operations
You can use the following commands after modifying the config to complete the tuning of the cluster roles.
Or use the equivalent abbreviated script.
Case 9: Monitor Targets
Pigsty manages Prometheus monitor objects by default using static file service discovery, default location: /etc/prometheus/targets.
Using Consul service discovery is optional, and in this mode, there is usually no need to manage monitor objects manually. When using static file service discovery, all monitor objects are automatically handled together with the execution instance when it goes online and offline: registered or logged out. However, some particular scenarios cannot be fully covered (e.g., changing cluster names).
Adding Prometheus monitor objects manually.
PostgreSQL service discovery object definitions are stored by default in the /etc/prometheus/targets/pgsql dir of all managed nodes. Each instance corresponds to a yml file containing the target’s label, with the port exposed by the Exporter.
Manually remove Prometheus monitor objects.
Add Grafana data source manually
Remove Grafana data source manually
In Grafana, click Data Source Management and manually remove it.
Case 10: Cluster Switchover
For example, if you want to perform a Failover on the three-node demo cluster pg-test, you can execute the following command.
Then follow the wizard prompts to execute Failover. After cluster Failover, you should refer to the instructions in Case 8: Cluster Role Adjustment to fix the cluster role.
Execute Failover's operation log
Case 11: Reset Component
As the saying goes, a reboot can solve 90% of the problems, while reinstallation can solve the remaining 10%.
Resetting the problem component is a simple and effective means of stopping it. Using Pigsty’s initialization playbook infra.yml with pgsql.yml can reset the infra with the database cluster, but usually, we only need to use specific subtasks to reset particular components.
Infrastructure Reset
Common infra reconfig commands include.
You can also forcibly reinstall these components.
In addition, you can reset specific components on the database node using the following command.
For example, if there is a problem with the cluster’s connection pool, a default way to stop the damage is to restart or reinstall the Pgbouncer connection pool.
Case 12: Switching DCS Servers
DCS (Consul/Etcd) is a very reliable service.
According to Patroni’s working logic, once the cluster primary finds that the DCS server is unreachable, it will immediately follow the Fencing logic and downgrade itself to a normal replica, unable to write.
Maintenance Mode
Unless the cluster is currently in “maintenance mode” (enter with pg pause <cluster> and exit with pg resume <cluster>).
Reset DCS service for PGSQL Nodes
When DCS fails to be available, and you need to migrate to a new DCS (Consul) cluster, you can use the following actions.
First, create the new DCS cluster, then edit the inventory dcs_servers and fill in the new DCS Servers address.
When Patroni finishes restarting (in maintenance mode, Patroni restart will not cause Postgres shutdown), it will write the cluster metadata K-V to the new Consul cluster, so you must make sure the Patroni service on the original primary database finishes restarting first.
45 - FHS: File Hierarchy Structure
Pigsty FHS
Prometheus FHS
Postgres FHS
The following parameters are related to the PostgreSQL database dir:
- pg_dbsu_home: Postgres default user’s home dir, default is
/var/lib/pgsql. - pg_bin_dir: Postgres binary dir, defaults to
/usr/pgsql/bin/. - pg_data: Postgres database dir, default is
/pg/data. - pg_fs_main: Postgres main data disk mount point, default is
/export. - pg_fs_bkup: Postgres backup disk mount point, default is
/var/backups(optional, you can also choose to backup to a subdirectory on the primary data disk).
PG Binary FHS
On RedHat/CentOS, the default installation location for the Postgres distribution is:
The installation playbook automatically creates a soft link to the currently installed version. For example, if version 14 of Postgres is installed, there are.
Therefore, the default pg_bin_dir is /usr/pgsql/bin/, and this path is added to the PATH environment variable for all users in /etc/profile.d/pgsql.sh.
PG Data FHS
Pigsty assumes at least one primary data disk (pg_fs_main) and an optional backup data disk (pg_fs_bkup) on the single node used to deploy the database instance. Usually, the primary data disk is a high-performance SSD, while the backup disk is a high-capacity inexpensive HDD.
PG Cluster FHS
Pgbouncer FHS
Pgbouncer is run using the Postgres user, and the config file is located in /etc/pgbouncer. The config file includes.
pgbouncer.ini: the main config fileuserlist.txt: lists the users in the connection poolpgb_hba.conf: lists the access privileges of the connection pool usersdatabase.txt: lists the databases in the connection pool
Redis FHS
Pigsty provides essential support for Redis deployment and monitoring.
Redis binaries are installed in /bin/ using RPM-packages or copied binaries, including:
For a Redis instance named redis-test-1-6379, the resources associated with it are shown below:
46 - HA Scenarios
You can strengthen your confidence in the cluster’s HA capability through a HA scenario experiment.
Below is a list of 24 typical HA failure scenarios, divided into three categories: Primary failure, Replica failure, and DCS failure, with eight specific scenarios in each category.
All experiments assume that HA auto-switchover mode is enabled, where Patroni should correctly handle Primary and Replica failures.
| Number | Case Name | Auto Mode | Manual switch |
|---|---|---|---|
| A | Primary Node Failures | ||
| 1A | Primary Node node down | Failover | Manual switch |
| 2A | Primary Node Postgres process shutdown (pg_ctl or kill -9) |
Failover | Manual reboot |
| 3A | The Primary Node Patroni process is shut down usually (systemctl stop patroni) |
Failover | Manual reboot |
| 4A | Abnormal shutdown of the Primary Node Patroni process (kill -9) |
Needs confirmation | No effect |
| 5A | Primary Node load hit full, false death (watchdog) | Needs confirmation | No effect |
| 6A | Primary DCS Agent is not available (systemctl stop consul) |
Cluster Primary demotion | No effect |
| 7A | Primary Node network jitter | Automatic Failover on timeout | Need to observe |
| 8A | Erroneous deletion of Primary data dir | Automatic Failover | Manual switch |
| B | Replica bank failure (1/n , n>1) | ||
| 1B | Replica Node down | No effect | No effect |
| 2B | Replica Node Postgres process shutdown (pg_ctl or kill -9) |
No effect | No effect |
| 3B | Replica Node process Postgres Manual Shutdown (pg_ctl) |
No effect | No effect |
| 4B | Replica Node Patroni process exception Kill (kill -9) |
No effect | No effect |
| 5B | Replica DCS Agent is not available (systemctl stop consul) |
No effect | No effect |
| 6B | Replica Node Load hit full, false death | Depends | Depends |
| 7B | Replica Node network jitter | No effect | No effect |
| 8B | Boosting a Replica node by mistake (pg_ctl promte) |
Automatic recovery | Split Brain |
| C | DCS failure | ||
| 1C | DCS Server is completely unavailable (most nodes are unavailable) | Downgrade all cluster Primary nodes | No effect |
| 2C | DCS pass Primary, not Replica (1 Primary & 1 Replica) | No effect | No effect |
| 3C | DCS pass Primary, not Replica (1 Primary n Replica, n>1) | No effect | No effect |
| 4C | DCS pass Replica, not Primary (1 Primary, 1 Replica) | No effect | No effect |
| 5C | DCS pass Replica, not Primary (1 Primary n Replica, n>1) | Automatic Failover | No effect |
| 6C | DCS network jitter: simultaneous outages, Primary and Replica nodes recover simultaneously, or the Primary node recovers first |
No effect | No effect |
| 7C | DCS network jitter: simultaneous outages, Replica nodes recover first, Primary nodes recover later (1 Primary, 1 Replica) |
No effect | No effect |
| 8C | DCS network jitter: simultaneous interruptions, Replica nodes recover first, Primary nodes recover later (1 Primary n Replica, n>1) |
Automatic Failover over TTL | No effect |
Environment
The following is a walkthrough of a local Pigsty four-node sandbox.
Prepare load
In the experiment, you can use pgbench to generate virtual loads and observe the state of load traffic under various failures.
If you wish, you can directly adjust the load generation commands and execute them if you want to emulate other traffic styles.
Observation Status
The PGSQL Cluster panel provides important monitor information about the pg-test cluster. You can review the last 5-15 minutes of metrics and automatically set it to refresh every 5 seconds.
Pigsty’s monitor metrics collection period is 10 seconds by default, while the typical time taken for Patroni Primary-Replica switchover is usually between a few and a dozen seconds. You can use patronictl to obtain sub-second observation accuracy.
You can open four Terminal windows for.
- Execute admin commands on the meta node (the command used to trigger a simulated failure).
- Initiate and observe read and write request loads (
pgbench). - Initiate and observe read-only request load (
pgbench --select-only). - Real-time access to cluster Primary-Replica status (
pg list).
Primary Failure
1A-Primary Node Down
Operating Instructions
Operation results
Patroni can handle the Primary node downtime, typically performing automatic Failover.
Manual intervention is required when the cluster is in maintenance mode (manual execution of pg failover <cluster>).
patronictl list results
2A-Primary Postgres Process Shutdown
Operating Instructions
Two different ways to shut down the Primary Postgres instance: regular pg_ctl and brute-force kill -9.
Operation results
After shutting down Postgres, Patroni tries to pull up the Postgres process again. If successful, the cluster returns to normal.
If the PostgreSQL process cannot be pulled up correctly, the cluster will automatically Failover.
patronictl list results
3A-Primary Patroni Process Shutdown
Operating Instructions
Operation results
Shutting down the Primary Patroni commonly causes the PostgreSQL instances managed by Patroni to shut down together and immediately trigger a cluster Failover.
Shutting down Patroni in maintenance mode normally, shutting down Patroni does not affect the managed PostgreSQL instances, which can restart Patroni to reload the config (e.g., change the DCS used).
patronictl list results
4A-Primary Node Patroni process abnormally shut down
This situation requires special attention!
Suppose you use Kill -9 to kill the Primary Patroni forcibly. In that case, there is a high probability that the Primary Patroni will not be able to shut down the managed PostgreSQL Primary instances. This will cause the original Primary PostgreSQL instance to survive Patroni’s death. At the same time, the remaining Replica nodes in the cluster will hold a leadership election to elect a new Primary, leading to a split-brain.
Operating Instructions
Operation results
This operation may cause a cluster split-brain: because Patroni dies violently and cannot kill the PostgreSQL process it manages. Instead, the other cluster members elect a new Primary node after the TTL timeout.
If you use the standard load balancing health check-based service access mechanism, there will be no problem because the original Primary node Patroni is dead, and the health check is false. The LB will not distribute traffic to this instance even if that Primary is alive. However, if you continue to write to this Primary by other means, you may have a split-brain!
Patroni uses the Watchdog mechanism to underwrite this situation, which you need to use as appropriate (parameter patroni_watchdog_mode). When watchdog is enabled, if the original Primary cannot shut down the PG Primary in time to avoid split-brain in Failover for various reasons (Patroni crash, machine load fake death, VM scheduling, PG shutdown too slow), etc., the Linux kernel module softdog will be used to force a shutdown to avoid split-brain.
patronictl list results
Recovering from this situation
When Patroni dies violently, first manually shut down the original PostgreSQL Primary that is managed by it and still running, then restarts Patroni again and have the PostgreSQL instance pulled up by Patroni.
If not, an error may occur where Patroni does not start properly.
Explanation of parameter
patroni_watchdog_mode.
- If mode is
requiredbut/dev/watchdogis not available, it will not affect Patroni startup, only the leadership candidacy of the current instance.- If the mode is
required, but/dev/watchdogis not available. The instance cannot be a qualified Primary candidate, i.e., it cannot participate in Failover, even if manually forced to specify it: aSwitchover failed, details: 412, switchover is not possible: no good candidates have been founderror. To solve this problem, change thepatroni_watchdogoption in the/pg/bin/patroni.ymlfile toautomatic|off.- If the mode is
automatic, there is no restriction, and the instance will be able to run in the Primary election regardless of whether/dev/watchdogis available or not.- Two conditions are required for
/dev/watchdogto be available, thesoftdogkernel module is loaded, and/dev/watchdogis owned bypostgres(dbsu).
5A-Primary DCS Agent is not available
In this case, the Patroni on the Primary will demote itself to a normal Replica because it cannot connect to the DCS service. However, if the Replica Patroni is still aware that the Primary is alive (e.g., streaming replication is still going on normally), it does not trigger Failover!
In this case, Pigsty’s access mechanism will cause the whole cluster to enter a Primaryless state and be unwritable because the original Primary node health check is false!
In maintenance mode, no changes.
6A-Primary Node load hit full, false death
The v1.5.1 source reserved this failure scenario but did not provide an additional procedure.
7A-Primary Node network jitter
8A-Made-deletion of the Primary data dir
Replica node failure experiment
1B-Replica node down
Operating Instructions
Operation Result
A Replica node going down will cause services such as HAPorxy, Patroni, Postgres, etc., on that node to become unavailable. Usually, the business side will notice a minimal number of transient error reports (the connection to the failed instance will be broken), and then the other LBs in the cluster will take this failed node off the backend list.
Note that if the cluster is one Primary & one Replica and the only Replica is down, the offline query service may be affected (no available bearer instances).
Once the node restart is complete, the Patroni service will automatically pull up, and the instance will automatically rejoin the cluster.
2B-Replica node Postgres process shutdown
Operating Instructions
Two different ways of shutting down the Replica Postgres instance: regular pg_ctl and brute-force kill -9.
Operation Results
After shutting down Postgres, Patroni tries to pull up the Postgres process again. If successful, the cluster returns to normal. If the Replica goes down causes the health check for that instance to be Down, the cluster’s LB will not redistribute traffic to that instance, and a few transient errors will be reported for application read-only requests.
3B-Replica node Postgres process manually shut down
4B-Replica Patroni process abnormally kills
5B-Replica DCS Agent is not available
6B-Replica node load hit full, fake death
7B-Replica network jitter
8B-Mislocated a Replica node
DCS Failure Experiment
1C-DCS Server is completely unavailable
DCS is completely unavailable is a severe failure that will cause all database clusters to be unwritable by default. If L2 VIP access is used, the L2 VIP bound to the Primary node is also unavailable by default, resulting in the entire cluster being potentially unreadable!
DCS can solve this problem: by using a distributed architecture with a reliable disaster recovery mechanism. For example, a 3-node DCS cluster allows one server to fail, while a 5-node DCS cluster allows up to two server nodes to fall simultaneously.
After shutting down Consul, all database cluster Primary with HA auto-switchover mode enabled to trigger the demotion logic (because the Patroni of the Primary are not aware of the presence of other cluster members and have to assume that the other Replicas already constitute a quorum majority of the partition and are elected, thus demoting themselves as Replicas to avoid split-brain).
Operating Instructions
Shut down the DCS Server on the meta node, at least two if three and at least three if there are 5.
Solution
- In maintenance mode, the user loses the ability to automatically Failover, but a DCS failure will not cause the Primary node to be unwritable. (fast manual switchover is still possible).
- Use more DCS instances to ensure DCS availability (DCS itself was created to solve this problem).
- Configure a long enough timeout retry time for Patroni and set the highest response priority for DCS failures.
2C-DCS pass Primary, not a Replica (1 Primary, 1 Replica)
3C-DCS pass Primary, no Replica (1 Primary n Replica, n>1)
4C-DCS pass Replica, not pass Primary (1 Primary, 1 Replica)
5C-DCS pass Replica, no Primary (1 Primary n Replica, n>1)
6C-DCS network jitter: simultaneous outages, Primary and Replica recover at the same time, or Primary recovers first
7C-DCS network jitter: simultaneous interruption, Replica recovers first, Primary recovers later (1 Primary, 1 Replica)
8C-DCS network jitter: simultaneous interruption, Replica recovers first, Primary recovers later (1 Primary n Replica, n>1)
47 - Common Failures
Hardware Faults
| ID | Name | Symptom | Process |
|---|---|---|---|
| H01 | Primary node down | pg_up = 0 for 1-3 minutes | No immediate intervention required. Additional examples after the fact Removal from Access Domain Execute Case 8: Cluster Role Adjustment |
| H02 | Replica node down | pg_up = 0 for 1-3 minutes | No immediate intervention required Adding examples after the fact. Removal from Access Domain Execute Case 8: Cluster Role Adjustment |
| H03 | Primary node network partition | Loss of all monitoring data of the primary instance, network unreachable | Confirm Failover status Force Fencing old primary if necessary |
| H04 | Replica Node Network Partitioning | Loss of all monitoring data from the instance, network unreachable | Usually no effect, waiting for recovery Contact O&M and network engineers to handle |
| H05 | TCP the retransmission rate is too high | TCP Retrans stay high for a long time, a lot of Conn Reset, a lot of query requests fail | Find O&M and network engineers to handle |
| H06 | Node memory error | EDAC counter growth, system error log | After confirming that there are no errors in the replica memory Execute Case 10: cluster primary-replica switch |
| H07 | Bad blocks on disk, data corruption | Query results, and logs show error messages such as can’t read block | Execute Case 10: cluster primary-replica switch Manual data recovery using data recovery tools |
| R01 | High CPU usage | CPU / load / pressure index high | topCheck for large CPU footprint programs and clean them up As in the case of an avalanche, execute a kill query stop. |
| R02 | OOM appears | Process Failure appears, OOM message, high memory usage, start using SWAP | Confirm memory, confirm SWAP topCheck for large memory hogs and clean them up Re-pulling the killed process Emergency SWAP partition addition |
| R03 | Disk Full | Disk Write Full Database Crash A large number of shell commands cannot be executed |
Remove /pg/dummy to free up emergency spaceCheck and handle WAL buildup Check aa and process a large number of Log files Confirm whether the business has cleanable data |
| R06 | Disk/network card IO too high | Disk/NIC BandWidth too large Disk > 2GB/s Network > 1 GB/s |
Check applications that use the network/disk, such as backups, to add speed limits. |
Software Errors
| ID | Name | Symptom | Process |
|---|---|---|---|
| SP1 | Database process abort | ps aux can’t find the postgres process |
Check Postgres, Patroni status Confirm Failover results, or perform Failover manually |
| SP2 | Connection pool process aborted | systemctl status pgbouncer Failure |
restart service component or reset service component |
| SP3 | Primary Patroni process aborted | systemctl status patroni Failure |
As above, enter maintenance mode, reboot or reset Patroni |
| SP4 | Primary Consul process aborted | systemctl status consul Failure |
As above, enter maintenance mode, reboot or reset Consul |
| S05 | HAProxy process aborts | systemctl status haproxy Failure |
As above, restart or reset Haproxy |
| S06 | Connection pool contamination | An error message similar to Cannot execute XXX on read-only transactions appears | Restart the Pgbouncer connection pool or configure server_reset_query |
| S07 | Connection pool cannot connect to the database | pgbouncer can not connect to server | Check whether the user, password, and HBA configuration are correct Execute Case-4: Cluster Service User Creation to refresh the user |
| S08 | Connection pool reaches QPS bottleneck | PGbouncer QPS reaches 3 to 4W, CPU usage reaches 100% | Use multiple Pgbouncers (not recommended) Use Default service to bypass Pgbouncer Notify business side of speed limit |
| S09 | DCS Server is not available | In auto-switchover mode, all primary will go to the unwritable state after TTL | Set all clusters to maintenance mode immediately |
| S10 | DCS Agavailableavailable | If it is a replica, it has no effect, if it is a primary, it will be demoted to a replica and the cluster is not writable | Set all clusters to maintenance mode immediately |
| S11 | XID Wraparound | Enter protection mode when age remaining 1000w. | This problem should be avoided in advance through monitoring locate the over-aged databases and tables, perform emergency cleaning quickly locate the cause of blocking the vacuum and solve restore in single user mode |
| S12 | WAL Stacking | WAL size continues to grow | Execute CHECKPOINTmultiple times confirm the wal archive status confirm whether there are unfinished ultra-longg transactions from the replica confirm whether there are replication slots to prevent wal recycling |
Human Errors
| ID | Name | Symptom | Process |
|---|---|---|---|
| M01 | Mistakenly deleted database clusters | The database cluster is gone | Use cold standby to recover the cluster Prepare to run |
| M02 | Mistakenly elevating an instance to the primary | split-brain | No need to handle it in automatic mode, otherwise, split-brain |
| M03 | Erased data by mistake | The data is gone | Stop vacuum, use PG_ Dirtyread extractextract from delayed cluster extract and restore from cold standby |
| M04 | Erasure Form | The table is gone | Fetch from delayed cluster Fetch and restore from cold standby |
| M05 | Integer Sequence Number Overflow | Sequence exceeds INTMAX | Refer to integer primary key online upgrade manual to handle |
| M06 | Insert data conflicts due to duplicate primary key serial numbers | violate constratint … | Grow serial number value (e.g. +100000) |
| M07 | Slow query queuing / avalanche | Large number of slow query logs | Use pg_terminate_backend to periodically clean up slow queries (e.g. every 1 second) |
| M08 | Deadlock queuing / avalanche | Lock stacking | Use pg_terminate_backend to periodically clean up queries (e.g. every 1 second) |
| M09 | HBA denied access | no HBA entry for xxx | Case 6: APPLY-PGSQL-HBA |
| M10 | User password error | password auth failure for xxx | Case 4: Create OGSQL Biz User |
| M11 | Insufficient access privileges | permission denied for x | Check if the user created the object with the correct admin Refer to Default Privilege to manually fix the object privileges |
48 - Community
There’s an active Pigsty community. Search WeChat pigsty-cc and join the user group.
Most answers cloud be found in FAQ. If there’s no answer to your questions, you can ask in the community.
It’s most welcome to create Issues or Pull Requests if you find some repeatable bugs.
Following information cloud helps a lot when asking for help:
- What commands are you typing?
- What result do you expect?
- What environment is used?
- Is it a CentOS 7.8 fresh node?
- Is it a physical/virtual machine, or a public cloud ECS?
- Is anything else running on that node?
- Is offline package
pkg.tgzbeen used?- If yes, in
/tmp/pkg.tgz, right? - If not, do you have proper Internet access?
- If yes, in
- Is there any special restriction ? (such as firewall, ssh ban, etc…)
- Author: Vonng ([email protected])
Github Issues
Telegram
Discord
49 - Roadmap
History
| Time | Description | Release |
|---|---|---|
| 2019-05-15 | POC | fa2ade31 (v0.0.1) |
| 2020-04-30 | First Commit | dd64677 (v0.0.2) |
| 2020-06-20 | Validation on Testing Environment | v0.1.0 |
| 2020-06-22 | Interface enhancement | v0.0.3 |
| 2020-07-10 | PGSQL Monitoring v6 GA | v0.2.0 |
| 2020-07-27 | Refactor playbooks into ansible roles | v0.0.4 |
| 2020-08-19 | Offline Installation Mode | v0.0.5 |
| 2020-10-22 | Provisioning Solution GA | v0.3.0 |
| 2020-12-14 | PostgreSQL 13 Support, Official Documentation | v0.4.0 |
| 2021-01-07 | Databaes Customize Template | v0.5.0 |
| 2021-02-19 | Architecture Enhancement | v0.6.0 |
| 2021-03-01 | Monitor only deployment | v0.7.0 |
| 2021-03-28 | Service Provision | v0.8.0 |
| 2021-04-04 | Pigsty GUI, CLI, Logging Intergration | v0.9.0 |
| 2021-04-20 | Accessibility and extensibility enhancement | v0.9.1 |
| 2021-07-26 | v1 GA, Monitoring System Overhaul | v1.0.0 |
| 2021-10-12 | HomePage, JupyterLab, Pgweb, Pev2 & Pgbadger | v1.1.0 |
| 2021-11-03 | Upgrade default Postgres to 14, monitoring existing pg | v1.2.0 |
| 2021-11-30 | PGCAT Overhaul & PGSQL Enhancement & Redis Support Beta | v1.3.0 |
| 2022-03-31 | MatrixDB Support, Separated INFRA, NODES, PGSQL, REDIS | v1.4.0 |
| 2022-04-20 | Bug fix & Full translation of English documents. | v1.4.1 |
| 2022-05-31 | Docker Applications | v1.5.0 |
Timeline
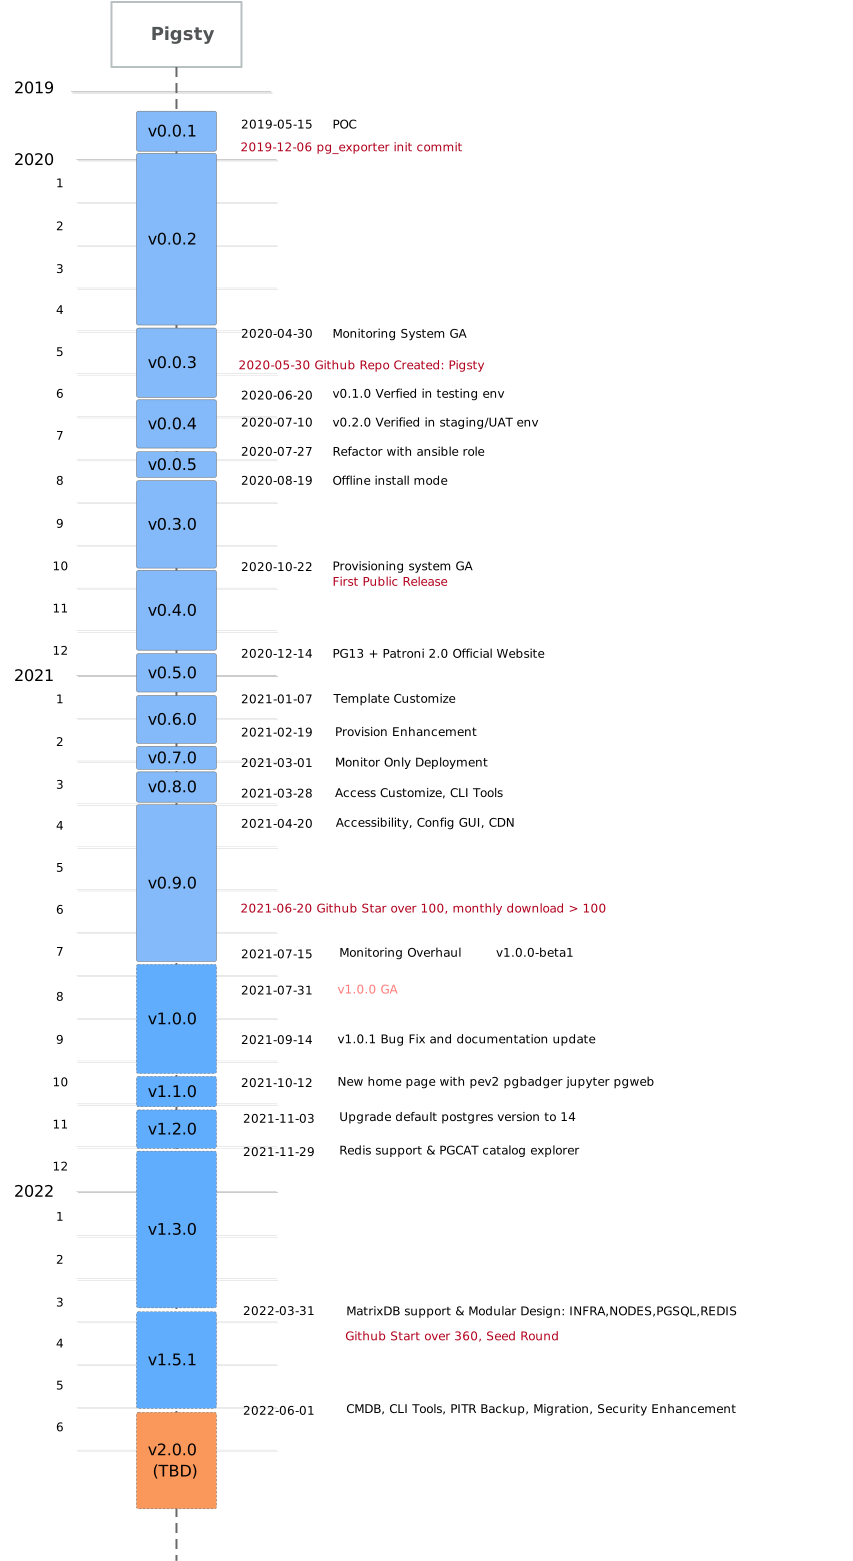
50 - Development Log
2022-06-18
- 1.5.1 for PostgreSQL 14.4
- Upgrade haproxy to 2.6.0
- repotrack i686 issus on el7
- New apps: wiki.js ferretDB
2022-05-21
- Grafana Logo Customize
- Nginx Log Rework
2022-05-20
- Prometheus Overview polish
- Grafana Overview polish
- DCS Overview polish
2022-05-15
- new role: etcd
- monitoring for etcd
- Make etcd a viable option for ha PG DCS
- Infra Dashboards rework
- fix nodes/infra/pgsql config docs
- Update docker containers, pgadmin4 to 6.9
2022-05-14
- fix redis join issue
- optimize consul role implementation
2022-05-13
- pg_exporter metrics & dashboard calibration
2022-05-12
- upgrade bytebase to v1.0.5
2022-05-09
- v1.5.0-alpha.1 released
- repo upstream calibration
- build docker.tgz image cache and add to download script
2022-05-07
- grant backup related permissions to
pg_replication_username - add pg_probackup to default packages
2022-05-06
- Docker application calibration
2022-05-05
- New CMDB Design
- Now cmdb works for redis & gpsql
2022-05-04
- Dashboard Overhaul: Infra-Overview
- Add node_crontab_overwrite implementation
- Test citus/dcs3/mxdb conf
- node_local_repo_url -> node_repo_local_urls
2022-05-02
- add crontab implementation
2022-05-01
- Refactor redis.yml & redis-remove.yml
- Remove role redis, redis-remove, redis-exporter
- Fix dashboard redis aliveness issue
- Upgrade to redis v6.2.7
2022-04-30
- Register Infra as common consul service
- Make consul service discovery great again
- implement
node_data_dirwhich create /data during node init if not exists - add pg_probackup to default package list
- integration test on pigsty-citus
2022-04-29
New Vars:
node_data_dir node_crontab
Bulk Rename:
node_ntp_config -> node_ntp_enabled node_admin_setup -> node_admin_enabled node_admin_pks -> node_admin_pk_list node_dns_hosts -> node_etc_hosts_default node_dns_hosts_extra -> node_etc_hosts node_dns_server -> node_dns_method node_local_repo_url -> node_repo_local_urls node_packages -> node_packages_default node_extra_packages -> node_packages node_packages_meta -> node_packages_meta node_meta_pip_install -> node_packages_meta_pip node_sysctl_params -> node_tune_params dcs_name -> dcs_name dcs_exists_action -> dcs_clean dcs_disable_purge -> dcs_safeguard app_list -> nginx_indexes grafana_plugin -> grafana_plugin_method grafana_cache -> grafana_plugin_cache grafana_plugins -> grafana_plugin_list grafana_git_plugin_git -> grafana_plugin_git haproxy_admin_auth_enabled -> haproxy_auth_enabled pg_exists_action -> pg_clean pg_disable_purge -> pg_safeguard pg_shared_libraries -> pg_libs
2022-04-28
- Upgrade Loki to v2.5.0 with new rpm packager
nfpm - Upgrade pg_exporter to v0.5.0 with new rpm packager
nfpm - Upgrade grafana version to 8.4.6
- Upgrade Consul to 1.13
- Upgrade Pgbouncer to 1.17
- Upgrade vip-manager to 1.0.2
- Upgrade Grafana to 8.5.0
- Remove pgweb by default (since docker will cover it)
- Remove role jupyter, move it’s logic into
infra-jupyter.yml - Refactor docker role, it can be enabled per nodes.
2022-04-26
Add new options:
2022-04-24
English Document Released!
2022-03-30
- Pigsty v1.4.0 Released!
2022-03-24
- Get the latest source with
curl -SL https://github.com/Vonng/pigsty/releases/download/v1.5.1/pigsty.tgz | gzip -d | tar -xC ~ - add download script to get pigsty/pkg/app/matrix packages from github
- if Github is not viable, use CDN instead.
2022-03-20
- Now playbooks are divided into 4 major groups:
infra,nodes,pgsql,redis - add promtail to
infra.yml,nodes.yml, etc…
2022-03-19
- build haproxy , loki, promtail rpm for pigsty
- enable loki by default
- enable promtail by default
- promtail now collect nodes
2022-03-08
- Greenplum/MatrixDB Support finished!
- Simplify
pigsty-matrixdb.ymlplaybook - Remove role
gp_prepare&gp_provision - Remove playbook
gpsql-post.yml - Update default pigsty-mxdb.yml example
- Simplify
- Fix all example configs
- Add
-d postgreswhen executepgsql-createuser.yml - Software update:
- pg_exporter v0.4.1 : new timeout parameter, bug fix, pgbouncer v1.16 support, etc…
- greenplum 6.19.1 -> 6.19.3
- grafana 8.4.2 -> 8.4.3
2022-03-05
- Overhaul dashboards
- Nodes Cluster / Nodes Instance / Nodes Overview
- Add ds datasource variable to all dashboards (so you can change prometheus datasource by select hidden variables)
- Reforge PGSQL Cluster Dashboards
- Add new dashboards: PGSQL Databases which focus on database dimension among cluster
- Adjust links for pgsql-node to nodes-instance
- Add database & service nav for pgsql-overview
2022-02-22
-
software upgrade
- postgres minor version update: 14.1 -> 14.2
- prometheus version 2.33
- timescaledb 2.6.0
- postgis 3.2
- grafana 8.4.2
-
add ins , cls label to node metrics
2022-02-14
- PGSQL Overview Dashboard Rework
- PGSQL Cluster Dashboard Reforge
2022-02-13
- Node Overview Dashboard
- Node Instance Dashboard
2022-02-02
- Add matrixdb support
2022-01-28
- Dashboard adjustment for new label structure
2022-01-25
- Redesign ip based node metrics
- refactor on pg_exporter node_exporter deployment
2022-01-24
- Software upgrade
- HAProxy 2.2 -> 2.5
- Greenplum: 6.18 -> 6.19
- Pev2 : 0.23 -> 0.24
- pgweb : 0.11.9 -> 0.11.10
- loki, promtail, logcli, loki-canary: 2.4.1 -> 2.4.2
2022-01-22
- Monitoring v9 Launch
- split nodes monitoring from infra & pgsql
- re-forge on labels, keys & etc..
- Reforge prometheus rules: infra, nodes, pgsql, redis, …
2022-01-21
- split role monitor into pg_exporter & node_exporter
- add new parameter: pg_exporter_params
- upgrade default haproxy version from 2.2 to 2.5
- bug fix: pip3 install jupyter failed now a pip3 upgrade is performed before download & install
2021-12-29
- disable repo on other meta nodes in infra-demo.yml Now bootstrap on multiple meta nodes are much easier
- enhancement: remove Require=consul from patroni systemd service Which makes dcs migration much easier
- fix pg_exporter.yml pg_index column sequence Which is a workaround for a known bug of PostgreSQL
2021-12-17
- Add terraform support for Aliyun
2021-12-09
- Redis Dashboards Enhancement
- PGCAT Dashboards Enhancement
- Separate loki & pgweb from standard infra.yml playbook
2021-12-04
- v1.3.1 Release
- Bug fix
- configure check_bin software version
- add citus to pigsty-pub4 pg-meta cluster by default
- add auth parts to environ patronictl.yml
- add option citus.node_conninfo: ‘sslmode=prefer’ for all conf template
- add example configuration files: citus, dcs3, pub4
- pg alias for patronictl on meta nodes
- add patroni to prometheus targets (since 2.1.1)
2021-12-03
- add ftp to package list
- add one-pass init playbook (for 3-dcs x 3-node deploy)
- add reloadha & reloadhba shell shortcuts
2021-11-29
- Add redis support for pigsty
- pgcat overhaul
- new key metrics panel for pgsql cluster & pgsql instance ….
2021-09-23
- [ENHANCEMENT] home page overhaul
- [ENHANCEMENT] add jupyter lab integration
- [ENHANCEMENT] add pgweb console integration
- [ENHANCEMENT] update default pkg.tgz software version:
2021-09-18
- add pev2 support
- add pgbadger support
2021-09-17
- [ENHANCEMENT] add
pg_dummy_filesizeto create fs space placeholder
2021-09-14
- release v1.0.1
- huge amount of documentation updates
- fix some minor bugs
2021-09-14
- Documentation Update
- Chinese document now viable
- Machine-Translated English document now viable
- Bug Fix:
pgsql-removedoes not remove primary instance. - Bug Fix: replace pg_instance with pg_cluster + pg_seq
- Start-At-Task may fail due to pg_instance undefined
- Bug Fix: remove citus from default shared preload library
- citus will force max_prepared_transaction to non-zero value
- Bug Fix: ssh sudo checking in
configure:- now
ssh -t sudo -n lsis used for privilege checking
- now
- Typo Fix:
pg-backupscript typo - Alert Adjust: Remove ntp sanity check alert (dupe with ClockSkew)
- Exporter Adjust: remove collector.systemd to reduce overhead
2021-07-22
- refactor
load_config.shwith python toload_conf.py - add
inventory_cmdbandinventory_confto switch between static config and dynamic inventory - add new dashboards: pgsql-activity which focus on cluster level activities
- add new dashboards: pgcat-bloat which focus on table & index bloat
- fix minor dashboard bugs
- fix pg_exporter config
pg_replcollector version overlap for PG12 - update covid dashboards & isd dashboards
- prepare for 1.0.0
2021-07-21
- add ipython jupyterlab to meta packages
- add pip support for meta python env
- add grafana plugins echarts & csv/json data source
- prepare for v1.0.0-beta2
2021-07-20
- bug fix: register role does not run on all meta nodes
- add check for createpg createdb createuser scripts
2021-07-19
- Use docsify as documentation solution
2021-07-15
- Calibration of dashboard data links
- remove
grafana&prometheusdatabase definition in config file instead, change grafana primary database to postgres will be a tutorial for get start with pigsty - build & fix dashboard data links
- add
catlogpglogalias for meta node environment (get and pour pgsql log) - change default timezone from Asia/ShangHai to Asia/Hong_kong
- add
pg_shared_librariesto customize extensions - install citus, timescaledb by default
- prepare for v1.0.0-beta1
2021-07-14
- add pgsql-xacts dashboard
- add pgsql-persist dashboard
- add pgsql-tables dashboard
- add pglog-analysis dashboard
- add pglog-session dashboard
- add softlinks in files dir to dashboards
2021-07-13
- Release pigsty v1.0.0-alpha2
- Fix systemd-devel deps failure on VPC.
- remove core apps
- refactor cmdb application, use pg_datbases.meta.baseline to provisioning cmdb schema
- add
load_configto parse and activate config from config file - Integrate pglog schema into
pigstyschema - Update files/conf
2021-07-12
- alert panel now links to alertmanager
- add click-able data-link to most graph
- release pg_exporter v0.4.0 (remove beta)
- adjust home & overview & cluster & instance layout
2021-07-09
- now comes to the juice part, monitoring dashboard designing
- add links between pgcat & pgsql, e.g table level dashboard
- add a pgcat-query dashboard which aims at pg_stat_statements view
- add alertmanager links on alert timeline panel
- add links to graph, so user can click graphic element and jump to corresponding dashboard
- finish pgsql-queries, and back port to pgsql query
2021-07-08
- use [acpgh].pigsty as placeholder, passing
nginx_upstreamvia environ, replace http host when provisioning dashboards - add pgsql-queries dashboard which runs on instance level, focusing on instance pgbouncer queries and rt, table qps, query qps, etc…
2021-07-07
- Add baidu netdisk download for mainland China https://pan.baidu.com/s/1DZIa9X2jAxx69Zj-aRHoaw 8su9
- Grafana static provision have some down-sides: root privileges / can’t update home dashboard. I wonder if we could switch to API provisioning instead.
- Use pure python for grafana provisioning
grafana.py
2021-07-06
- Use v1.0.0-alpha1 instead. Since the change are significant, it is not appropriate to use v0.10.
- Remove the crud haproxy index pages, using grafana table & data links instead
- At last register by instance may be the easiest way to implement and manage
- Add new role
loki - Add new role
promtail - Register datasource when create new database with
pgsql-createdb.yml
2021-07-05
- Extract a new role named
registerto handler all interaction between pgsql & infra. - Extract a new role named
envrionto setup meta node environment including: ssh, metadb, env vars, etc… - Dashboard tags now have hierarchy:
Pigstyis the top tier, Application namePGSQLPGLOGis second tierOverview,Cluster,Instance,Databaseare filter withPigstyand<Level>tags. which means the nav-link can cross multiple applications
2021-07-04
- Milestone chart of Pigsty
2021-06-30
- Rough implementation on v0.10.0-alpha1
- Setup environment for admin user (pgpass, pg_service, env vars,)
- Application install script will have environ
- Fix nofile limit on postgres|pgbouncer|patroni
- Milestone planning.
2021-06-29
- Remake release system
- Have a draft on application installation standard
- Use ‘v’ prefixed fully qualified version string
- remove polysh from default pkg (unstable when downloading)
- remove grafana plugins, since lot’s of them were covered in grafana 8.0
2021-06-28
- Remake alerting rules
2021-06-25
- Remake infra-rules and pgsql-rules
2021-06-23
- Remake PGSQL node
2021-06-10
It’s time to have an overhaul on monitoring system, which includes:
- Upgrade
pg_exporterto 0.4.0 , re-write metric definition and add support for PostgreSQL 14 - Use static file service discovery by default to reduce dependency for monitoring system
- Use static label set (job,cls,ins), remove (svc,role,ip) from labels, Which makes identity immutable
- Redesign entire monitoring system to use new label system and embrace Grafana 8.0
- Using grafana 8.0 new features
2021-06-01
Well it’s good to write some dev logs.
51 - Why Pigsty
Why use Pigsty?
Our philosophy is: use the good database, use the good database so that there is no hard-to-use database in the world!
The database is the core component of an information system, a relational database is the absolute mainstay of the database, and PostgreSQL is the world’s most advanced open-source relational database.
PG provides a perfect enough database kernel, but it is not so simple to really use it well, and we help users to do that.
User’s Demand
What kind of database do traditional enterprises, especially SMEs, need for information technology? Is it a distributed cloud-native lake warehouse integrated flow batch time hyper-converged HTAP database?
No, most of the enterprise database needs, even Excel will be enough to solve! The pain point does not lie in the database kernel cattle, but whether the user can use it!
99% of enterprises, the complete life cycle of data needs, singleton PostgreSQL is sufficient!
Requirements
Software swallows the world, and open source swallows software. Cloud vendors whoring out open source, but not seeing the mantis, will eventually be dried out by multi-cloud deployments.
It’s one thing to build a personal toy demo to use a database, it’s another thing to deploy and maintain a database in a production environment: installation and deployment, operation and maintenance management, supporting facilities, platform building, service access, high availability, failover, load balancing, connection pooling, database and table splitting, monitoring, logging, auditing, backup, recovery, upgrade strategy, schema changes …… There are countless practical problems to solve, not just yum install postgresql14* && systemctl start postgresql.
PostgreSQL already provides a perfect enough database kernel, but just as Linux users are directly exposed to operating system distributions such as RedHat, SUSE, and Ubuntu, not the Linux kernel. Users need a complete solution – a database distribution, not just a database kernel.
If PostgreSQL, the database kernel, is an engine, then what users really need is the whole car, the complete, battery-included solution. What we build is such a car: stable and reliable, polished and verified in a long-time production environment; self-driving, with intelligent situational awareness.
What’s more, Pigsty is completely open-source and free! Pigsty can reduce the comprehensive cost of database ownership by 50% to 80% while providing a similar or even better experience than cloud vendors’ RDS.
Product Position
Battery-included distribution
RedHat for Linux
- Pigsty is packaged with the PostgreSQL 14.4, the powerful geospatial plugin PostGIS 3.2, the temporal database plugin TimescaleDB 2.7, and the distributed extension plugin Citus 11.0, and hundreds of functional extensions, all installed with a single click and ready to use battery-included.
- Pigsty integrates a complete large-scale database monitoring and control solution: Grafana, Prometheus, Loki, Ansible, CMDB, and can be used directly as a production application runtime to monitor and manage other databases and applications.
- Pigsty integrates the most popular tools in the data analysis ecosystem: Jupyter, Echarts, Grafana, PostgREST, Postgres, and allows you to develop interactive data applications and data visualizations in a low-code manner. Produce prototypes quickly, and share, demonstrate and deliver in a standard way.
Easy-to-use Developer Toolkit
HashiCorp for Database!
-
Pigsty is designed with Infra as Data in mind, users describe what kind of database cluster they want and Pigsty automatically creates it for you! Just like Kubernetes!
-
Pigsty comes with the ultimate observability, designing monitoring systems with a BI mindset, from the topmost global insight to the most detailed every object, to get real-time data to support decision making.
-
Pigsty provides flexible and rich deployment support, local sandbox, cloud, and multi-cloud deployments. Both high-spec physical machines and 1-core 1G virtual machines can run, keeping production, pre-release, development, and test environments highly consistent.
Smart and cost-saving SRE solutions
Alternative for RDS!
-
Highly available database clusters: Pigsty integrates proven production-grade highly available database architecture solutions: master-slave offsite disaster recovery, self-healing failures, automatic high availability switchover, self-contained connection pooling, and load balancer, providing a distributed database like experience.
-
Pigsty provides a complete backup solution with one-click deployment of autopilot highly available master-slave clusters and self-healing hardware failures, greatly simplifying O&M work. Cold backup and delayed slave can effectively deal with all kinds of software failures and human failures to ensure stable system operation.
-
Pigsty can also be used as a complete SRE solution: host monitoring, application deployment, and will gradually add the deployment and monitoring of other databases: Redis/Greenplum/Kafka/Minio, or support other SaaS services, produce POC, deliver demos, etc.
VS Cloud Database RDS
Cloud Database/RDS, another “battery-included” solution, does not deliver nearly enough to satisfy the professional user:
High cost
- The cost of RDS is 5 to 10 times higher than IDC hosting and 2 to 3 times higher even than cloud VMs.
- The price of RDS may be advantageous relative to commercial databases, but it is still ridiculously high in front of self-build.
Life is not your choice.
- Cloud vendors can access all types of your data, and many are not truly neutral third-party operators.
- Cloud vendor failures are not uncommon, and the only compensation you can have is usually a poor hourly voucher.
Limited functionality
- You don’t have true superuser access to RDS and some advanced features are not available.
- ‘Stream replication’, and ‘high availability’ which should be standard are often sold as value-added items.
Limited experience
- Cloud vendor RDS provides observability often with only a few sporadic monitoring metrics, lacking global integration and God’s perspective.
- Installation, deployment, access, and use still require a lot of UI interaction and manipulation.
52 - User Interface
User Interface
After completing the installation, the GUI provided by Pigsty can be accessed through a browser.
http://g.pigsty -> http://10.10.10.10:80 (nginx) -> http://10.10.10.10:3000 (grafana)
Visit http://<node_ip>:3000 to browse Pigsty home (username: admin, password: pigsty)
You can visit http://demo.pigsty.cc to view the public Pigsty Demo and browse through the features provided by the Pigsty Monitoring System.
Web Services
Pigsty will provide services to the public through a series of ports, and web services will be accessed uniformly through Nginx port 80.
| Component | Port | Default Domain | Description |
|---|---|---|---|
| Grafana | 3000 | g.pigsty |
Pigsty Monitoring System GUI |
| Prometheus | 9090 | p.pigsty |
Monitoring Timing Database |
| Loki | 3100 | l.pigsty |
Log collection server (no interface) |
| AlertManager | 9093 | a.pigsty |
Alarm aggregation management component |
| Consul | 8500 | c.pigsty |
Distributed Config Management, Service Discovery |
| Consul DNS | 8600 | - | Consul-provided DNS services |
| Nginx | 80 | pigsty |
Entry proxy for all services |
| Yum Repo | 80 | yum.pigsty |
Local Yum repos |
| Haproxy Index | 123 | h.pigsty |
Access proxy for all Haproxy management interfaces |
| NTP | 123 | n.pigsty |
The NTP time server used uniformly by the environment |
| Dnsmasq | 53 | - | The DNS name resolution server used by the environment |
Users can configure their own existing domain names for these services, or use the make dns shortcut to write the default domain names to /etc/hosts.
Users can still access most services directly using the IP: Port method, for example, the entry point to the Pigsty monitoring system is the meta node IP+3000 port.
Note that if Consul is used as the DCS, the Consul UI must be accessed through the Nginx domain. Consul listens on port 127.0.0.1, a deliberate design for security reasons: Consul contains sensitive metadata that should not be exposed directly to the public.
Demo
Pigsty provides a public demo at: http://demo.pigsty.cc
Because the demo instance is an empty virtual machine with 1 core and 1GB, the display is thin, so please refer to the actual effect.
53 - Deploy
There are 3 steps to deploy pigsty: prepare, configure, playbook
Prepare
Configure
- Config Entry
- Config File
- Infrastructure Config
- Database Cluster Config
- Identity Parameters
- Connection Information
- Custom Business User
- Customize business Database
- Customize PGSQL Template
Playbook
- INFRA Init
- PGSQL initialization (cluster creation, new instances)
- PGSQL Remove (Remove instance, remove cluster)
- Create Biz user
- Create Biz database
54 - Customization of Postgres Template
Parameters
The template database template1 in a cluster can be customized using the PG template configuration item.
This ensures that any database newly created in this database cluster comes with the same default configuration: schema, extensions, and default permissions.
| name | type | hierarchy | description |
|---|---|---|---|
| pg_init | string |
G/C | Custom PG initialization scripts |
| pg_replication_username | string |
G | PG replication user |
| pg_replication_password | string |
G | PG replication user’s password |
| pg_monitor_username | string |
G | PG monitor user |
| pg_monitor_password | string |
G | PG monitor user password |
| pg_admin_username | string |
G | PG Admin User |
| pg_admin_password | string |
G | PG admin user password |
| pg_default_roles | role[] |
G | Default created roles and users |
| pg_default_privileges | string[] |
G | Database default permissions configuration |
| pg_default_schemas | string[] |
G | The schema created by default |
| pg_default_extensions | extension[] |
G | Default installed extensions |
| pg_offline_query | bool |
I | Whether to allow offline queries |
| pg_reload | bool |
A | Whether to reload database configuration (HBA) |
| pg_hba_rules | rule[] |
G | Global HBA rules |
| pg_hba_rules_extra | rule[] |
C/I | Cluster/instance specific HBA rules |
| pgbouncer_hba_rules | rule[] |
G/C | Pgbouncer global HBA rules |
| pgbouncer_hba_rules_extra | rule[] |
G/C | Pgbounce specific HBA rules |
| pg_databases | database[] |
G/C | business database definitions |
| pg_users | user[] |
G/C | business user definitions |
Related files
When customizing the database template, the relevant parameters are first rendered as SQL scripts and then executed on the deployed database cluster.
pg-init
pg-init is the path to a Shell script for customizing the initialization template that will be executed as a postgres user, only on the master, when the database cluster master has been pulled up for execution, and can execute any Shell command, or execute any via psql SQL commands.
If this configuration item is not specified, Pigsty will use the default pg-init Shell script as shown below.
This script can be appended to if the user needs to perform complex customization logic. Note pg-init is used to customize database clusters, which is usually achieved by modifying template databases. At the time this script is executed, the database cluster has been started, but the business users and business databases have not yet been created. Therefore the changes to the template database are reflected in the business database defined by default.
pg-init-roles.sql
In pg_default_roles you can customize the global unified role system. The definitions therein are rendered as /pg/tmp/pg-init-roles.sql, and a sample rendering in the pg-meta cluster is shown below.
pg-init-template.sql
PG模板参数大多会通过pg-init-template.sql的方式渲染,pg-meta集群中的渲染样例如下所示:
Custom Patroni templates
Pigsty uses Patroni to manage and initialize Postgres database clusters.
Pigsty uses Patroni for the main work of provisioning, even if the user selects no Patroni mode, pulling up the database cluster will be taken care of by Patroni and removing the Patroni component after the creation is complete.
Users can do most of the PostgreSQL cluster customization through Patroni configuration files. For details of Patroni configuration file format, please refer to Patroni official documentation.
Predefined templates
Pigsty provides four predefined initialization templates, the initialization templates are the definition files used to initialize the database cluster and are located by default in roles/postgres/templates/. Included are.
oltp.ymlOLTP template, default configuration, optimized for latency and performance for production models.olap.ymlOLAP template, improve parallelism, optimize for throughput, long queries.crit.yml) Core business template, based on OLTP template optimized for RPO, security, data integrity, enable synchronous replication with data checksum.tiny.ymlMicro database template optimized for low-resource scenarios, such as demo database clusters running in virtual machines.
Specify the path to the template to be used via the pg_conf parameter, or simply fill in the template file name if using a pre-built template.
If a custom Patroni configuration template is used, the companion node optimization template should usually be used for the machine node as well.
Sample Patroni Template
When customizing your own Patroni template, you can use several existing base templates as a baseline to build upon.
and place them in the templates/ directory, just name them in mode.yml format.
Please keep the template variables in Patroni, otherwise the related parameters may not work properly.
A typical Patroni configuration file (OLTP)
55 - Redis Deploy & Monitor
Pigsty is also a universal application runtime that could be used for deploying & monitoring other databases and applications, such as Redis.
It takes two steps to deploy a Redis cluster:
- Declare it
- Execute playbook
Define Redis
E-R Model
The Redis entity conceptual model is almost identical to [PostgreSQL]c-pgsql.md#ER-Model), and also includes the concepts of Cluster and Instance. Note that the concept of Cluster here does not refer to the clusters in Redis’ native clustering scheme.
The core difference is that Redis is typically deployed in a single multi-instance deployment, with many Redis instances typically deployed on a single physical/virtual machine node to take advantage of multi-core CPUs. therefore, how Redis instances are defined is slightly different from PGSQL.
In Pigsty-managed Redis, the nodes are fully subordinate to the cluster, i.e. it is not currently allowed to deploy two Redis instances from different clusters on a single node, but this does not prevent you from deploying multiple independent Redis instances on a single node.
Redis Identity
The identity parameters are the information that must be provided when defining a Redis cluster and include.
| name | attributes | description | example |
|---|---|---|---|
redis_cluster |
must, cluster level | cluster-name | redis-test |
redis_node |
must, node level | node number | 1,2 |
redis_instances |
MUST, node level | instance definition | { 6001 : {} ,6002 : {}} |
redis_clusteridentifies the name of the Redis cluster, configured at the cluster level, and serves as the top-level namespace for cluster resources.redis_nodeidentifies the serial number of the node in the clusterredis_instancesis a JSON object with the Key as the instance port number and the Value as a JSON object containing the instance-specific configuration
Redis Cluster Definition
Given below are three condensed definitions of Redis clusters, including.
- A 1-node, 3-instance Redis Sentinel cluster
redis-sentinel - A 2-node, 12-instance Redis Cluster
redis-cluster - A 1-node, one-master-two-slave Redis Standalone cluster
redis-standalone
You need to assign a unique port number to the Redis instance on the node.
Create Cluster
Deployment script
Create a Redis instance/cluster using the script redis.yml
Notes
Although this is not the recommended behavior, you can deploy PostgreSQL with Redis in a mixed deployment to make the most of machine resources.
The redis.yml script will deploy the Redis Monitor Exporter on the machine at the same time, including redis_exporter and node_exporter (optional)
During this process, the machine’s node_exporter will be redeployed if it exists.
By default, Prometheus will use the “multi-target crawl” mode, using the Redis Exporter on port 9121 on the node to crawl all Redis instances on that node.
Redis Monitoring
Pigsty currently provides 3 Redis monitoring panels as part of a standalone monitoring application REDIS, which are.
- Redis Overview: provides a global overview of Redis across the entire environment
- Redis Cluster: focuses on monitoring information for a single Redis business cluster
- Redis Instance: provides detailed monitoring information about a single Redis instance
You can use the included redis-benchmark test
CAVEAT
Pigsty v1.5.1 supports whole-cluster Redis deployment and monitoring, and the tagged redis.yml/redis-remove.yml playbooks also target one instance with -e redis_port=<port>.
Offline, scale-up, scale-down, and single-instance management features will be provided in subsequent versions gradually.
56 - PGWeb
Pigsty v1.5.1 does not ship the former infra-pgweb.yml playbook or the pgweb_enabled / pgweb_username inventory parameters. PGWeb is provided as a Docker application at app/pgweb.
Run PGWeb
Docker is enabled on the meta node in the bundled v1.5.1 inventory. Start the tagged PGWeb application with:
The tagged Compose file maps host port 8886 to container port 8081. Supply a database connection string in the PGWeb interface, for example postgres://dbuser_dba:[email protected]:5432/meta after replacing the credentials as appropriate.
To expose it through Nginx, add an nginx_upstreams entry for 127.0.0.1:8886 and rerun ./infra.yml -t nginx_config,nginx_restart. See Docker Applications for the frozen v1.5.1 application context.
57 - Using TimescaleDB to store Prometheus data
You can use postgres as the remote storage database used by the Prometheus backend.
While this is not the recommended behavior, it is a good opportunity to understand how the Pigsty deployment system is used.
Preparing the Postgres database
Create a Prometheus business database with business users.
Check database availability and create extensions。
Configure Promscale
Install promscale by executing the following command on the meta node
If not available in the default package, you can directly download it.
Edit the promscale config file /etc/sysconfig/promscale.conf.
Finally start promscale, which will access the database instance with timescaledb installed and create the required schema.
Configure Prometheus
Prometheus can use Remote Write/ Remote Read via Promscale, using Postgres as remote storage.
Edit Prometheus config file.
Add the following record.
After restarting Prometheus, the monitoring data can be placed in Postgres.