Version v1.5.1 of the documentation is no longer actively maintained. The site that you are currently viewing is an archived snapshot.
For up-to-date documentation, see the latest version.
Pigsty provides a sandbox environment. Ultimately creating and running through the sandbox installation and deployment process for deployment in production envs have Pigsty very helpful.
Introduction
The config specifications, object identities, and default database predetermined environment of the sandbox are consistent in both the local and cloud versions.
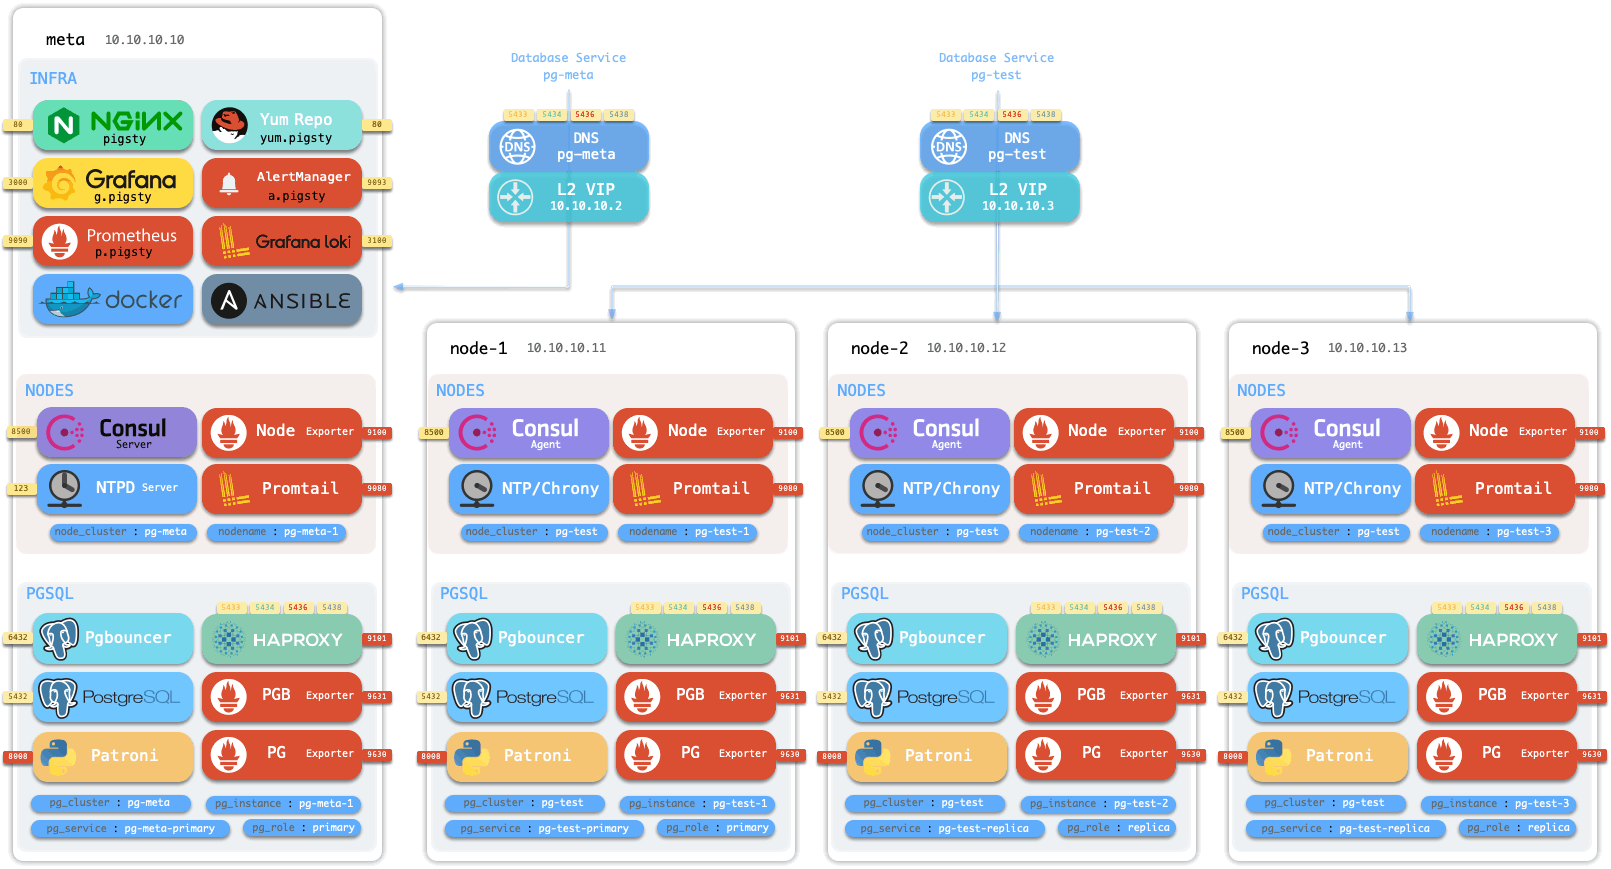
The sandbox meta node IP is fixed to: 10.10.10.10. 10.10.10.10 is also a placeholder for the IP of the meta node in all config templates, which is used as the actual IP of the meta node when executing config.
You can use a single-node sandbox with a meta, deployed with complete infrastructure, and a single instance Postgres database pg-meta.
meta 10.10.10.10 pg-meta.pg-meta-1
The single-node sandbox is suitable for personal development, experimentation, and learning; the four-node sandbox can demonstrate Pigsty’s capabilities, data analysis and visualization, design, demonstration, and distribution of interactive data applications. Please select as you need.
There are three additional nodes in the four-node sandbox, with a set of three-node PostgreSQL cluster pg-test.
node-1 10.10.10.11 pg-test.pg-test-1
node-2 10.10.10.12 pg-test.pg-test-2
node-3 10.10.10.13 pg-test.pg-test-3
Also, the sandbox will use the following two IPs with two static DNS records for accessing the database cluster.
10.10.10.2 pg-meta
10.10.10.2 pg-test
Pigsty offers a local sandbox based on Vagrant (pulling up local VMs using Virtualbox), and a cloud sandbox based on Terraform (creating VMs using the cloud vendor API).
Local sandbox can be run on Mac/PC for free. If running a full 4-node sandbox, your Mac/PC should have at least 4C/8G.
Cloud sandbox can be easily shown and shared. You need to create a cloud account. VM resources are created and used on-demand and can be destroyed with one click after use, which is also very cheap.
Local Sandbox
The Pigsty local sandbox relies on Vagrant to host the local Virtualbox VM.
Before using Pigsty sandbox, you need to install Vagrant and Virtualbox in your operating system. You can also create VMs for standard installation and deployment by choosing other VM software (Parallel Desktop, VMWare).
Quick Start
Make sure that Vagrant and Virtualbox are installed and available. On macOS, you can use homebrew to install both with one click (requires reboot).
/bin/bash -c "$(curl -fsSL https://raw.githubusercontent.com/Homebrew/install/HEAD/install.sh)"# Install homebrewbrew install vagrant virtualbox # Installing Vagrant and Virtualbox on a MacOS host
You can install software dependencies on macOS, configure local static DNS, and pull up VMs with the following four shortcutS. A few additional manual steps are required under Windows and Linux.
make deps # Install homebrew, and install vagrant and virtualbox via homebrew (requires reboot)make dns # Write a static domain name to local /etc/hosts (requires sudo password)make start # Pull up a single meta node using Vagrant (4 nodes for start4)
Next, you can ssh meta to log in to the default meta node. SSH sudo for the meta node access to all nodes is already configured, and you can execute the Pigsty installation.
Vagrant
Local VM configuration is relatively cumbersome, and Vagrant can solve this problem.
Vagrant makes it fast and straightforward to pull several VMs on a laptop, PC, or Mac, depending on the user’s needs. Users need to express their requirements for VMs in a vagrant configuration file.
We have provided a sample Vagrant configuration file. Vagrantfile
In the Vagrant configuration file, four VMs, including a 2-core/4GB central control/meta node meta and three 1-core/1GB database nodesnode-1, node-2, node3.
When using the sandbox via shortcuts like make up, make new, and make demo, only one meta node meta is used by default. And make up4, make new4, and make demo4 use all the VMs. The N value defines the number of additional database nodes. The user can also modify the number of CPU cores and memory resources per machine, etc.
Vagrantfile Example
IMAGE_NAME="centos/7"N=3# Number of database machine nodes, can be modified to 0Vagrant.configure("2")do|config|config.vm.box=IMAGE_NAMEconfig.vm.box_check_update=falseconfig.ssh.insert_key=false# Meta Nodesconfig.vm.define"meta",primary:truedo|meta|# The default ssh alias for the meta node is `meta`meta.vm.hostname="meta"meta.vm.network"private_network",ip:"10.10.10.10"meta.vm.provider"virtualbox"do|v|v.linked_clone=truev.customize["modifyvm",:id,"--memory",4096,"--cpus","2",# Memory and CPU cores for meta nodes: default is 2 cores/4GB"--nictype1","virtio","--nictype2","virtio","--hwv·irtex","on","--ioapic","on","--rtcuseutc","on","--vtxvpid","on","--largepages","on"]endmeta.vm.provision"shell",path:"provision.sh"end# Initialize N database nodes(1..N).eachdo|i|config.vm.define"node-#{i}"do|node|# The default ssh aliases for the database nodes are `node-{1,2,3}`node.vm.box=IMAGE_NAMEnode.vm.network"private_network",ip:"10.10.10.#{i+10}"node.vm.hostname="node-#{i}"node.vm.provider"virtualbox"do|v|v.linked_clone=truev.customize["modifyvm",:id,"--memory",2048,"--cpus","1",# Database node memory and CPU cores: default is 1 core/2GB"--nictype1","virtio","--nictype2","virtio","--hwvirtex","on","--ioapic","on","--rtcuseutc","on","--vtxvpid","on","--largepages","on"]endnode.vm.provision"shell",path:"provision.sh"endendend
The vagrant binary will invoke Virtualbox by default to complete the creation of the local VMs defined in the Vagrant configuration file. Go to vagrant in the Pigsty root directory and execute vagrant up to bring up the four VMs. The Makefile provides some wrappers for the original vagrant command.
The default VM image used by the sandbox is IMAGE_NAME = "centos/7".
Virtualbox
Virtualbox is an open-source and free cross-platform VM software. Installing Virtualbox on MacOS is very simple: brew install virtualbox, similar to other OS.
After installing Virtualbox, you may need to reboot your computer to load the VM kernel module. Pigsty requires an x86_64 runtime environment, and Macbooks with M1 chips installed may not be able to run Virtualbox properly.
DNS Config
Pigsty accesses all web systems via domain name by default. If you do not have a DNS server or public domain name, you can use local static DNS records. The static DNS records used by the sandbox are shown below.
On macOS and Linux, running sudo make dns will write the above records to /etc/hosts (requires sudo access). On Windows, you will need to add them manually to C:\Windows\System32\drivers\etc\hosts.
Cloud Sandbox
You can also use cloud VMs that are ready to use and destroy.
Terraform
Terraform is an open-source and free infrastructure or code tool. Just declare the required cloud VMs, network, security group configurations, etc., and pull up the corresponding resources with one click.
To install Terraform under MacOS, execute brew install terraform. You will need a cloud account to obtain AccessKey and AccessSecret credentials.
Config file
The project root dir terraform/ provides Terraform files for several cloud vendors. You can use these templates to quickly request VM resources on the cloud for Pigsty deployment. Here is an example of Ali cloud.
cd terraform # Go to the terraform dirvi alicloud.tf # Edit the config file, fill in your AliCloud AccessKey and SecretKey
First, use the terraform command to create the cloud resource defined above (Pay on demand).
terraform init # Install terraform provider: aliyun (required only for the first time)terraform apply # Generate execution plans: create VMs, virtual segments/switches/security groups
After running apply and entering yes, terraform will call AliCloud API to create the corresponding VM resource.
Terraform Execution Results
Terraform used the selected providers to generate the following execution plan. Resource actions are indicated with the following symbols:
+ create
Terraform will perform the following actions:
# alicloud_instance.pg-meta-1 will be created + resource "alicloud_instance""pg-meta-1"{ + availability_zone=(known after apply) + credit_specification=(known after apply) + deletion_protection=false + dry_run=false + host_name="pg-meta-1" + id=(known after apply) + image_id="centos_7_8_x64_20G_alibase_20200914.vhd" + instance_charge_type="PostPaid" + instance_name="pg-meta-1" + instance_type="ecs.s6-c1m2.small" + internet_charge_type="PayByTraffic" + internet_max_bandwidth_in=(known after apply) + internet_max_bandwidth_out=40 + key_name=(known after apply) + password=(sensitive value) + private_ip="10.10.10.10" + public_ip=(known after apply) + role_name=(known after apply) + secondary_private_ip_address_count=(known after apply) + secondary_private_ips=(known after apply) + security_groups=(known after apply) + spot_strategy="NoSpot" + status="Running" + subnet_id=(known after apply) + system_disk_category="cloud_efficiency" + system_disk_performance_level=(known after apply) + system_disk_size=40 + volume_tags=(known after apply) + vswitch_id=(known after apply)}# alicloud_instance.pg-test-1 will be created + resource "alicloud_instance""pg-test-1"{ + availability_zone=(known after apply) + credit_specification=(known after apply) + deletion_protection=false + dry_run=false + host_name="pg-test-1" + id=(known after apply) + image_id="centos_7_8_x64_20G_alibase_20200914.vhd" + instance_charge_type="PostPaid" + instance_name="pg-test-1" + instance_type="ecs.s6-c1m1.small" + internet_max_bandwidth_in=(known after apply) + internet_max_bandwidth_out=0 + key_name=(known after apply) + password=(sensitive value) + private_ip="10.10.10.11" + public_ip=(known after apply) + role_name=(known after apply) + secondary_private_ip_address_count=(known after apply) + secondary_private_ips=(known after apply) + security_groups=(known after apply) + spot_strategy="NoSpot" + status="Running" + subnet_id=(known after apply) + system_disk_category="cloud_efficiency" + system_disk_performance_level=(known after apply) + system_disk_size=40 + volume_tags=(known after apply) + vswitch_id=(known after apply)}# alicloud_instance.pg-test-2 will be created + resource "alicloud_instance""pg-test-2"{ + availability_zone=(known after apply) + credit_specification=(known after apply) + deletion_protection=false + dry_run=false + host_name="pg-test-2" + id=(known after apply) + image_id="centos_7_8_x64_20G_alibase_20200914.vhd" + instance_charge_type="PostPaid" + instance_name="pg-test-2" + instance_type="ecs.s6-c1m1.small" + internet_max_bandwidth_in=(known after apply) + internet_max_bandwidth_out=0 + key_name=(known after apply) + password=(sensitive value) + private_ip="10.10.10.12" + public_ip=(known after apply) + role_name=(known after apply) + secondary_private_ip_address_count=(known after apply) + secondary_private_ips=(known after apply) + security_groups=(known after apply) + spot_strategy="NoSpot" + status="Running" + subnet_id=(known after apply) + system_disk_category="cloud_efficiency" + system_disk_performance_level=(known after apply) + system_disk_size=40 + volume_tags=(known after apply) + vswitch_id=(known after apply)}# alicloud_instance.pg-test-3 will be created + resource "alicloud_instance""pg-test-3"{ + availability_zone=(known after apply) + credit_specification=(known after apply) + deletion_protection=false + dry_run=false + host_name="pg-test-3" + id=(known after apply) + image_id="centos_7_8_x64_20G_alibase_20200914.vhd" + instance_charge_type="PostPaid" + instance_name="pg-test-3" + instance_type="ecs.s6-c1m1.small" + internet_max_bandwidth_in=(known after apply) + internet_max_bandwidth_out=0 + key_name=(known after apply) + password=(sensitive value) + private_ip="10.10.10.13" + public_ip=(known after apply) + role_name=(known after apply) + secondary_private_ip_address_count=(known after apply) + secondary_private_ips=(known after apply) + security_groups=(known after apply) + spot_strategy="NoSpot" + status="Running" + subnet_id=(known after apply) + system_disk_category="cloud_efficiency" + system_disk_performance_level=(known after apply) + system_disk_size=40 + volume_tags=(known after apply) + vswitch_id=(known after apply)}# alicloud_security_group.default will be created + resource "alicloud_security_group""default"{ + id=(known after apply) + inner_access=(known after apply) + inner_access_policy=(known after apply) + name="default" + security_group_type="normal" + vpc_id=(known after apply)}# alicloud_security_group_rule.allow_all_tcp will be created + resource "alicloud_security_group_rule""allow_all_tcp"{ + cidr_ip="0.0.0.0/0" + id=(known after apply) + ip_protocol="tcp" + nic_type="intranet" + policy="accept" + port_range="1/65535" + priority=1 + security_group_id=(known after apply) + type="ingress"}# alicloud_vpc.vpc will be created + resource "alicloud_vpc""vpc"{ + cidr_block="10.10.10.0/24" + id=(known after apply) + ipv6_cidr_block=(known after apply) + name=(known after apply) + resource_group_id=(known after apply) + route_table_id=(known after apply) + router_id=(known after apply) + router_table_id=(known after apply) + status=(known after apply) + vpc_name="pigsty-demo-network"}# alicloud_vswitch.vsw will be created + resource "alicloud_vswitch""vsw"{ + availability_zone=(known after apply) + cidr_block="10.10.10.0/24" + id=(known after apply) + name=(known after apply) + status=(known after apply) + vpc_id=(known after apply) + vswitch_name=(known after apply) + zone_id="cn-beijing-k"}Plan: 8 to add, 0 to change, 0 to destroy.
Changes to Outputs:
+ meta_ip=(known after apply)Do you want to perform these actions?
Terraform will perform the actions described above.
Only 'yes' will be accepted to approve.
Enter a value: yes
alicloud_vpc.vpc: Creating...
alicloud_vpc.vpc: Creation complete after 6s [id=vpc-2zed78z7n5z06o1dmydhj]alicloud_security_group.default: Creating...
alicloud_vswitch.vsw: Creating...
alicloud_security_group.default: Creation complete after 1s [id=sg-2ze7x7zu8tcdsefroofa]alicloud_security_group_rule.allow_all_tcp: Creating...
alicloud_security_group_rule.allow_all_tcp: Creation complete after 0s [id=sg-2ze7x7zu8tcdsefroofa:ingress:tcp:1/65535:intranet:0.0.0.0/0:accept:1]alicloud_vswitch.vsw: Creation complete after 6s [id=vsw-2zejctjdr16ryz194jxz4]alicloud_instance.pg-test-3: Creating...
alicloud_instance.pg-test-2: Creating...
alicloud_instance.pg-test-1: Creating...
alicloud_instance.pg-meta-1: Creating...
alicloud_instance.pg-test-3: Still creating... [10s elapsed]alicloud_instance.pg-test-2: Still creating... [10s elapsed]alicloud_instance.pg-test-1: Still creating... [10s elapsed]alicloud_instance.pg-meta-1: Still creating... [10s elapsed]alicloud_instance.pg-meta-1: Creation complete after 16s [id=i-2zef4frw6kezb47339wr]alicloud_instance.pg-test-1: Still creating... [20s elapsed]alicloud_instance.pg-test-2: Still creating... [20s elapsed]alicloud_instance.pg-test-3: Still creating... [20s elapsed]alicloud_instance.pg-test-2: Creation complete after 23s [id=i-2zefzvz0fyl7mloc4v30]alicloud_instance.pg-test-1: Still creating... [30s elapsed]alicloud_instance.pg-test-3: Still creating... [30s elapsed]alicloud_instance.pg-test-3: Creation complete after 33s [id=i-2zeeyodo2pc8b1k2d167]alicloud_instance.pg-test-1: Creation complete after 33s [id=i-2zef4frw6kezb47339ws]
SSH Config and Tweaking
The manager will assign a pay-per-use public IP, which you can also print out using the command terraform output.
# Print public IP and root passwordssh_pass='PigstyDemo4'public_ip=$(terraform output | grep -Eo '[0-9]{1,3}\.[0-9]{1,3}\.[0-9]{1,3}\.[0-9]{1,3}')echo"meta node: root:${ssh_pass}@${public_ip}"
Next, let’s configure the local SSH login to the cloud manager (default user root, password PigstyDemo4).
You can access the cloud manager via the SSH alias demo.
# Add local to meta node for password-free accesssshpass -p ${ssh_pass} ssh-copy-id demo
Now, it is possible to access the node from the local password-free. If only a single node installation is required, this will do. Next, complete the standard installation on that meta node.
DNS Config
Pigsty accesses all web systems via domain name by default and does not recommend using IP: Port to access the primary system’s web interface.
The static DNS records used by the cloud sandbox are shown below, and you need to fill in the public IP of the meta node.
In macOS and Linux, you need to write the above records to /etc/hosts (requires sudo access), and in Windows, you need to add them manually to C:\Windows\System32\drivers\etc\hosts.
Caveat
The AliCloud VM CentOS 7.8 mirror runs with nscd, which locks out the glibc version and causes RPM dependency errors during installation.
Run yum remove -y nscd on all machines to resolve this issue.